
Essential Guide to NVIDIA GPU Operator in Kubernetes
 Sameer Kulkarni
  Sanket Sudake
 As artificial intelligence (AI) and machine learning (ML) workloads continue to grow in complexity and scale, the need for powerful and efficient computational resources becomes more critical. Running workloads on Kubernetes allows you to leverage the scalability and self-healing capabilities, however, there are challenges when it comes to managing and optimizing GPU resources. This is where the GPU Operators and plugins step in. They provide a solution to deploy and manage GPUs in Kubernetes.
There are a few GPU operators like Intel Device Plugin Operator, AMD GPU operator and NVIDIA GPU Operator. However,the NVIDIA GPU Operator is one of the most popular ones. It provides a comprehensive solution to streamline the deployment, management, and optimization of GPUs in Kubernetes environments.
In this post, we’ll dive into the NVIDIA GPU Operator, its features and understand some basic constructs that enable you to use those features. Let’s begin!
What is the NVIDIA GPU Operator?
Managing GPUs in Kubernetes clusters can be a daunting task. Traditional methods often require manual installation and configuration of GPU drivers, which can be time-consuming and error-prone. Additionally, leveraging advanced GPU features and ensuring efficient data transfer between GPUs and other system components requires specialized knowledge and tools. Without a streamlined approach, these challenges can hinder the performance and scalability of AI/ML workloads.
The NVIDIA GPU Operator offers multiple features. It makes setting up GPU drivers and their configuration on Kubernetes effortless. The ability to use advanced features like vGPU, Multi-Instance GPU (MIG), and GPU Time-Slicing is crucial when it comes to running multiple AI workloads on given nodes. Also, GPUs need fast communication abilities with other applications/GPUs as well as with the storage setup. GPUDirect RDMA, GPU Direct storage and GDR Copy play an important role in enabling the same. GPU Operator helps easily bring all of these features and more to your Kubernetes cluster.
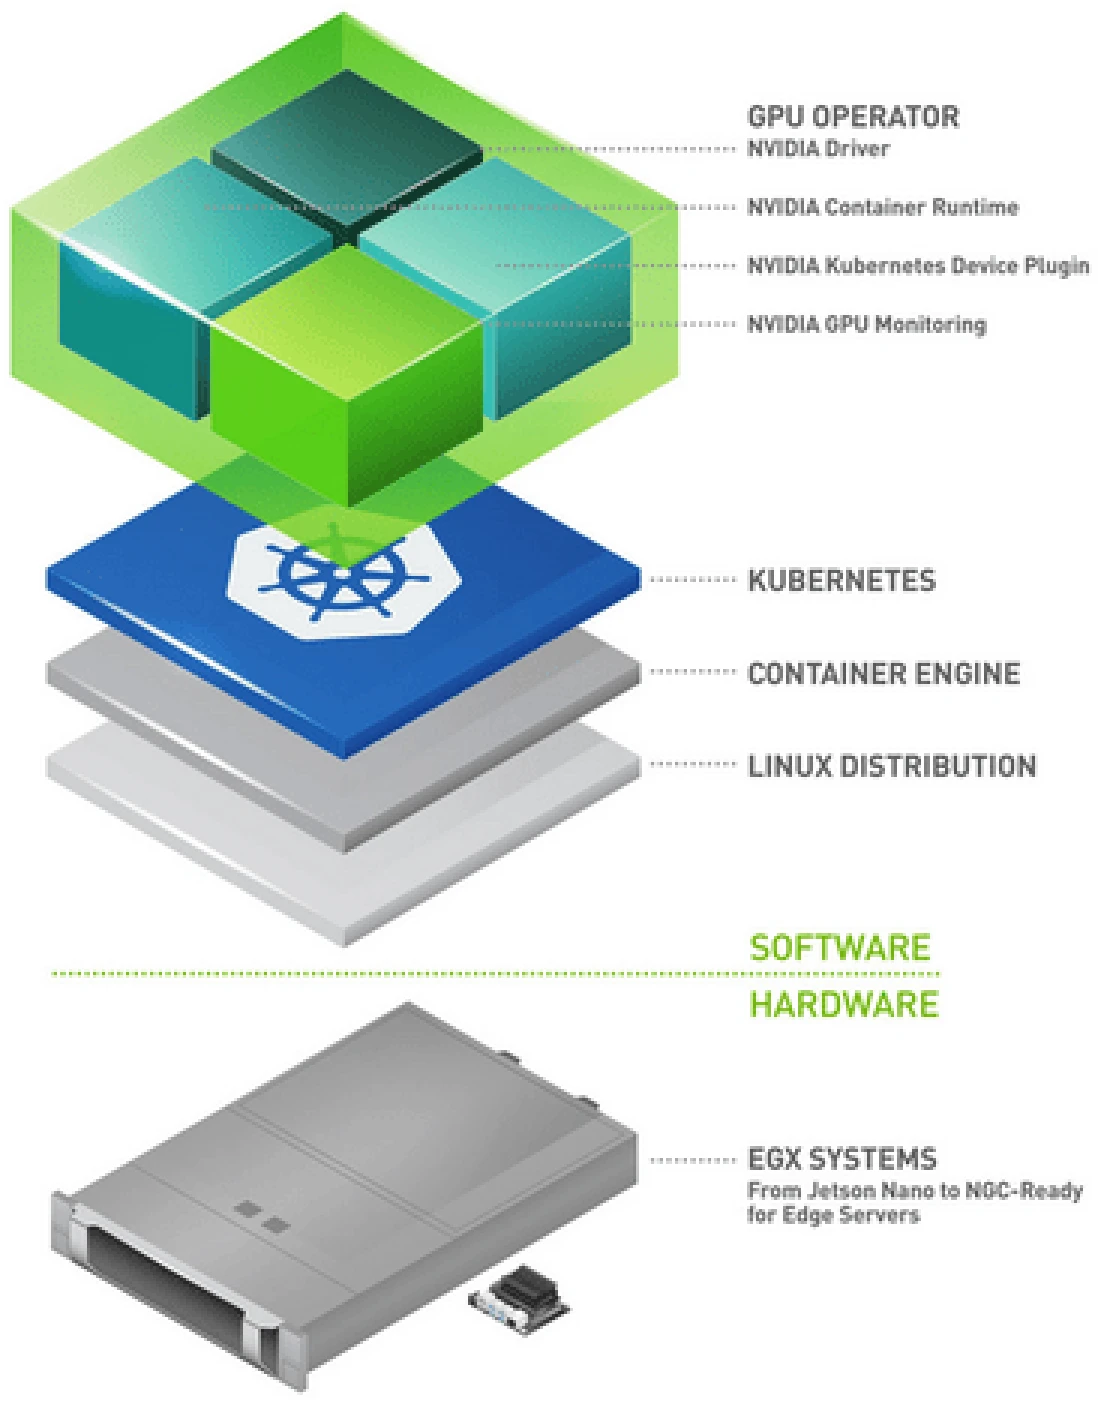
Key Features of NVIDIA GPU Operator
-
Automated installation and maintenance of GPU drivers: The NVIDIA GPU Operator automates the installation and upkeep of GPU drivers, eliminating the need for manual intervention. This automation ensures that the drivers are always up-to-date and correctly configured, allowing AI/ML workloads to run smoothly and efficiently.
-
Configuration of advanced GPU features:
- vGPU (Virtual GPU): Enables the sharing of a single GPU among multiple virtual machines, maximizing resource utilization and flexibility.
- MIG (Multi-instance GPU): Allows a single GPU to be partitioned into multiple independent instances, each with its own dedicated resources, improving workload isolation and efficiency.
- GPU Time-Slicing: Slices GPU time among multiple tasks, ensuring fair and efficient distribution of GPU resources across different workloads.
-
Configuring GPUDirect RDMA and GPUDirect Storage:
- GPUDirect RDMA (Remote Direct Memory Access): Facilitates direct communication between GPUs across different nodes, bypassing the CPU and reducing latency, which is crucial for high-performance computing applications.
- GPUDirect Storage: Enables direct data transfer between GPUs and storage devices, significantly speeding up data access and processing for data-intensive applications.
-
Configuring GDR Copy: GPUDirect RDMA (GDR) Copy is a low-latency GPU memory copy library based on GPUDirect RDMA technology that allows the CPU to directly map and access GPU memory. It enhances the efficiency of memory copy operations, reducing overhead and improving overall performance.
-
Sandboxed Workloads: Enables applications to run in an isolated environment leveraging virtual machines (VMs) or containers with security restrictions. This helps with enhanced security, better resource management and reproducibility of the models.
Installation of NVIDIA GPU Operator
To leverage the power of the NVIDIA GPU Operator for managing GPU resources in your Kubernetes clusters, you need to follow a structured installation process and meet certain prerequisites.
Prerequisites
Before installing the NVIDIA GPU Operator, ensure that the following prerequisites are met:
-
Kubernetes Cluster v1.18 or later
- Node Requirements:
- Nodes equipped with NVIDIA GPUs.
- Nodes must have NVIDIA drivers installed (though the GPU Operator can automate this).
- Helm v3
Installation steps
Follow these steps to install the NVIDIA GPU Operator on your Kubernetes cluster.
-
Set up Helm Repository. Add the NVIDIA Helm repository to your Helm configuration.
helm repo add nvidia https://nvidia.github.io/gpu-operator helm repo update -
Create a dedicated namespace for the GPU Operator:
kubectl create namespace gpu-operator -
Use Helm to install the GPU Operator in the created namespace:
helm install --namespace gpu-operator gpu-operator nvidia/gpu-operator -
Verify installation. Check the status of the deployed resources to ensure the GPU Operator is running correctly:
kubectl get pods -n gpu-operatorYou should see the GPU Operator and its components running in the gpu-operator namespace.
-
Check Node Configuration: Verify that the GPU Operator has configured the nodes correctly by checking for NVIDIA drivers and other necessary components.
$ kubectl describe nodesName: infracloud01 Roles: control-plane Labels: beta.kubernetes.io/arch=amd64 beta.kubernetes.io/os=linux ... nvidia.com/gpu.deploy.container-toolkit=true nvidia.com/gpu.deploy.dcgm=true nvidia.com/gpu.deploy.dcgm-exporter=true nvidia.com/gpu.deploy.device-plugin=true nvidia.com/gpu.deploy.driver=true nvidia.com/gpu.deploy.gpu-feature-discovery=true nvidia.com/gpu.deploy.node-status-exporter=true nvidia.com/gpu.deploy.operator-validator=true nvidia.com/gpu.present=true Annotations: node.alpha.kubernetes.io/ttl: 0 nvidia.com/gpu-driver-upgrade-enabled: true projectcalico.org/IPv4Address: 192.168.0.52/24 ... Capacity: cpu: 32 ephemeral-storage: 982345180Ki hugepages-1Gi: 0 hugepages-2Mi: 0 memory: 131600376Ki pods: 110 Allocatable: cpu: 32 ephemeral-storage: 905329316390 hugepages-1Gi: 0 hugepages-2Mi: 0 memory: 131497976Ki pods: 110 ...Look for annotations and labels indicating that the nodes are GPU-enabled and configured.
Running a sample GPU application
You can now test your setup by deploying a sample CUDA VectorAdd application in your cluster. The sample application adds two vectors together and requests 1 gpu resource. The GPU allocation request is handled by the GPU operator.
-
Run the CUDA VectorAdd application.
cat << EOF | kubectl create -f -


apiVersion: v1
kind: Pod
metadata:
  name: cuda-vectoradd
spec:
restartPolicy: OnFailure
containers:
- name: cuda-vectoradd
  image: "nvidia/samples:vectoradd-cuda11.2.1"
  resources:
    limits:
      nvidia.com/gpu: 1
EOF
pod/cuda-vectoradd created -
Check the pod logs.
$ kubectl logs cuda-vectoradd[Vector addition of 50000 elements] Copy input data from the host memory to the CUDA device CUDA kernel launch with 196 blocks of 256 threads Copy output data from the CUDA device to the host memory Test PASSED Done
Let’s look at some of the key technologies of GPU Operators in detail.
GPU concurrency
GPU concurrency is the ability of a GPU to execute multiple operations simultaneously by utilizing its parallel processing capabilities. This feature is essential for enhancing the performance, efficiency, and scalability of AI/ML workloads. With parallel processing, GPUs can significantly speed up training and inference, manage larger and more complex datasets, and provide real-time responses.
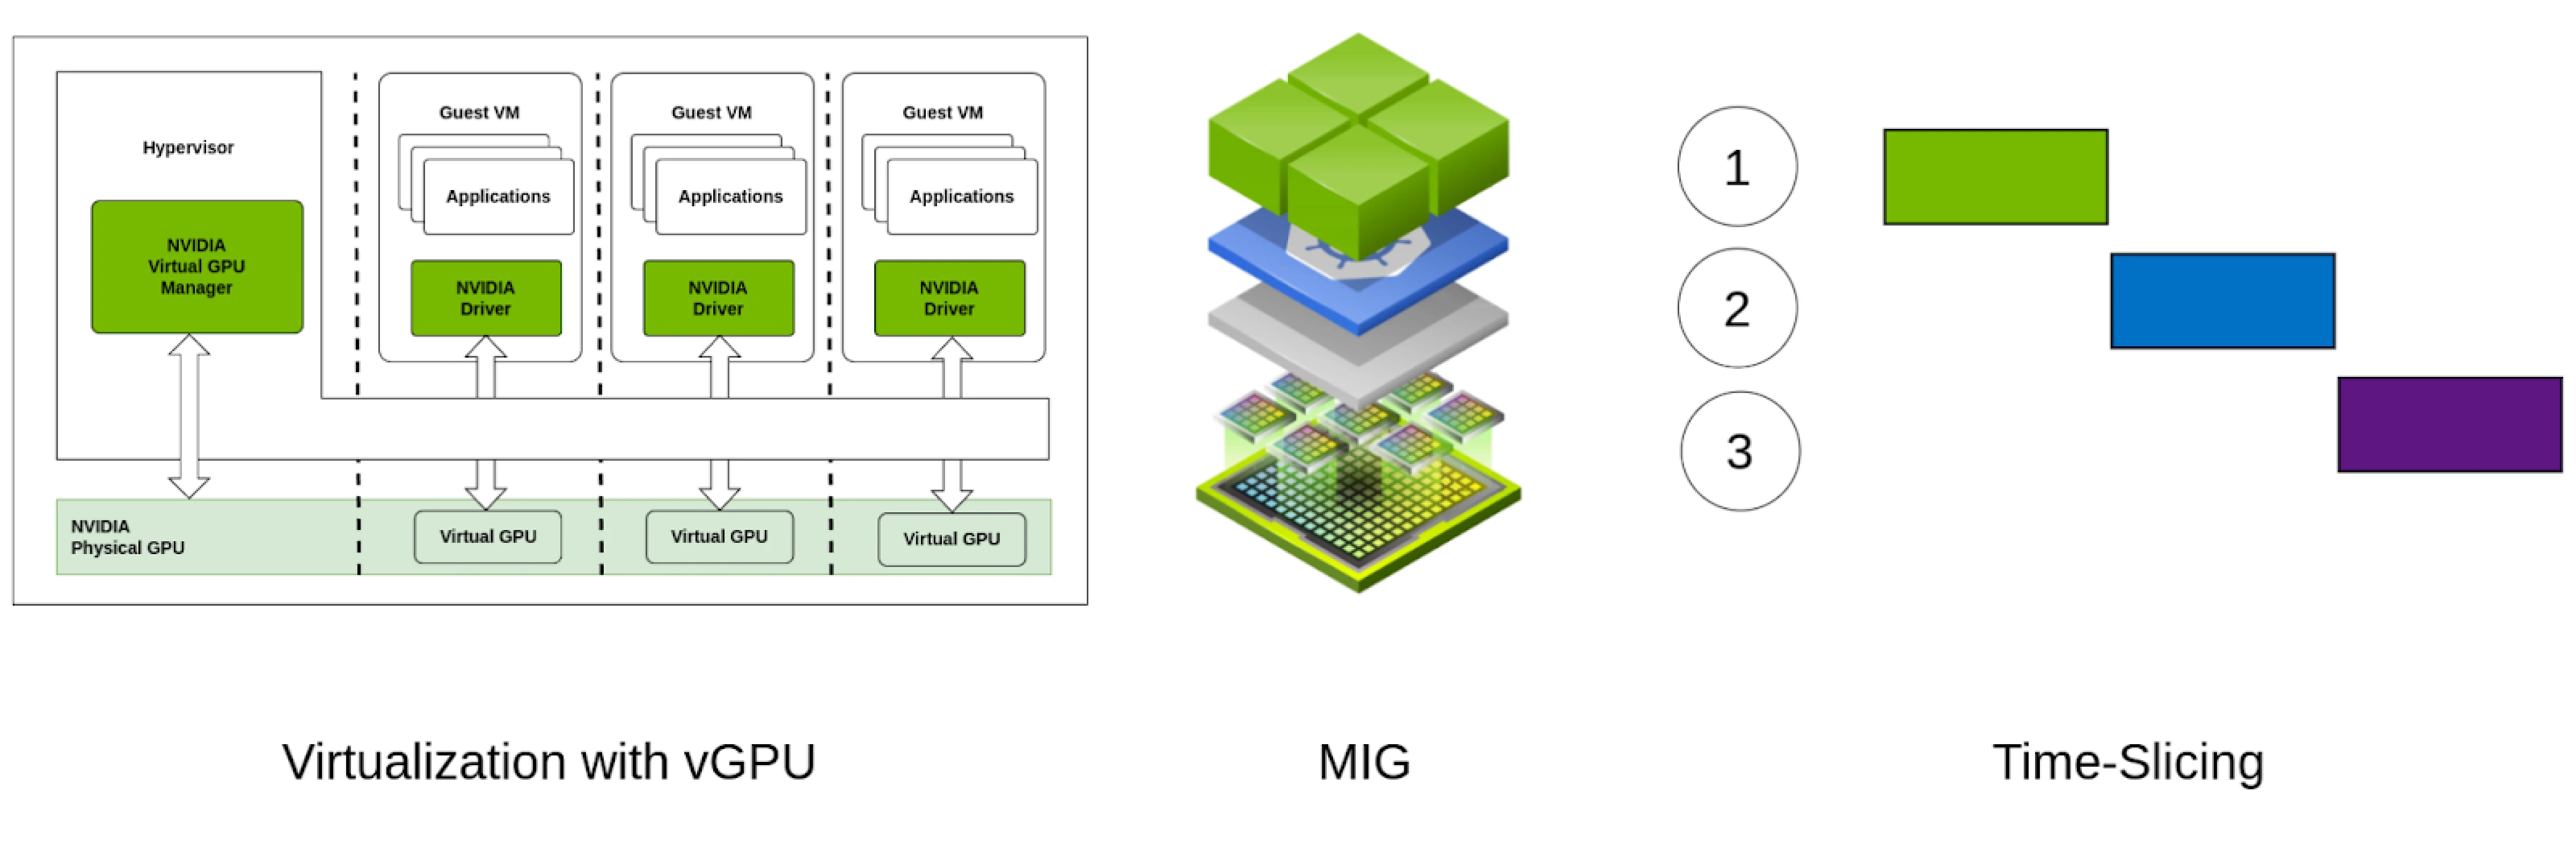
vGPU (Virtual GPU), Multi-Instance GPU (MIG), and GPU Time-Slicing are key technologies that enable GPU concurrency in various scenarios and through different mechanisms. Here’s a brief overview of each.
- vGPU: vGPU enables a single physical GPU to be shared among multiple virtual machines (VMs), each with its own dedicated GPU resources.
- MIG: MIG partitions a single GPU into multiple isolated instances at the hardware level, each with its own dedicated memory and compute resources. This feature is specific to NVIDIA’s A100 and later version GPUs such as H100, H200, B100, B200
- GPU Time-Slicing: GPU Time-Slicing involves dividing the GPU’s processing time among multiple tasks or users, allowing them to share the GPU in a time-allocated manner, very similar to how CPU concurrency works.
GPUDirect RDMA and GPUDirect Storage
NVIDIA GPUDirect RDMA (Remote Direct Memory Access) and GPUDirect Storage (GDS) are advanced technologies designed to optimize data transfer for high-performance computing applications. GPUDirect RDMA enables direct communication between GPUs across different nodes, bypassing the CPU and reducing latency. This direct data path is crucial for applications requiring fast, low-latency communication, such as distributed AI training and real-time data processing. By minimizing CPU involvement, GPUDirect RDMA significantly enhances performance and efficiency, enabling faster computations and more scalable AI workloads.
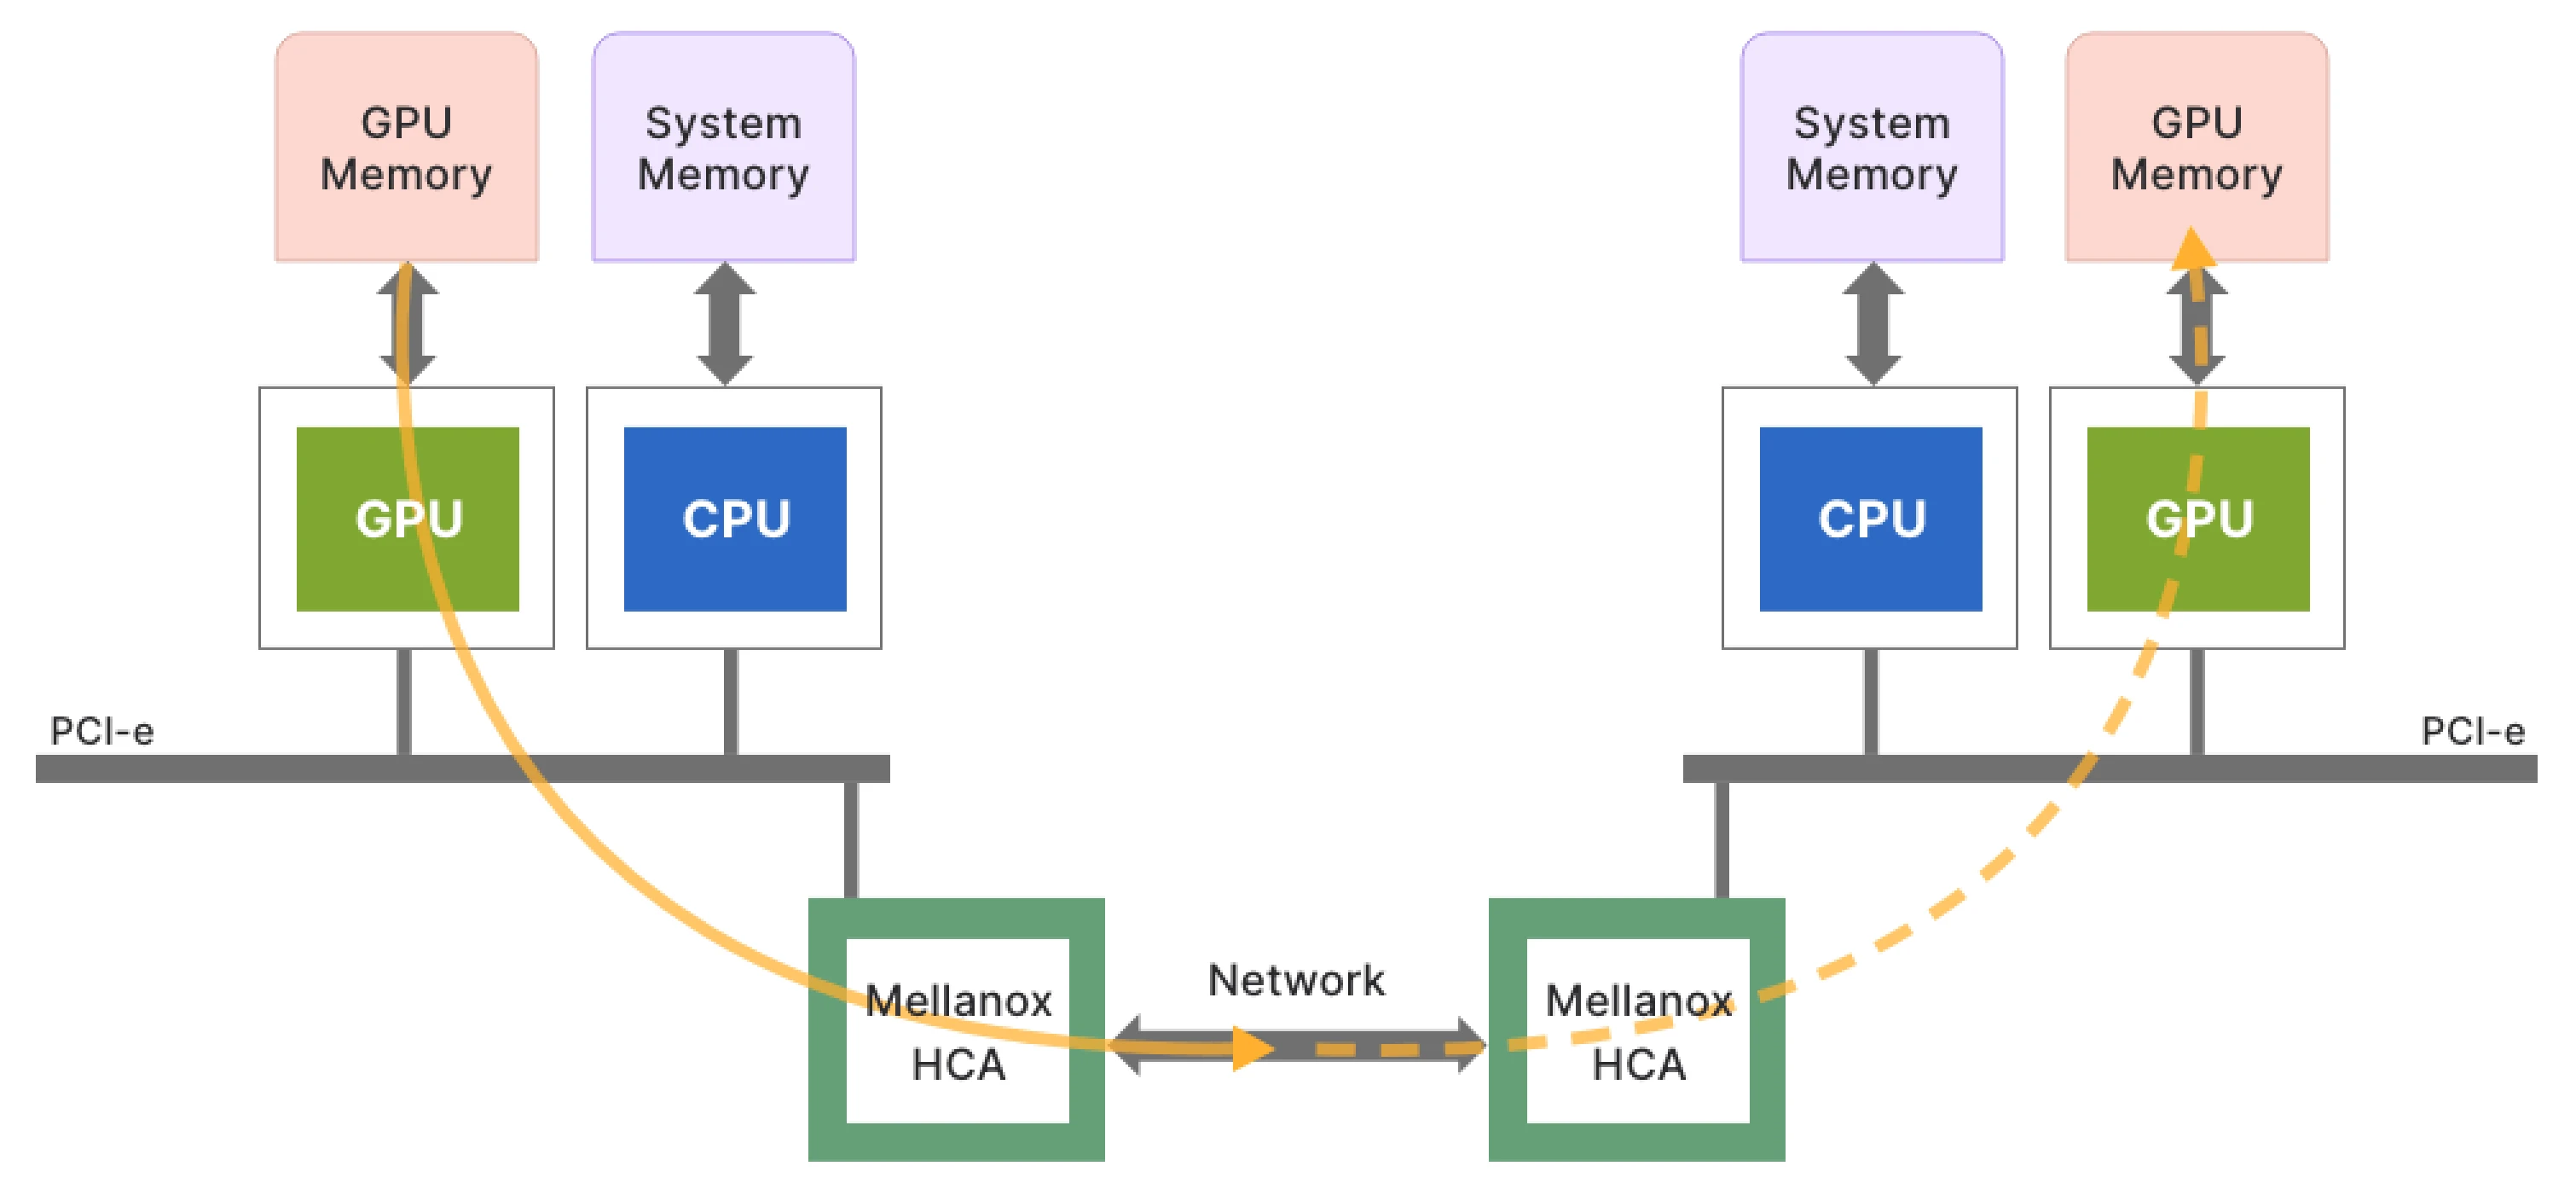
(GPUDirect RDMA: directly connecting GPUs over the network)
Similarly, GPUDirect Storage facilitates direct data transfer between GPUs and storage devices, bypassing the CPU and system memory. This direct access to storage devices, such as NVMe SSDs, accelerates data throughput and reduces latency, which is essential for data-intensive applications. By streamlining the data flow, GPUDirect Storage ensures that GPUs can quickly access and process large datasets, leading to faster and more efficient computations.
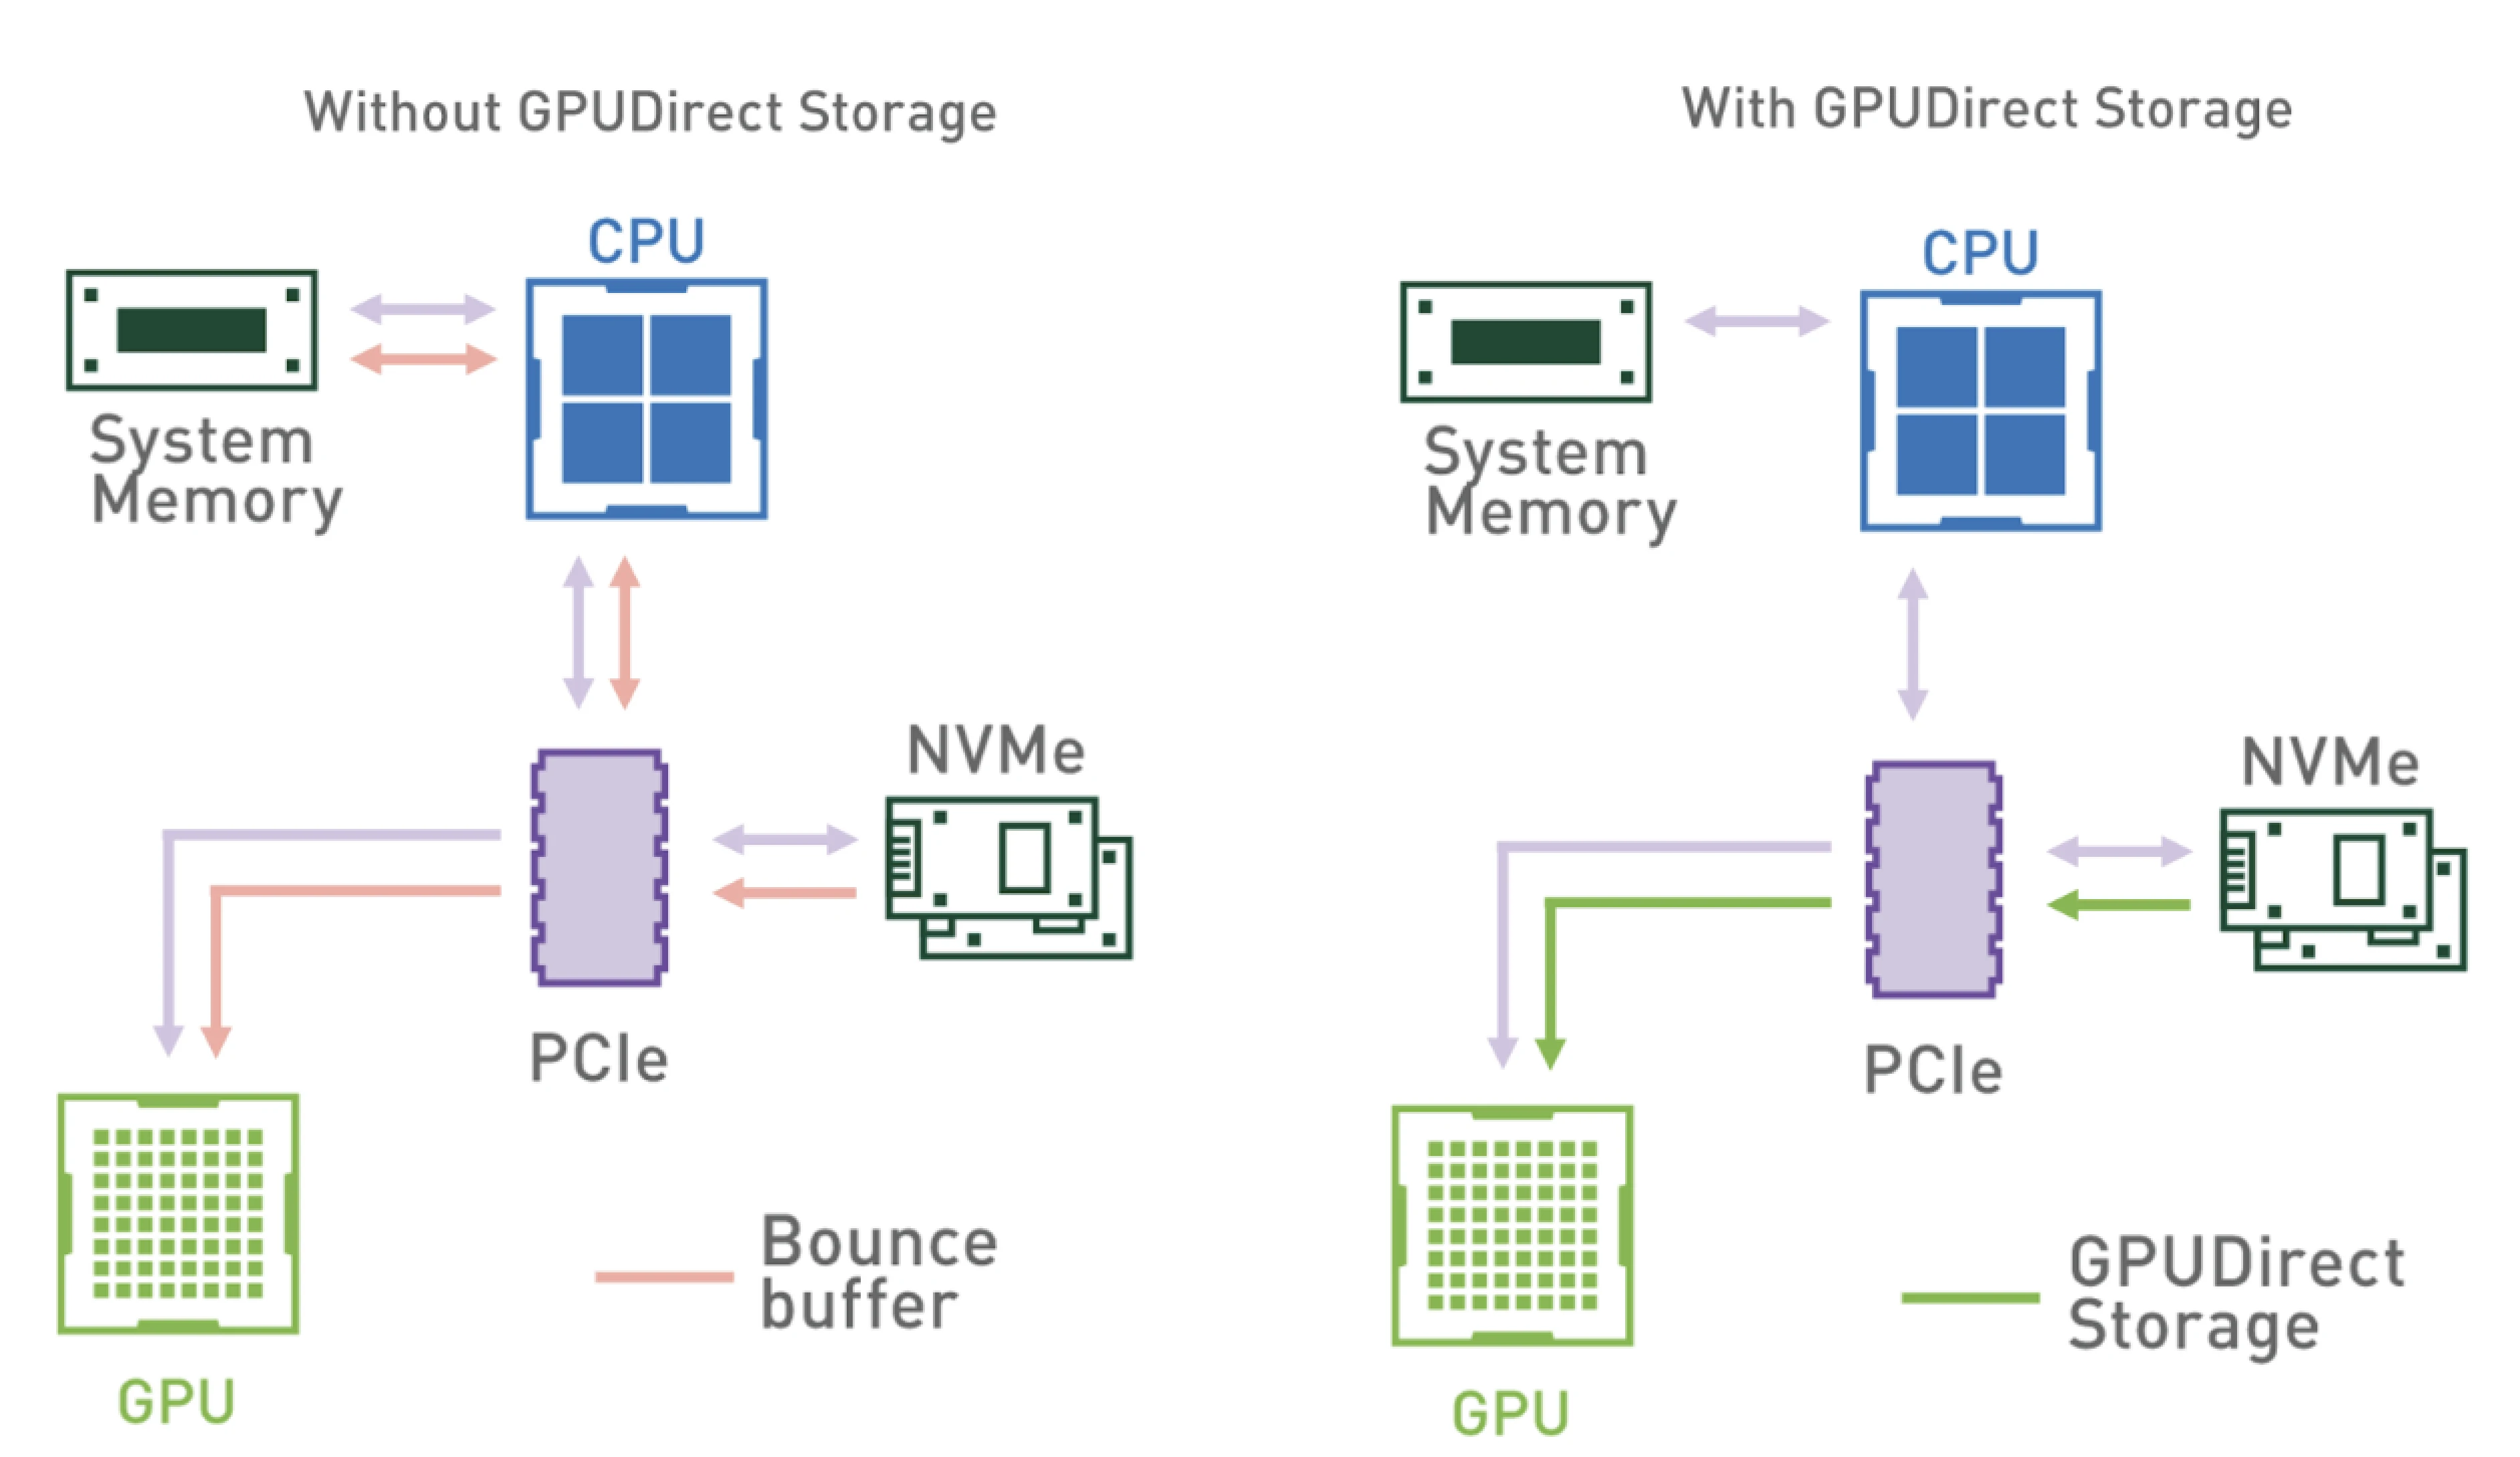
(GStorage access pattern with and without GPUDirect Storage)
GDR Copy
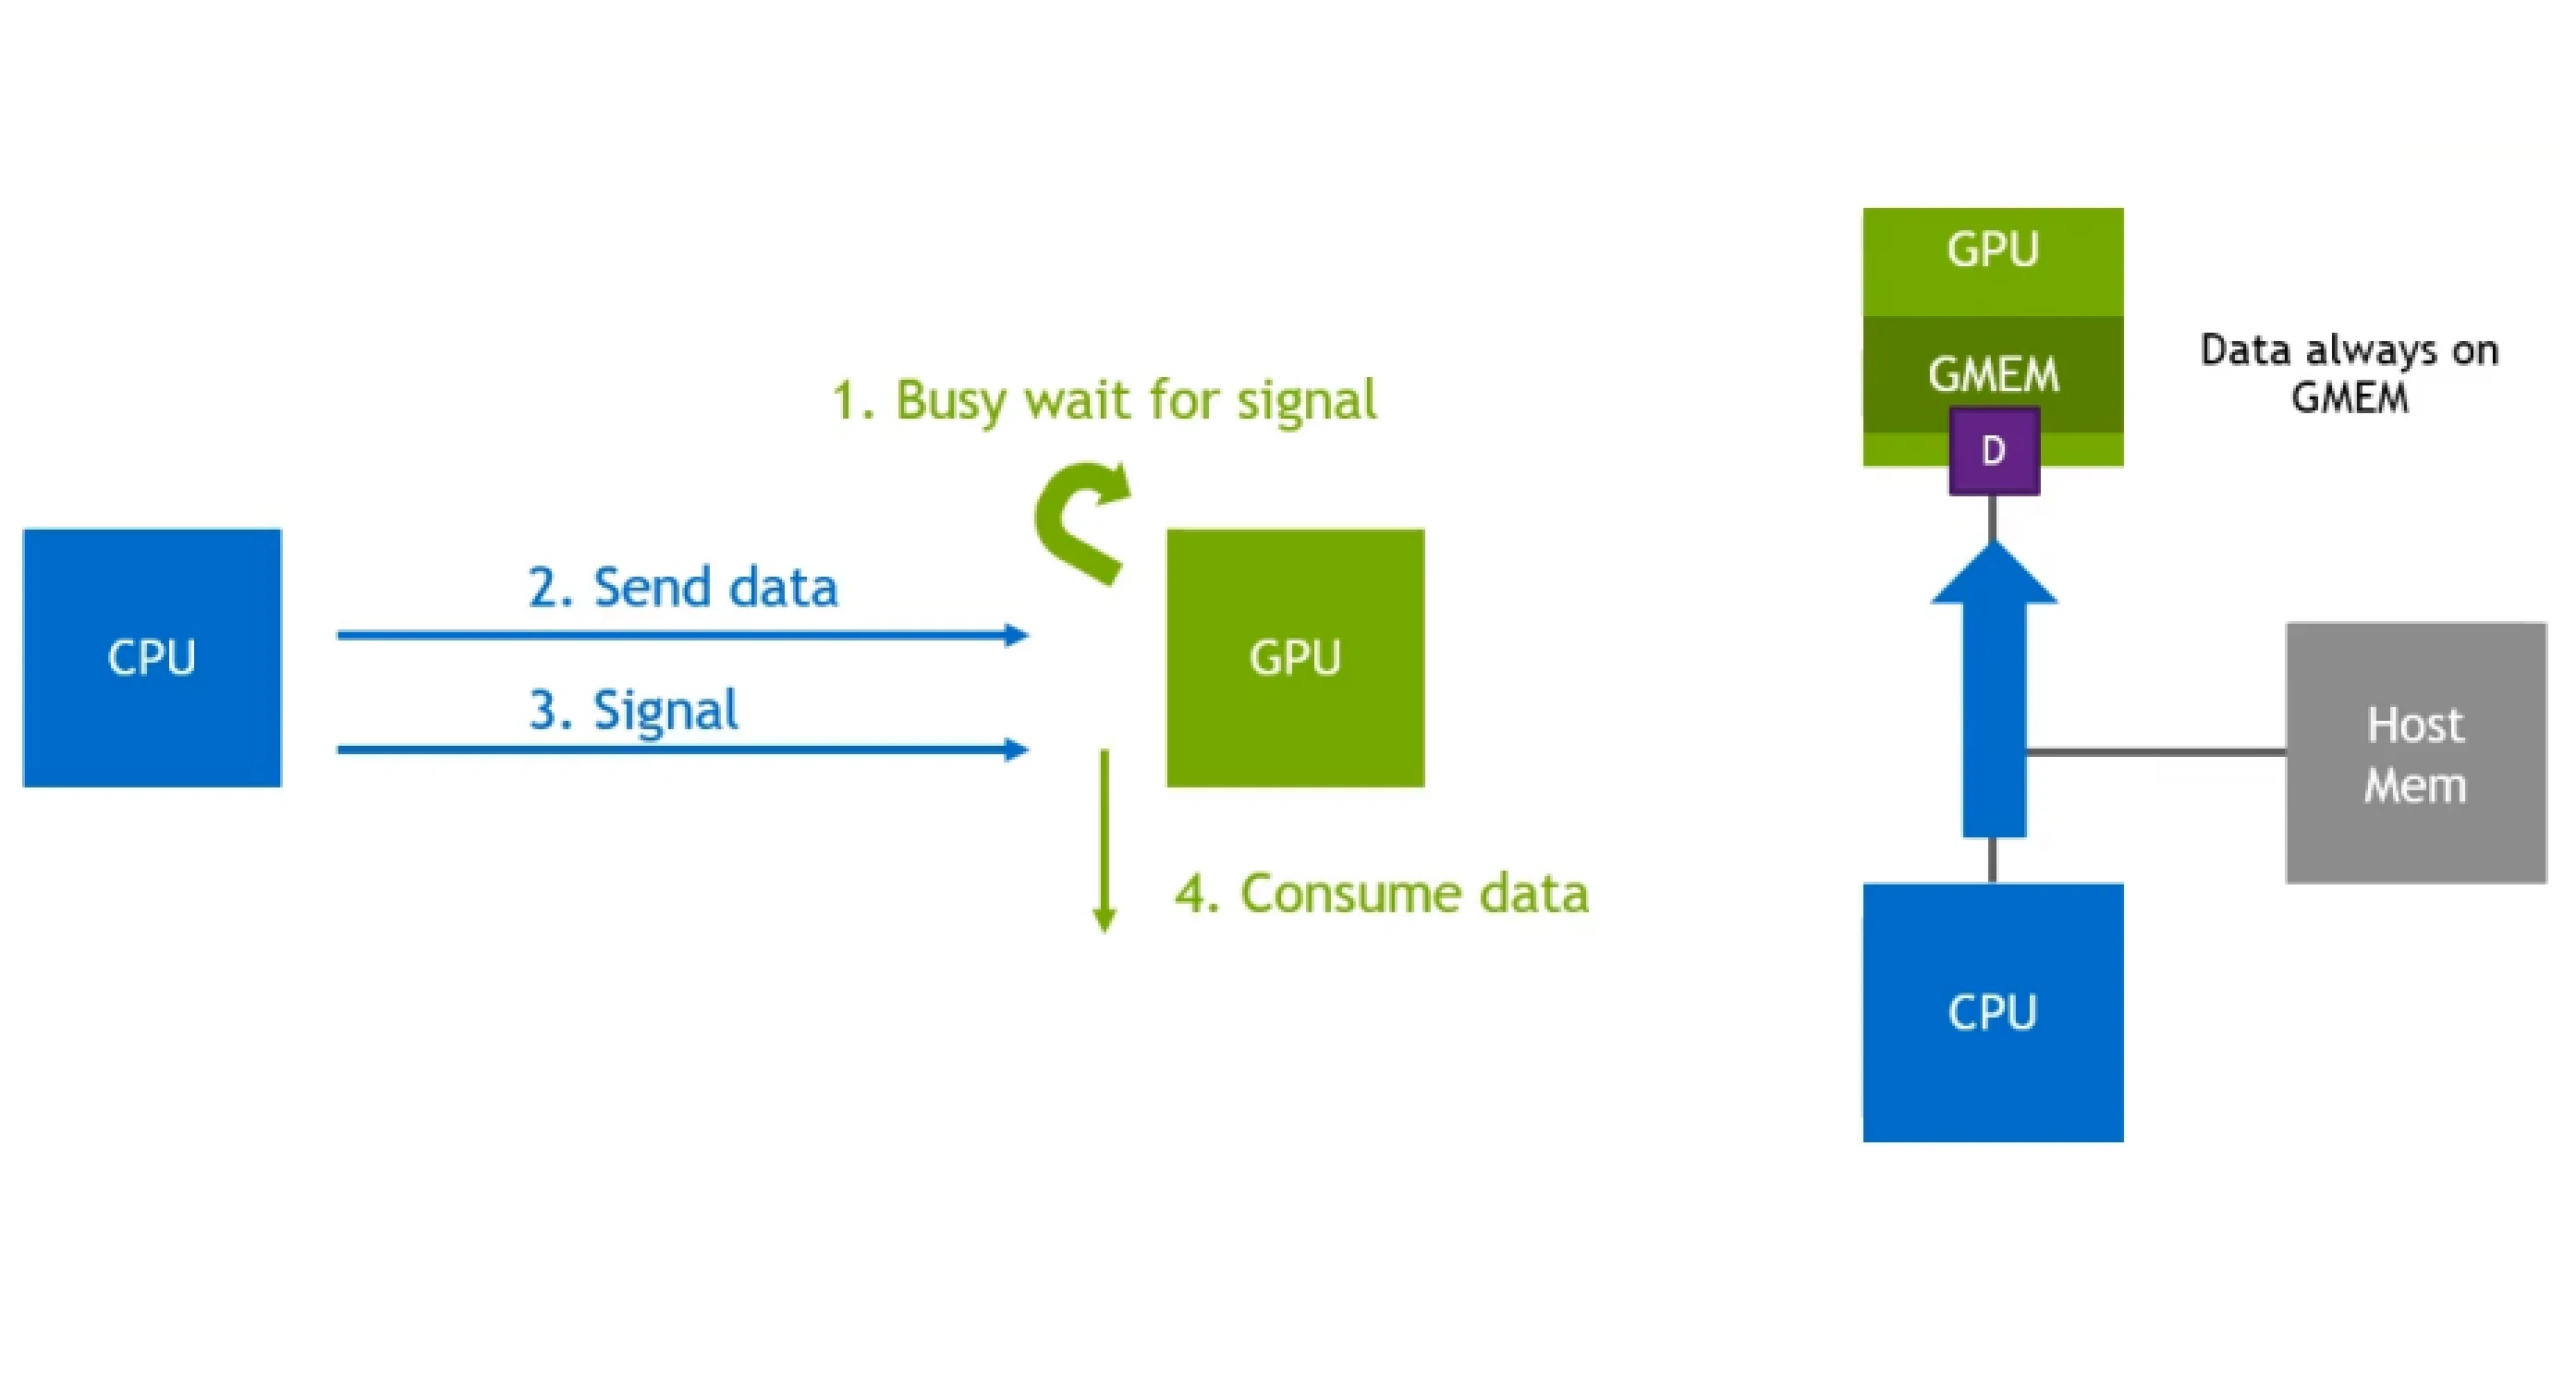
GDR Copy stands for GPUDirect RDMA Copy, which is a low-latency GPU memory copy library based on GPUDirect RDMA. One of the prominent use-cases for this library is to transfer data between the CPU (host) and GPU when the GPU is waiting to receive data and signal from the host to start the processing operations. GDR Copy uses the GPUDirect RDMA capability of exposing a part of the GPU memory to external devices, such as NICs, CPU, etc. to do CPU driven data copy operations. This enables GDR Copy to execute copy operations between CPU and GPU memory with lower latency and higher throughput, as opposed to GPU driven memory copy operations, such as cudaMemcpy, for small data sizes.
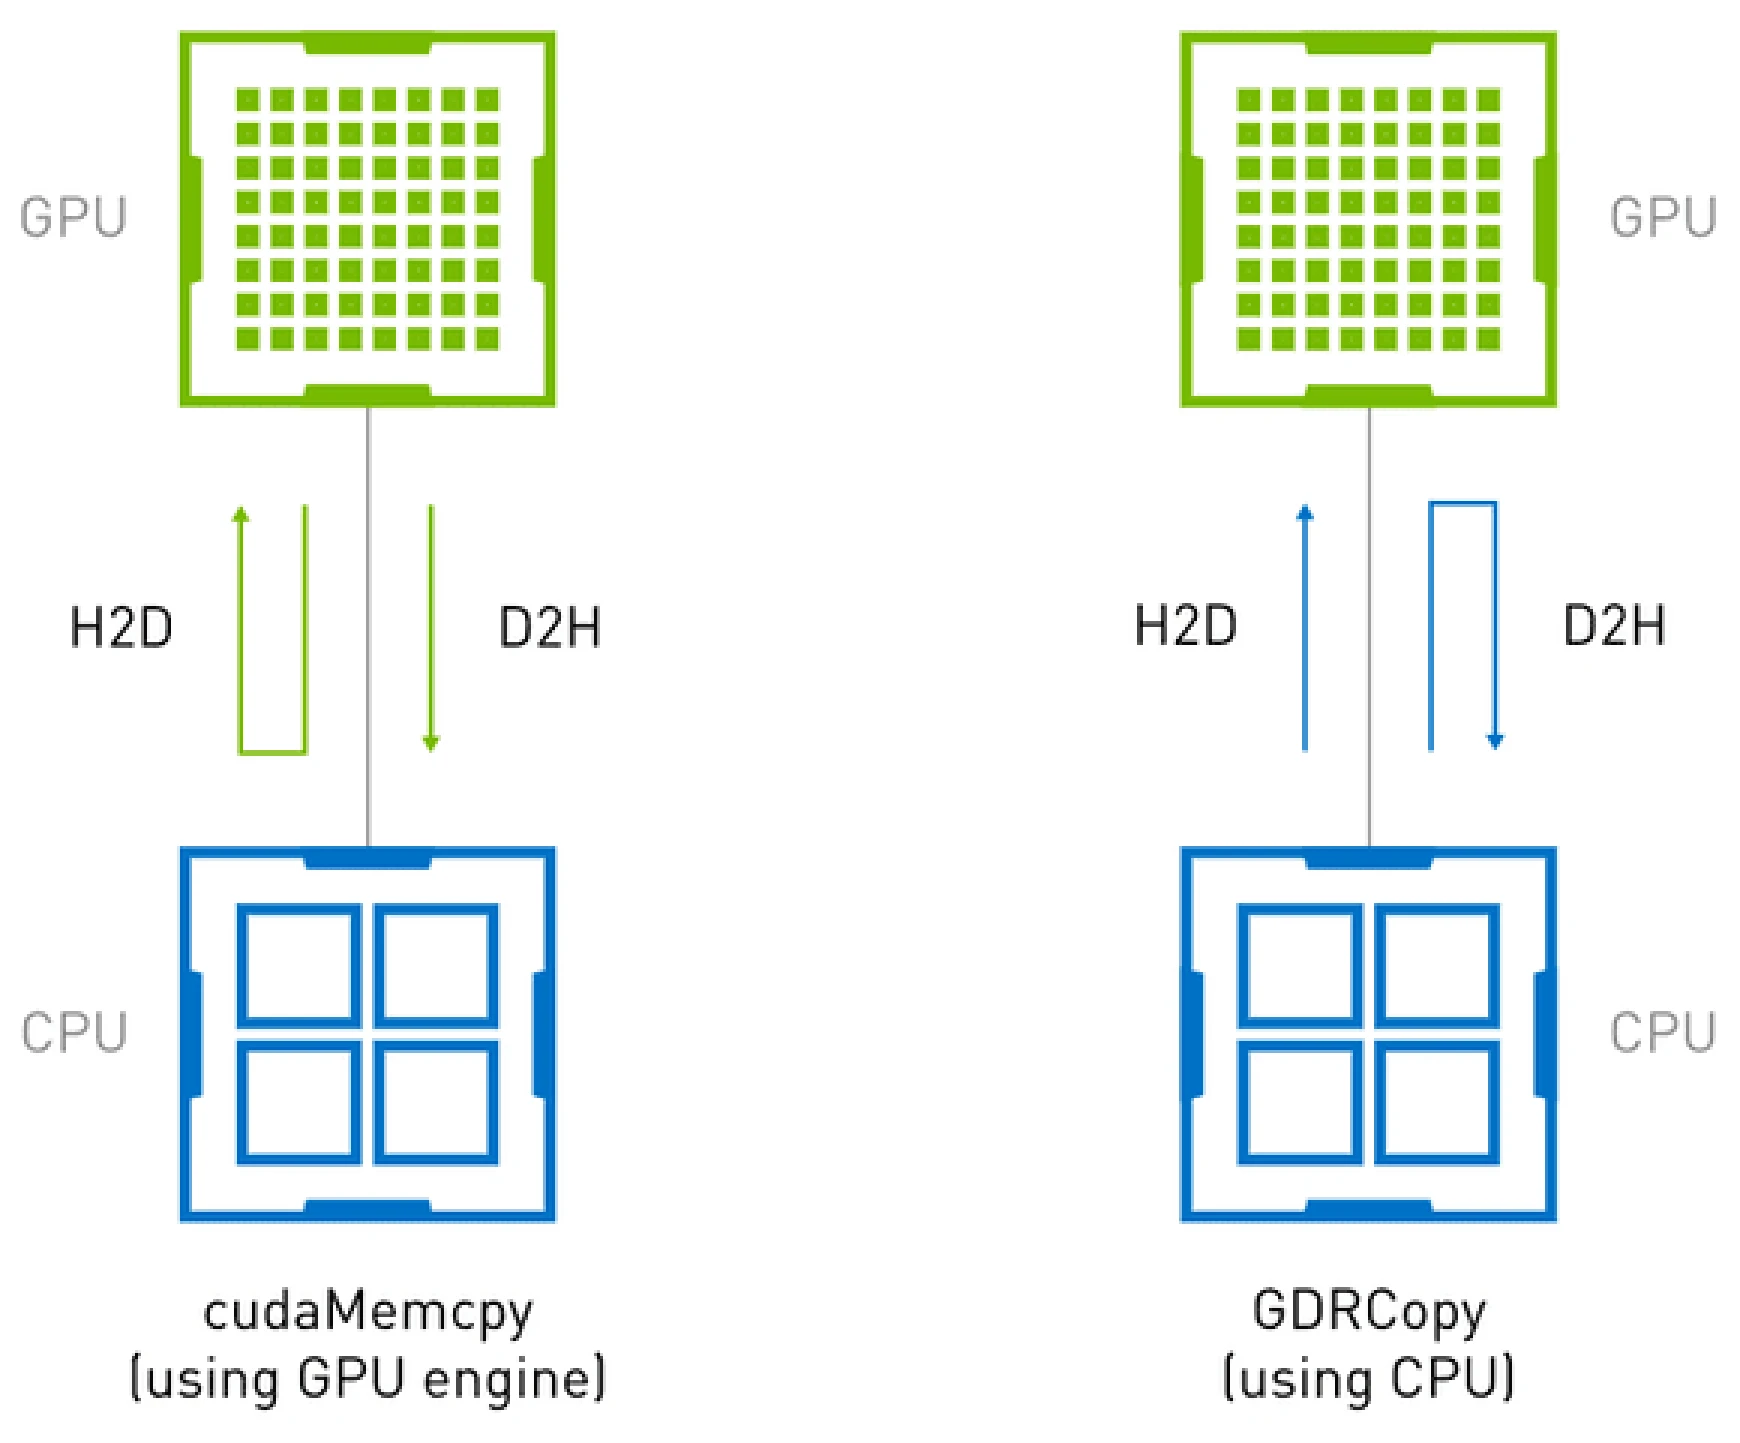
(Host-Device memory copy operation using cudaMemcpy and GDR Copy)
Figure above shows the difference between host-device memory copy operations using GDR Copy vs cudaMemcpy. cudaMemcpy is GPU driven operation and it uses GPU DMA engine to move data. This involves DMA engine overheads for lower data sizes. GDR Copy allows the CPU to access GPU memory directly via BAR mappings, allowing for low latency data transfers.
GPU Operator CRDs
The NVIDIA GPU Operator uses several Custom Resource Definitions (CRDs) to manage the lifecycle of GPU drivers and associated components on Kubernetes. Here are some of the main CRDs.
Cluster Policy CRD
The ClusterPolicy custom resource definition (CRD) is central to the NVIDIA GPU Operator. It serves as a single point of configuration for deploying all necessary NVIDIA software components on a Kubernetes cluster. The ClusterPolicy CRD allows administrators to specify and manage the entire lifecycle of GPU-related components, including drivers, runtime, device plugins, and monitoring tools.
The custom resource allows managing the configuration of important properties such as:
- driver: Configuration for the NVIDIA driver, including image, version, and repository settings.
- toolkit: Settings for the NVIDIA Container Toolkit, which provides utilities to run GPU-accelerated containers.
- devicePlugin: Configuration for the NVIDIA device plugin, which allows Kubernetes to recognize and schedule GPU resources.
- mig: Parameters for managing Multi-Instance GPU (MIG) configurations on supported hardware.
- gpuFeatureDiscovery: Settings for the GPU Feature Discovery tool, which detects and labels nodes with GPU capabilities.
- dcgmExporter: Configuration for the Data Center GPU Manager (DCGM) Exporter, used for monitoring GPU metrics.
- validator: Configuration for the GPU Operator Validator, which ensures all components are properly deployed and functioning.
NVIDIA Driver CRD
The NvidiaDriver custom resource definition (CRD) specifically manages the deployment and lifecycle of NVIDIA drivers on the Kubernetes nodes. It ensures that the correct version of the driver is installed and running, compatible with the GPU hardware and Kubernetes environment. While the driver configuration can also be controlled by the Cluster Policy CR, the Driver CR allows to specify the driver type and version per node.
Here are some of the configurations that can be managed with it.
- image: Specifies the container image for the NVIDIA driver. This includes the repository, image name, and tag.
- repository: URL or path to the repository containing the driver image.
- version: The specific version of the NVIDIA driver to be deployed.
- deploy: Configuration options for how the driver should be deployed, such as using DaemonSets.
- nodeSelector: Specifies the nodes on which the driver should be installed, usually matching GPU-capable nodes.
- tolerations: Tolerations for node taints, ensuring the driver can be scheduled on tainted nodes if necessary.
- resources: Resource requests and limits for the driver installation pods.
Summary
In this post, we saw how the NVIDIA GPU Operator is a crucial tool for optimizing and managing GPU resources in Kubernetes clusters, specifically tailored to meet the demanding needs of AI and ML workloads. It automates the installation and maintenance of GPU drivers, simplifies the configuration of advanced GPU features like Virtual GPU (vGPU), Multi-Instance GPU (MIG), GPU Time Slicing, GPUDirect RDMA, and GPUDirect Storage, and significantly enhances performance and efficiency.
We also examined the key technologies supported by the GPU Operator, such as GPUDirect RDMA and GPUDirect Storage, which are essential for low-latency, high-speed data transfers. We also discussed GPU sharing technologies like vGPU, MIG, and GPU Time-Slicing and how all three aim to enable shared GPU access, improve efficiency, and reduce costs, but for different use cases and hardware configurations.
In summary, the NVIDIA GPU Operator is vital for managing GPU resources efficiently in Kubernetes environments, supporting advanced technologies, and simplifying complex configurations, thereby driving superior performance and scalability for AI and ML workloads.
Now that you have learned about NVIDIA GPU Operator, its features and key concepts, you can bring in AI & GPU Cloud experts to help you build your own AI cloud.
If you found this post useful and informative, subscribe to our weekly newsletter for more posts like this. We’d love to hear your thoughts on this post, so do start a conversation on LinkedIn with Sameer and Sanket.
Stay updated with latest in AI and Cloud Native tech
We hate 😖 spam as much as you do! You're in a safe company.
Only delivering solid AI & cloud native content.


