Styra DAS - Simplifying OPA Policy Adminstration

If you have used Open Policy Agent (OPA), you must have used OPA Playground to write and test out your Rego policies. I always wished for a feature where the policies in the playground can be directly applied in OPA. Basically, a control plane which allows policy authoring and enforcement easily. In KubeCon NA 2020, Styra (creators of OPA) launched a free edition of their Declarative Authorisation Service (DAS). In this blog post, I will go through the features of Styra DAS Free edition and see how it simplifies OPA policy administration.
This blog post is focused on using the Styra DAS for configuring OPA as the admission controller of Kubernetes cluster. If you want to know more about OPA / Rego, then I would recommend you to go through Rego documentation or attend an interactive online free tutorial by Styra.
Let’s get started then.
OPA as Kubernetes admission controller
OPA can be configured as the Admission Controller in Kubernetes by following this tutorial. While this approach works great to get started with OPA, I faced following challenges:
-
Rego Editor : Without a proper editor, writing Rego files can be challenging. We can ofcourse use the VS Code plugin or the OPA playground. However, debugging and testing with different sets of inputs is cumbersome and hence impacts the productivity.
-
Extracting input request: To write the correct Rego policies, I needed the input request that is received by OPA. Extracting this request from decision logs was the only way out. And not very intuitive if you are just starting out with OPA.
-
Loading the policies in OPA: Tutorial uses configmaps to load policies in OPA. This is ofcourse the easiest way to get started. However, it soon becomes difficult to manage as the number of rules increase. And, there is no easy way to visualise the status of each policy.
-
Debugging failed policies: To debug, we need to get the logs and extract decisions out of it to determine the exact cause of failure. Further, testing the updated policy requires us to redeploy the policy.
-
Distributing policies across multiple clusters: OPA recommends using bundle servers to distribute policies across multiple clusters. This requires custom setup with a file server serving the policy bundle and a way to access control / manage policies in the server.
With the Free edition of Styra DAS, the initial onboarding experience has become very smooth. Let’s explore how Styra DAS helps you get started with OPA smoothly:
Before we start
Following are some pre-requisites needed to follow the examples in the blog post:
- Styra DAS account. (Click here to create a new Dev Edition account if you haven’t already!)
- Kubernetes cluster with admin access (minikube or kind cluster will work fine)
- Basic understanding of Kubernetes (cluster components, API requests and resources), OPA, Rego, JSON Objects / paths.
We will first create a Kubernetes system on the DAS UI, install the System agent OPA in the cluster and create a connection between them (System and OPA). Then we will enforce the Rego policies on the cluster.
Creating the Styra system
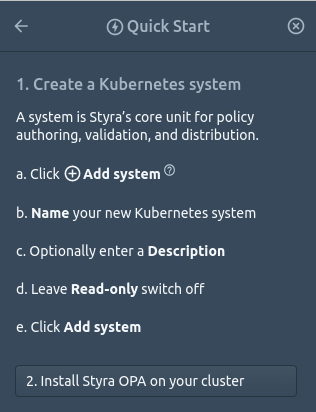
Let’s start with creating a Kubernetes system
Create the Kubernetes system by following the Quick Guide instructions.
Install the system agent in Kubernetes cluster
Once we create the System, we need to install the OPA in the Kubernetes cluster and get the DAS System in sync with OPA. It can be done by just running the System agent installation commands.
For that go to System > Settings > Install tab. The system agent can be installed in our Kubernetes cluster by different ways like helm or kustomize, we will use the kubectl commands to install it.
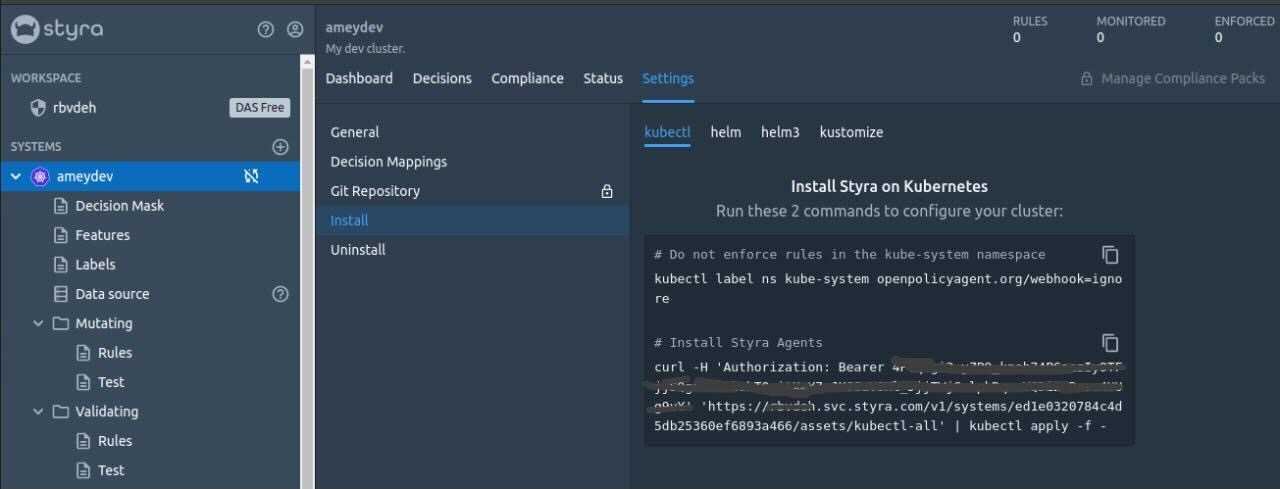
These commands will install the Styra system agent in your Kubernetes cluster and create a bunch of Kubernetes resources (under the namespace styra-system) which include necessary configurations, secrets and cluster Role / RoleBinding and the OPA deployment itself along with datasources-agent deployment.
Test the system-agent installation
Check the status of pods in the styra-system namespace.
$ kubectl get pods -n styra-system
NAME                                 READY   STATUS    RESTARTS   AGE
datasources-agent-658b4ddf49-v2zbn   1/1     Running   0          24s
opa-7b8b85c779-hlbgc                 2/2     Running   0          28s
opa-7b8b85c779-hxtbf                 2/2     Running   0          28s
opa-7b8b85c779-kxd8p                 2/2     Running   0          28s
Once all the pods are in Running state we can see on DAS UI, that the system agent is installed on the cluster System > Status.
Validate the system connection with OPA
As soon as the system-agent is installed in the cluster, OPA will start receiving the various AdmissionReview requests which we can see getting added to the System > Decisions tab. Streaming Decisions make sure that the DAS system and cluster are connected.

Adding policies to Kubernetes
We will implement the following rules with OPA to demonstrate the utility of Styra DAS. These Styra DAS policies are available on Github.
-
The containers must be pulled from an approved registry gcr.io/<projectid>/: Organisations can have their own container registries where they can perform security scans and test the images in order to avoid any security negligence while using the images in the cluster. In my case I am using a GKE cluster so I would prefer the docker images to be pulled in the cluster MUST only be fromgcr.io. -
The Containers must not use “latest” tag: Avoid using the latest tag when deploying containers because it is harder to determine which version of the image is running and it is harder to roll back properly. -
No deployment should have replicas more than 2: If the replica count of a deployment is more than 2, then mutate the incoming request by updating the replica count to 2. This is not a best practice but just a precautionary setting for my cluster as it is a test cluster and I do not want my nodes to run low on CPU / Memory due to any accidental scaling of any application.
Retrieving the admissionReview request
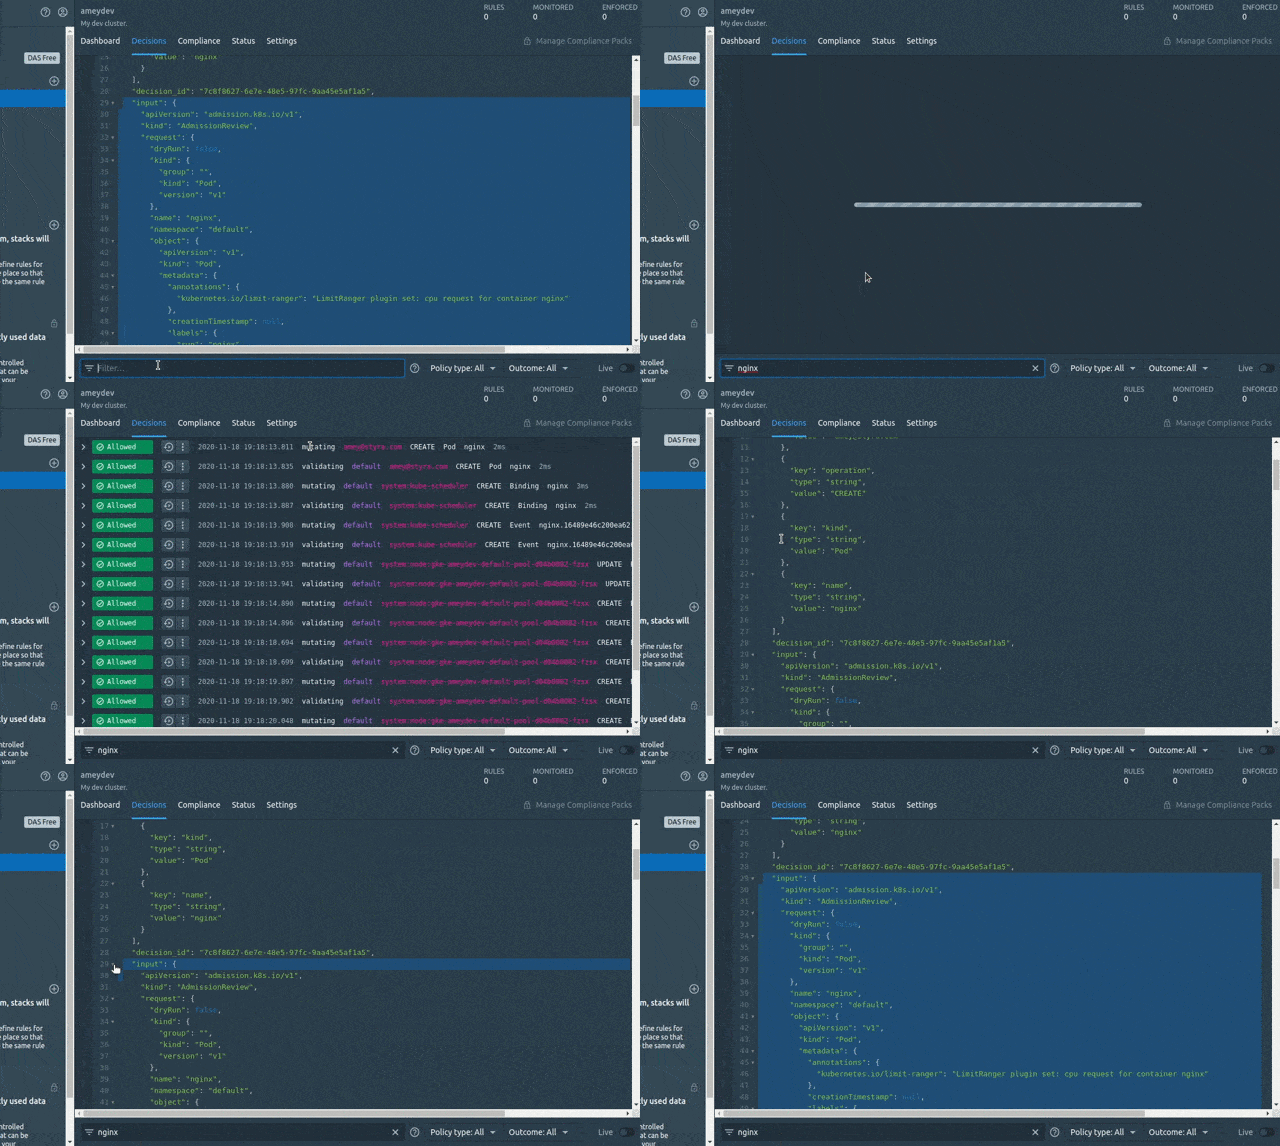
Before writing the Rego rules for above policies we should get familiar with the AdmissionReview request. The AdmissionReview request consists of JSON Objects that can be used while defining the rule statements to refer to the JSONPaths. We will retrieve a sample input.request JSON (CREATE pod) by using the System’s Decisions. We will be referring to this JSON while writing our first policy.
To do that , let’s create a pod so that the CREATE Pod input request gets logged by OPA and sent to the System > Decisions.
$ kubectl run nginx --image=nginx
pod/nginx created
Go to System > Decisions > Enter
Writing a validating rule
The validating rules as their name suggest are used to validate any incoming request (of type CREATE or UPDATE or DELETE) in the cluster. For our first rule (The containers must be pulled from an approved registry gcr.io/<projectid>/) we will add the validating rule in the Rego editor (under System / Validating / rules).

Testing rules using preview functionality
When we write rules, it is recommended to test them before deploying it to the OPA. With DAS we can use the Preview button from the editor screen for the same. It evaluates the policy rules present in the editor against a custom input (use the AdmissionReview input request JSON we retrieved earlier) and view the output display.
We can also enable the Coverage feature under Preview button which would give us a clear view of the statements getting executed (✅) or skipped (❌) against a particular request. This is a great feature to debug failing policies.
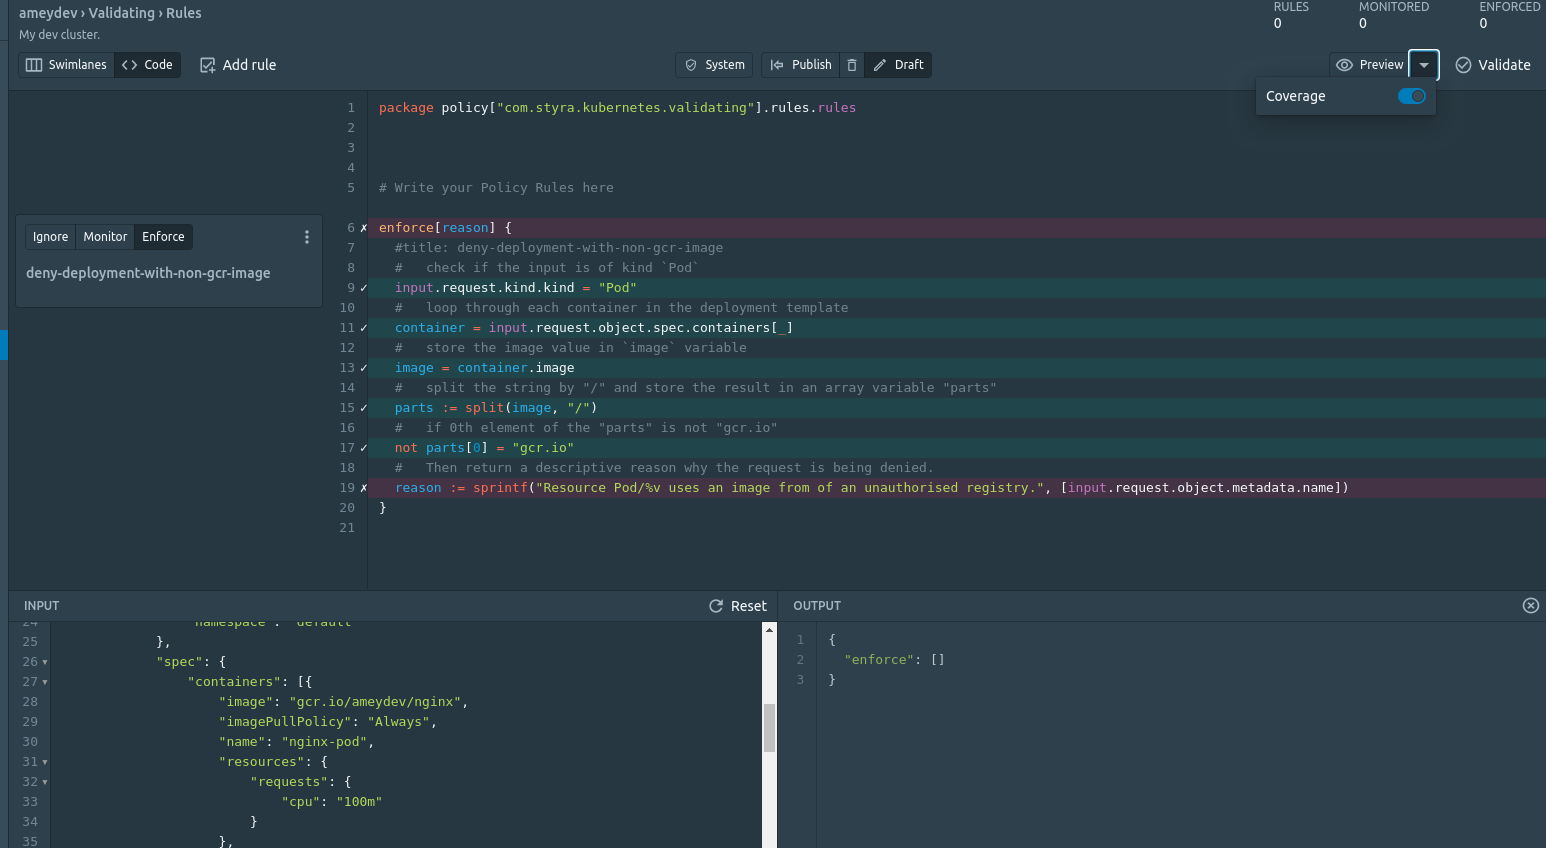
As per our policy rule we check the image value from the incoming request and validate if it starts with gcr.io. So let’s update the INPUT by adding the input.request JSON object (retrieved from the Decisions) and Preview the rule with different inputs. The rule returns the error which can be seen in the OUTPUT, until the image was updated to gcr.io/<project-id> (check INPUT section).
The policy rules seems to be working as expected. Let’s deploy it to OPA by Publishing the changes.
Publish the Rego rule
Before publishing, we can have a look at the state (enforce, monitor and ignore) of the rules. The enforced rule(s) will deny the requests straight away if the rules get violated, whereas the monitored rules will only monitor (won’t take any action such as Allow or Deny on the incoming request) and log the violations in the System > Compliance. The ignored type will neither monitor nor enforce any decision, but they will be kept in the editor without impacting any Decisions.
So we will set our first Rego rule to enforce and deploy it to OPA by just clicking on Publish the changes.
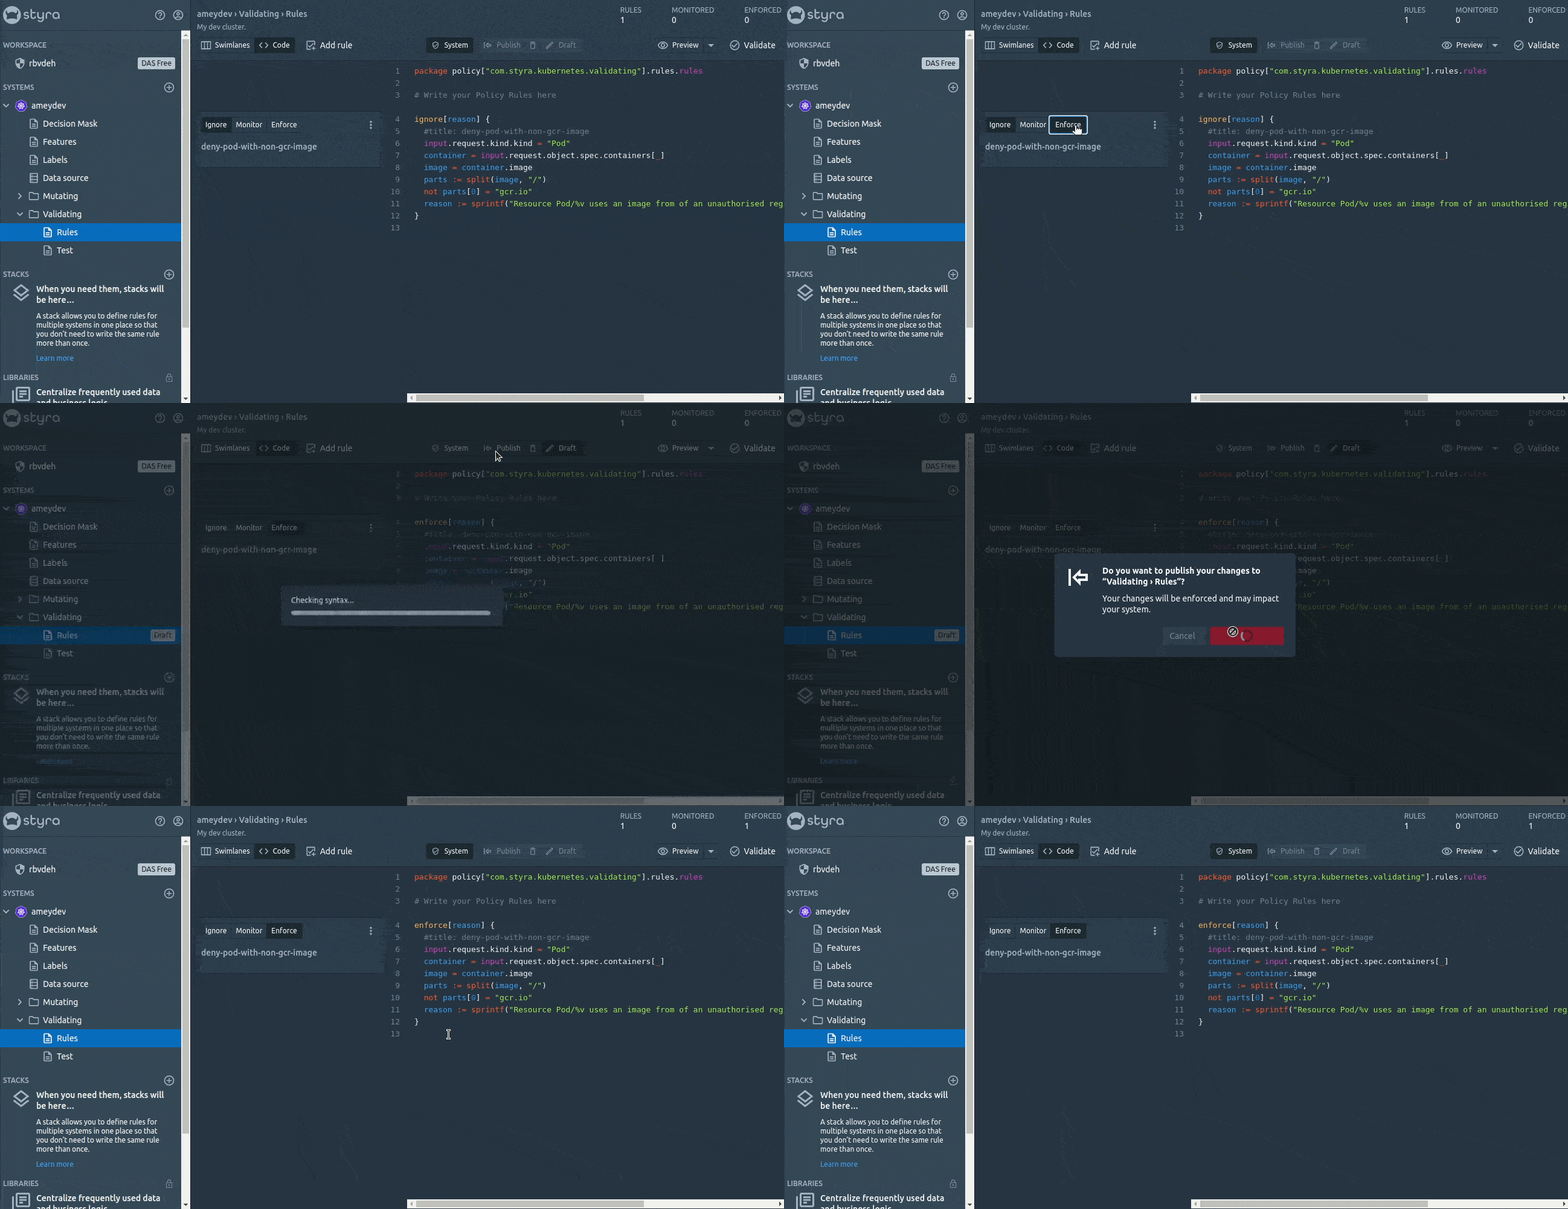
This looks really super easy compared to creating the ConfigMap for Rego rules and mounting them to OPA.
Validating rule
As the policy is published we can see the number of Enforced rules value gets increased to 1 (Upper right corner of the Page), meaning our policy is successfully configured in the cluster. Time to validate our policy, lets create a pod which should violate our policy.
$ kubectl run nginx-pod --image=nginx
Error from server: admission webhook "validating-webhook.openpolicyagent.org" denied the request: Enforced: Resource Pod/test-pod uses an image from an unauthorised registry.
As we can see our request to create a pod with a docker image from an unapproved registry (docker hub in this case) has been Denied by the OPA admission controller. The error message Enforced: Resource Pod/test-pod uses an image from an unauthorised registry. returned by the admission controller can be seen in the command output.
The denial decision has been logged in the System’s Decisions stream. It can be checked out by going to System > Decisions > Type pod-name(test-pod) and hit enter to filter all the Decisions that contain the pod-name.

A request for pod with image from an unapproved registry is Denied, due to a Validating rule. We can even see the same error message returned from the rule with the decision itself.
Congratulations! we have successfully enforced our first Validating policy in the cluster. In future if any request reaches the cluster API server trying to create a pod with the image other than gcr.io then I will be able to see it in the Decisions stream.
Add rule from a pre-written library
Now we will add our second validating rule for The containers must not run with 'latest' tag. But this time we will not write it from scratch! Rather we will import this policy rule from an existing Policy library which also includes Policy Pack - Kubernetes Pod Security Policies (PSP). We can set any of the predefined rules with matter of seconds and that too without putting extra efforts in writing / testing the rules. All we need to do is to select the required rule(s) from the Add Rule dropdown, configure it to enforce or monitor and Publish the changes.
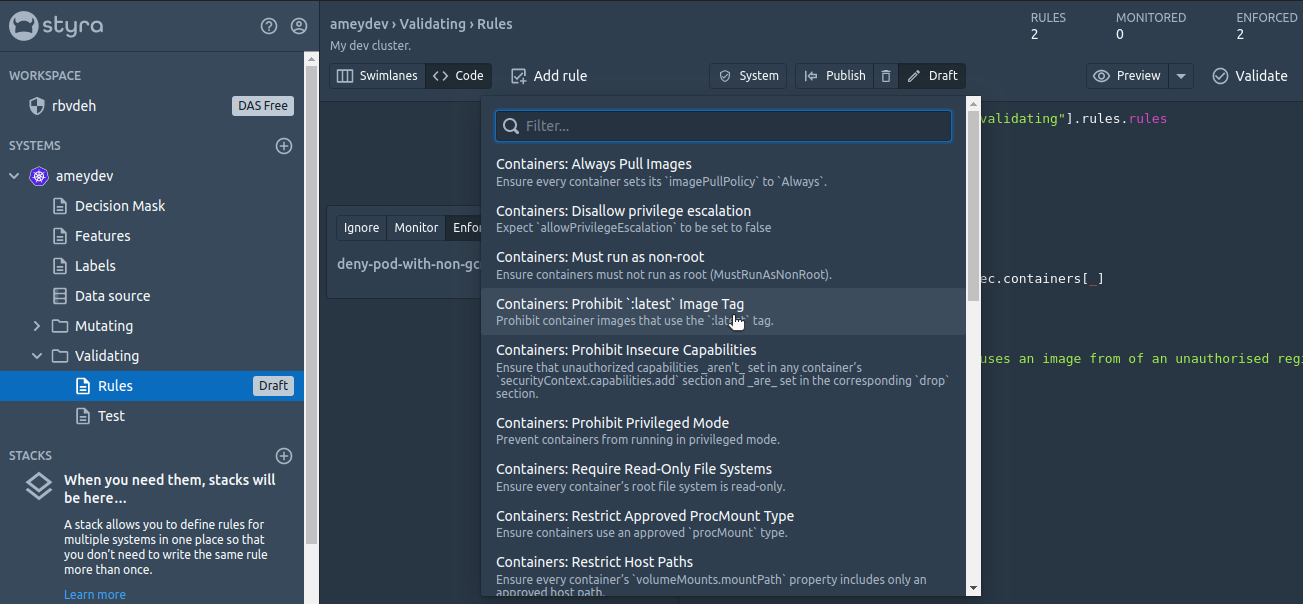
For now we will configure Containers: Prohibit :latest Image Tag rule only. After publishing the changes let’s validate the policy by trying to recreate the pod with nginx image.
$ kubectl run nginx-pod --image=nginx
Error from server: admission webhook "validating-webhook.openpolicyagent.org" denied the request: Enforced: Resource Pod/default/nginx-pod should not use the 'latest' tag on container image nginx., Resource Pod/nginx-pod uses an image from of an unauthorised registry.
As we can see the request is Denied with 2 error messages as it is violating both the policies (the nginx image uses the default latest image tag and it is also pulled from Dockerhub registry which is not allowed as per first policy). Perfect! it is working as expected!
Writing mutating rule
For our third policy (No deployment should have replicas more than 2) our focus is to update the incoming request (CREATE or UPDATE Deployment with replicas > 2) on the fly instead of denying it by a Validating rule. So we will write a Mutating rule just to update request spec (with replicas = 2 ) before it persists in the cluster DB (etcd).
To write our mutating policy, we will add the rule under System > Mutating > rules and Publish the changes.
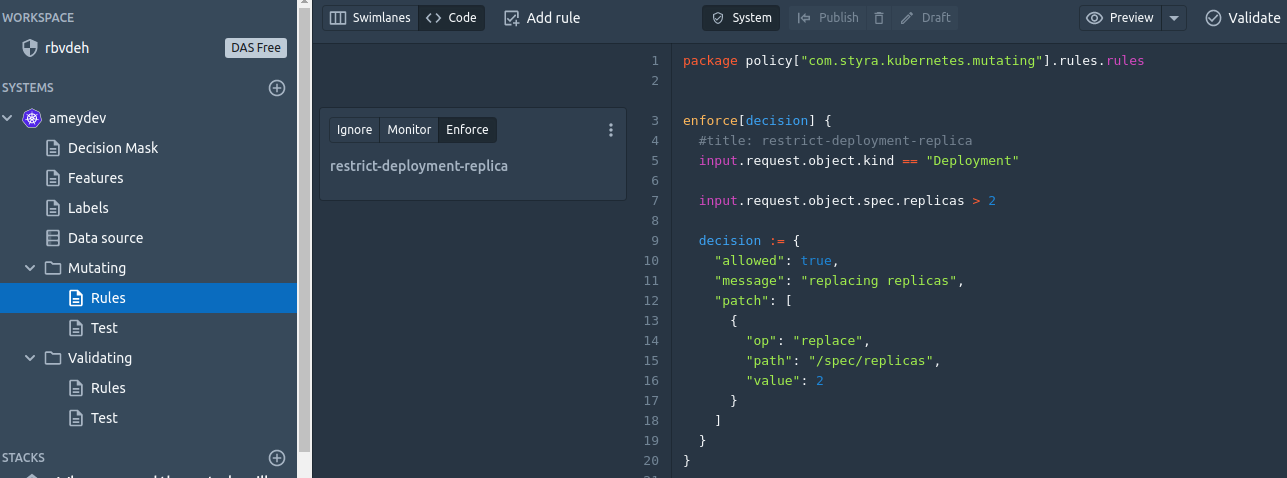
Time to test mutating policy.
Validate the policy by creating a deployment with --replicas=4 and we will see that only 2 pods are created. I used the --image=gcr.io/cloud-marketplace/google/nginx:1.15 so that it does not violate our validating rules. The Deployment gets created but when we list the pods it shows only 2 pods are created.
$ kubectl create deployment nginx-deployment --image=gcr.io/cloud-marketplace/google/nginx:1.15 --replicas=4
deployment.apps/nginx-deployment created
$ kubectl get pods
NAME                                READY   STATUS    RESTARTS   AGE
nginx-deployment-84bf6449bc-5sb8r   1/1     Running   0          5s
nginx-deployment-84bf6449bc-dc5dl   1/1     Running   0          5s
In the System > Decisions, we can see a decision of type Advice, with a description of Mutation of the admission request.
Great! Now we have enforced the Mutating policy as well. We can use the Mutating rules to set defaults of a cluster, such as adding some mandatory labels at runtime, or update imagePullPolicy to Always, or adding the default storageClassName to a PVC and more.
Decisions logging and analysis for security auditing
The decisions are saved and can be used for security auditing. It can be used by analysing the decisions patterns to take the preemptive measures regarding the safety of the software or infrastructure.
While monitoring these decisions I noticed that our 1st rule was not applicable to Deployment resources. As I saw CREATE deployment with image nginx:1.15 request was allowed which was supposed to be Denied . Let’s update the same rule for deployment and replay the decision.
Replay decisions
The earlier code snippet was focused on Pod resources only (because of the statement input.request.kind.kind = 'Pod'), so to update the policy for other kinds as well (such as Deployments, Statefulsets etc.) we will add another rule.
After adding the new rule instead of publishing the changes directly on the cluster let’s test it by replaying the same Decision with request (CREATE deployment with image nginx:1.15). This would help me analyse my new changes and show me the expected decision taken by OPA in advance without actually deploying the rules to it.
So just keep the changes in Draft state > Then go to Decisions > Select the specific Decision (with request CREATE deployment with image nginx:1.15 in this case ) and click on Replay button.
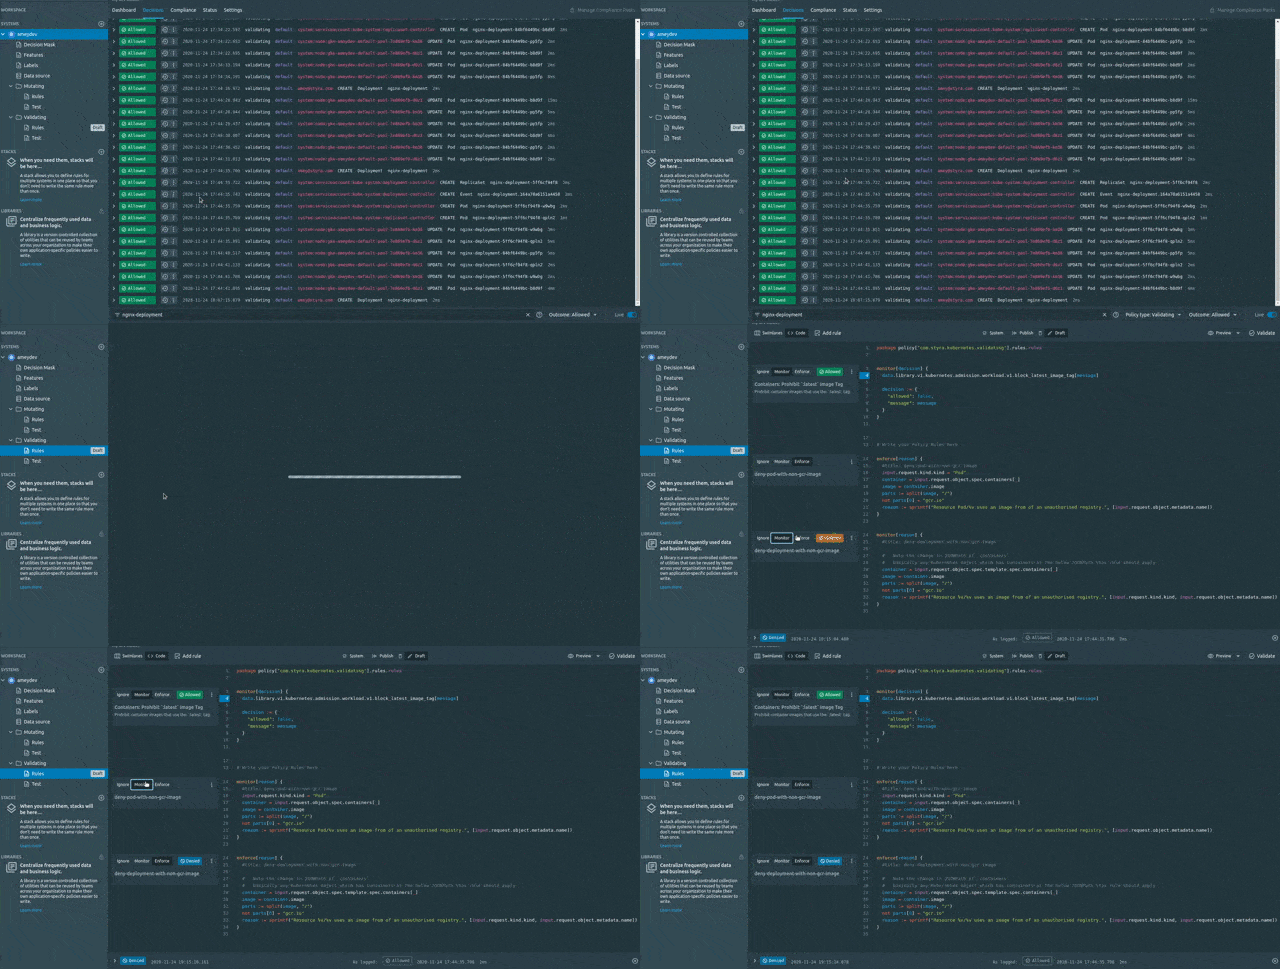
Note: Use the filters (Policy Type: Validating, Decision: Allowed) to sort the decisions.
After clicking on Replay we get redirected to the policy editor with a pre-analysed decisions being prompted in front of all the rules (published as well as unpublished). This shows how the rules in the editor behave against that particular request Decision. At the bottom of the editor, we could see that because of new changes the Decision would get changed to Denied. If the rule is changed to be in Monitor mode then the rule would have gotten Violated while the Decision would be Allowed. Now once we are sure about new changes, lets Publish the rules and validate it by recreating the same Deployment.
$ kubectl create deployment nginx-deployment --image=nginx:1.15
error: failed to create deployment: admission webhook "validating-webhook.openpolicyagent.org" denied the request: Enforced: Resource Deployment/nginx-deployment uses an image from an unauthorised registry.
We can see the error message shows Deployment/nginx-deployment creation request violated our rule and got Denied.
So…
This was a very high level overview of Styra DAS. We saw how it can help us to overcome the challenges I mentioned earlier. Certainly this approach simplifies the overall experience of using OPA as Admission Controller in Kubernetes. Hopefully, this helps you get started with OPA much faster. Apart from the above features, there are many more features in their enterprise edition.
Styra DAS beyond Dev edition
Styra DAS Developer’s Edition can be a good entry-point to get started with DAS / OPA for individual developers or small teams. For enterprises with multiple environments and clusters Styra offers DAS-Pro and DAS-Enterprise editions with extended features. Some of the interesting key features are Pre-built Policy Library - a collection of many standard policies ready to be enforced, Policy-as-Code with Git - Sync your policy rules from a git repo to DAS system, Custom Datasources - to make contextual policy decisions and so on.
Thank you for reading!
Have you tried the Styra DAS Free edition? Please share your experience with me. Also, any feedback or suggestions about this blog post, please feel free to reach out to me on amey@infracloud.io or @ameydev2 on Twitter.
Stay updated with latest in AI and Cloud Native tech
We hate 😖 spam as much as you do! You're in a safe company.
Only delivering solid AI & cloud native content.


