Provisioning Kubernetes on Bare Metal using AWS EKS-Anywhere

Organizations are increasingly turning to Kubernetes to orchestrate their containerized applications. However, many enterprises face unique challenges that cloud-based Kubernetes solutions cannot fully address. These challenges include leveraging existing bare metal infrastructure, ensuring data sovereignty, optimizing costs, and maintaining granular control over their environments. By deploying Kubernetes on bare metal, companies can achieve greater infrastructure flexibility, meet compliance requirements, and optimize performance for resource-intensive workloads.
In this blog post, we’ll explore the process of provisioning a Kubernetes cluster on bare metal infrastructure using AWS EKS-Anywhere. But before we start using self-hosted Kubernetes, it’s crucial to understand the key differences between managed and self-hosted solutions and where AWS EKS-Anywhere fits in.
Managed Kubernetes vs self-hosted Kubernetes
Managed Kubernetes
Managed Kubernetes is a type of service where cloud providers or third-party vendors handle the underlying infrastructure, enabling users to focus on deploying and managing their applications without worrying about operational complexities.
| Pros of Managed Kubernetes | Cons of Managed Kubernetes |
| Simplified setup and management: Abstracts away the complexities of infrastructure management for easier deployment and operation. | Limited control: May restrict advanced configurations or customizations for a standardized experience. |
| Automatic scaling and updates: Offers automatic scaling based on demand and regular updates and patches. | Vendor lock-in: Ties you to a specific provider, making migration to another provider potentially difficult. |
| Enhanced security and monitoring: Includes built-in security features and monitoring tools for better reliability and security. | Cost: Additional costs on top of underlying cloud infrastructure charges. |
Self-hosted Kubernetes
Self-hosted Kubernetes requires manual setup and maintenance of the Kubernetes cluster on your own infrastructure or cloud instances.
| Pros self-hosted Kubernetes | Cons of self-hosted Kubernetes |
| Full control and customization: Complete control over configuration, allowing customization to meet specific requirements. | Complex setup and maintenance: Requires expertise in configuring, deploying, and maintaining the cluster infrastructure, which can be time-consuming and resource-intensive. |
| Flexibility in infrastructure choice: You can deploy clusters on any infrastructure, whether on-premises or in the cloud. | Manual scaling and updates: Scaling and updating the cluster need to be done manually, which may result in additional administrative overhead. |
| Cost savings: Can be cost-effective for organizations with existing infrastructure or those requiring highly customized setups. | Security and monitoring responsibilities: Puts the burden of security implementation, patching, and monitoring on the user. |
AWS Kubernetes offerings: EKS vs. EKS-A
Amazon Web Services (AWS) provides both Kubernetes offerings, managed and self-hosted Kubernetes, making it easier for developers to deploy, manage, and scale containerized applications.
- Amazon EKS: A fully managed Kubernetes service, eliminating the need for users to manage the underlying Kubernetes control plane.
- Amazon EKS-Anywhere: It allows users to run Amazon EKS on their own infrastructure, on-premises, or in other public clouds.
Why is AWS EKS-Anywhere different from other Kubernetes implementation tools?
AWS EKS-Anywhere is not the only tool to self-host Kubernetes. There are many, like below:
- Rancher: Rancher simplifies Kubernetes cluster management with a user-friendly interface and supports multiple clusters across different environments.
- Kubeadm: Kubeadm provides a simple way to set up and manage Kubernetes clusters by initializing and managing the control plane and worker nodes.
- Metal3: Metal3 manages bare metal Kubernetes clusters, offering a way to provision and operate clusters on physical servers using Kubernetes-native tools.
- K3s: K3s is a lightweight Kubernetes distribution designed for resource-constrained environments and ease of deployment, making it ideal for edge computing and development.
So why should we use AWS EKS-Anywhere?
AWS EKS stands out because it integrates well with the AWS ecosystem and AWS services, such as Elastic Load Balancing, Identity and Access Management (IAM), and CloudTrail, making it easier to build comprehensive cloud native applications.
There can be projects where you have to leverage the services provided by Amazon Web Services (AWS) but prefer not to use their underlying infrastructure. In such cases, EKS-Anywhere (EKS-A) can be a suitable solution. You can read the detailed comparison of Amazon EKS-Anywhere and Amazon EKS.
How does AWS EKS-A achieve bare metal provisioning?
AWS EKS-Anywhere uses the open source project called Cluster API, which provides a declarative way to define, create, and manage Kubernetes clusters. Cluster API is built on top of the Kubernetes API and uses Kubernetes custom resources to represent infrastructure objects like machines and networks.
AWS EKS-Anywhere extends Cluster API with a proprietary component called AWS EKS-Anywhere Cluster API Provider, a tool that works with Cluster API and is designed specifically for AWS EKS-Anywhere. Its objective is to handle the setup and management of the underlying infrastructure needed for Kubernetes clusters when using EKS-Anywhere. The AWS EKS-Anywhere Cluster API Provider allows you to use AWS’s Kubernetes service (EKS) in different places, like your own servers (bare metal), VMware virtualized environments (vSphere), and even in your data centers (AWS Outposts). It gives you flexibility in where and how you run your Kubernetes clusters with AWS EKS technology.
When deploying to bare metal, the AWS EKS-Anywhere integrates with various providers, such as Nutanix, Tinkerbell, vSphere, etc., to provision and manage the infrastructure.
AWS EKS-Anywhere integrates with Tinkerbell in order to provide a bare metal provisioning solution for Kubernetes clusters. It uses tools like PXE boot and IPMI to automate the process of installing an operating system and configuring the hardware, ultimately making the hardware ready for deploying Kubernetes cluster resources.
Tinkerbell’s role and how it integrates with EKS-A?
Tinkerbell is an open source bare metal provisioning system that can be used to automate the process of installing and configuring operating systems and applications on bare metal servers. When integrated with EKS-Anywhere, Tinkerbell can be used to provision the underlying infrastructure for Kubernetes clusters.
Here are the high-level steps to integrate AWS EKS-Anywhere with Tinkerbell:
- Deploy Tinkerbell: First, you need to deploy Tinkerbell on your bare metal servers. This involves installing Tinkerbell’s various components, including its DHCP, TFTP, and HTTP servers, as well as its workflow engine and API server.
- Define hardware profiles: Once Tinkerbell is up and running, you need to define hardware profiles for your servers. These profiles define the specific hardware characteristics of each server, such as its CPU, RAM, and storage capacity.
- Create workflows: Next, you need to create workflows that define the provisioning process for each server. Workflows are defined using Tinkerbell’s YAML-based workflow language, and they specify the steps required to install and configure the operating system and any additional software on each server.
- Integrate with EKS-Anywhere: Finally, you need to integrate Tinkerbell with EKS-Anywhere. This involves configuring EKS-Anywhere to use Tinkerbell as its bare metal provisioning solution. Specifically, you need to provide EKS-Anywhere with the API endpoint for Tinkerbell’s workflow engine, as well as any authentication credentials that may be required.
Once Tinkerbell is integrated with EKS-Anywhere, you can use it to provision the bare metal infrastructure for your Kubernetes clusters. When you create a new cluster in EKS-Anywhere, it will automatically launch the necessary Tinkerbell workflows to provision the underlying infrastructure.
Explore more about the underlying infrastructure of Tinkerbell and how to automate bare metal provisioning with it. Tinkerbell can also be set up locally using a sandbox environment.
Protocols that help Tinkerbell communicate with bare metal machines
DHCP (Dynamic Host Configuration Protocol) and TFTP (Trivial File Transfer Protocol) are two network protocols that serve different purposes in a computer network. You can read more about DHCP & TFTP.
The gist is that in the case of ‘On-Premise’ infrastructure, there exist requirements to manage bare metal machines via the network. A hard drive connected to a bare metal machine for storage purposes does not have any OS from which it could boot. Hence, once it is powered on, it looks for options via a network, and that’s where DHCP and TFTP come into the picture.
Here is a brief about the whole process:
- DHCP and TFTP servers are up.
- The boot sequence set is on a bare metal: Hard Drive, and then a Network
- Bare metal is powered on.
- It looks for files to boot in the hard drive. It does not find any.
- Then, it looks for files to boot over the network. The first step is to send a DHCP request over the network. It basically looks for its own IP address, TFTP server details (also known as Next server), and the Bootfile name.
- Once it gets all the above details in response from the DHCP server, it connects to the TFTP server and fetches: boot-loader, installation kernel, and initial ram-disk files.
- These files help in booting the bare metal, and the OS that boots from these files then proceeds to install an OS onto the hard drive of the bare metal.
- The bare metal then restarts, but since an OS is already present in the hard drive, it boots using the installed OS. That is when the bare metal becomes ready to use.
Now, the installed OS can be customized in a way to install agents that can be used to configure AWS EKS-A. We will look into that sometime.

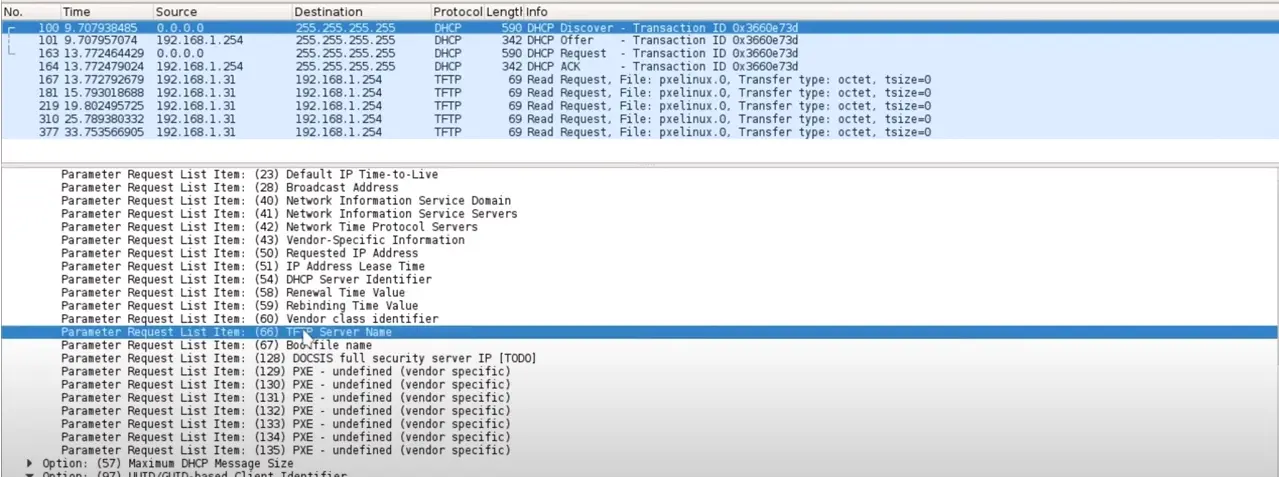
The above snapshot shows a bare metal trying to boot via network, getting its IP address from the DHCP server but failing to connect to the TFTP server. On analyzing the data packets, we can retrieve more information about the DHCP and TFTP requests. In the below snapshots, it can be seen that the bare metal asks for the TFTP Server Name and Bootfile name as well.
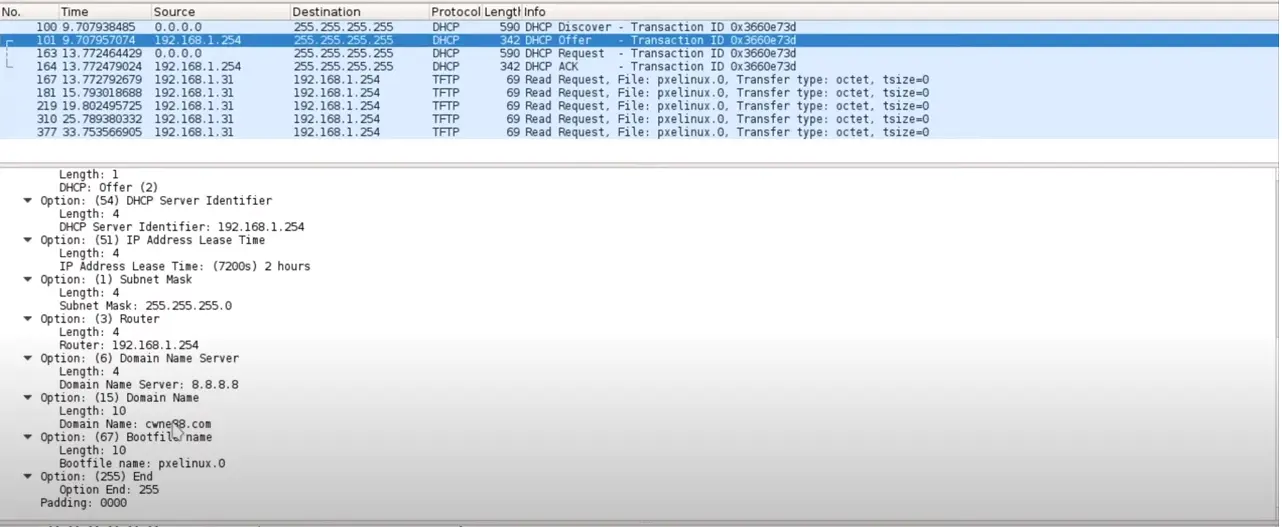
On analyzing the response of the DHCP request, we can see that it gets TFTP server details and Bootfile name in response.
The below image shows how it downloads the pre-boot files, specifically the Linux kernel (vmlinuz) and the initial RAM disk (initramfs), once it successfully connects with the TFTP server.

AWS EKS-A Kubernetes cluster setup with VirtualBox VMs
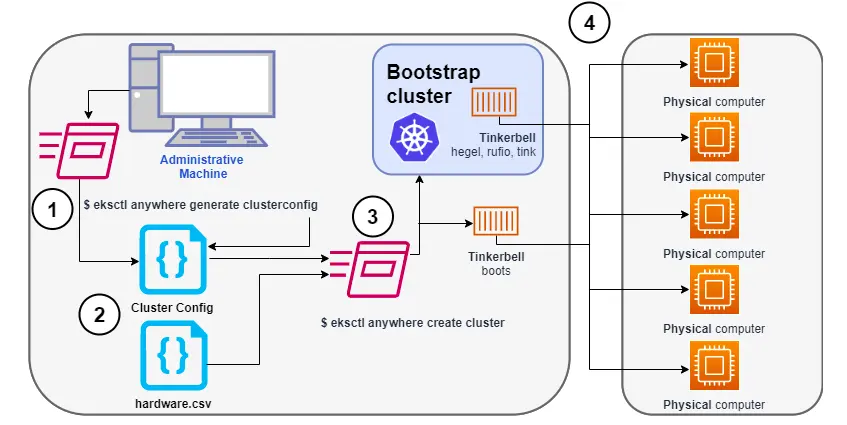
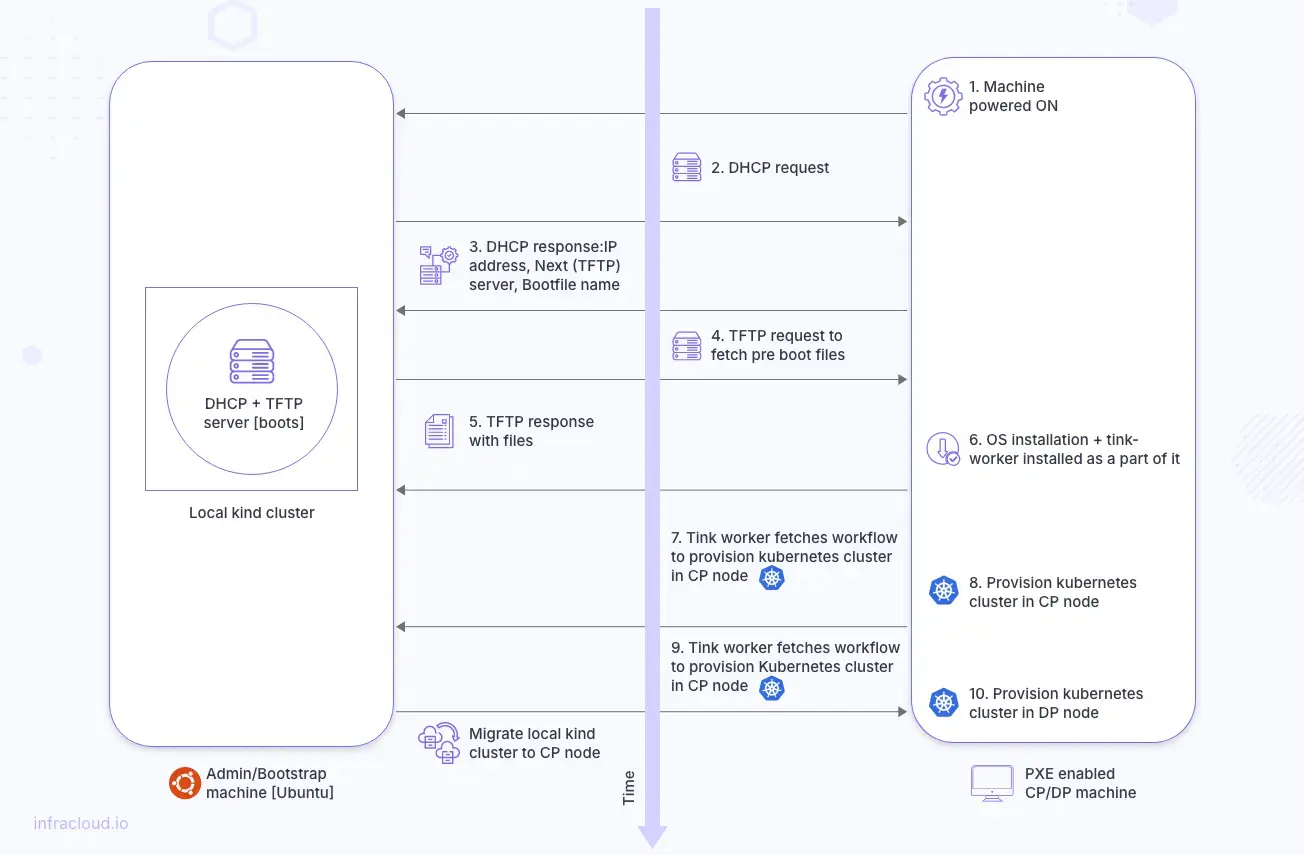
In this section, we will attempt to install a Kubernetes cluster in 2 nodes (physical machines) within the same subnet. We will use an admin or bootstrap machine to run eksctl anywhere CLI commands to provision the Kubernetes cluster. The local kind cluster will come up in the admin machine, which will comprise of DHCP + TFTP server, among other things.
Both Control Plane (CP) and Data Plane (DP) nodes will PXE boot. Following boot, a Kubernetes cluster will be provisioned in both nodes (first CP node and followed by DP node). In the end, the kind cluster migrates from the admin machine to the CP node(s).
As mentioned above, we will run eksctl anywhere CLI commands to provision the cluster. eksctl is the tool, and anywhere is the plugin. They require docker internally to spin up a kind cluster, hence docker too needs to be installed.
To provision clusters, eksctl anywhere will require a multi-yaml cluster config file (which contains cluster definition) and a hardware CSV file (which contains node/machine details). Hardware csv contains details about the bare metal machines that are going to be part of the cluster. Let’s take a look at the contents of it and understand the fields:
hostname,mac,ip_address,netmask,gateway,nameservers,labels,disk,bmc_ip,bmc_username,bmc_password
eksabmhp1-cp-n-1,08:00:27:99:5B:B7,192.168.10.179,255.255.255.0,192.168.10.1,8.8.8.8,type=cp,/dev/sda,,,
eksabmhp1-dp-n-1,08:00:27:AC:C9:77,192.168.10.31,255.255.255.0,192.168.10.1,8.8.8.8,type=cp,/dev/sda,,,
- hostname: Name of the machine.
- mac: MAC address of the machine.
- ip_address: IP address of the machine. Bare metal servers do not already have an IP address. They are assigned by the DHCP server once they are powered on and make DHCP requests. Since this hardware csv is fed to the
eksctl anywherecommand which spins up a local kind cluster that has the DHCP server running, the DHCP server knows which IP to assign to which MAC. - netmask, nameservers, gateway: These are the network-related details.
- disk: The partition of the disk on which the OS is going to be installed.
- bmc details (bmc_ip, bmc_username, bmc_password): Baseboard management controller details are required to power off, and restart the machines. These details are optional. If not provided, the onus to switch on/off the machines at the appropriate time falls on the client/user.
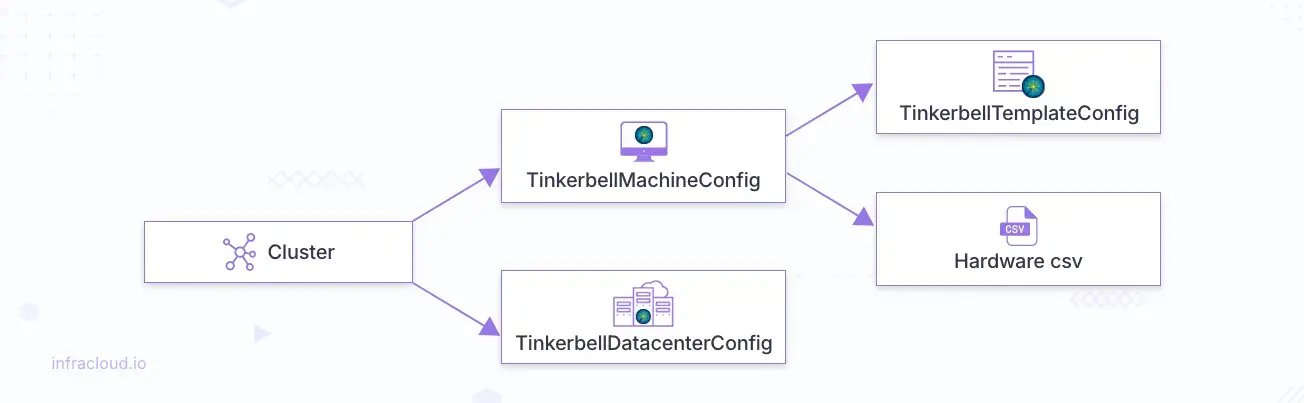
Now, we will try to understand the muti-yaml cluster config file before moving on to the next step. The cluster config contains 4 kind of objects:
- Cluster
- TinkerbellDatacenterConfig
- TinkerbellTemplateConfig
- TinkerbellMachineConfig
As mentioned before, we are dealing with two types of machines: CP and DP. CP is referred to as Control-Plane, and DP is called Data-Plane or Worker Groups. In this setup, we are using 1 VM for CP and 1 VM for DP, but we can have multiple VMs for CP and DP as well for a high-availability setup. Furthermore, we can have multiple worker groups, and each worker group is a collection of 1 or more VMs. But the control plane is always going to be 1 group. Let us look in detail at each object present in the cluster config.
Cluster
This is what a Cluster object looks like:
apiVersion: anywhere.eks.amazonaws.com/v1alpha1
kind: Cluster
metadata:
  name: mgmt
spec:
  kubernetesVersion: "1.23"
  clusterNetwork:
    …
  controlPlaneConfiguration:
    count: 1
    endpoint:
      host: 192.168.10.41
    machineGroupRef:
      kind: TinkerbellMachineConfig
      name: mc1
  workerNodeGroupConfigurations:
    - count: 1
      name: md-0
      machineGroupRef:
        kind: TinkerbellMachineConfig
        name: mc2
  managementCluster:
    …
  datacenterRef:
    …
Apart from configurations like kubernetesVersion, clusterNetwork; there are two notable configurations: controlPlaneConfiguration and workerNodeGroupConfigurations.
Both these configurations have a reference to machineGroupRef. Via this configuration, they are connected with their own TinkerbellMachineConfig objects. Going by the above Cluster kind, we should be expecting 2 TinkerbellMachineConfig object definitions, one for CP and the other for DP or worker node group.
Also controlPlaneConfiguration expects an IP in endpoint.host. This is a floating IP and the real host behind it changes from time to time depending on the location of the cluster components at that point of time. For example, the local kind cluster is spun up in the admin/bootstrap machine but it migrates to CP nodes once the provisioning is complete. Hence Day-2 operations like upgrade, scale, etc are supervised from a different location.
TinkerbellDatacenterConfig
Here is TinkerbellDatacenterConfig object:
apiVersion: anywhere.eks.amazonaws.com/v1alpha1
kind: TinkerbellDatacenterConfig
metadata:
  name: mgmt
spec:
  tinkerbellIP: 192.168.10.64
This config requires an available IP, which is going to be used by Tinkerbell components. The IP can be generated via the same script as Endpoint IP.
TinkerbellMachineConfig
Now let’s look at TinkerbellMachineConfig object:
apiVersion: anywhere.eks.amazonaws.com/v1alpha1
kind: TinkerbellMachineConfig
metadata:
  name: mc1
spec:
  hardwareSelector:
    type: cp
  osFamily: bottlerocket
  templateRef:
    kind: TinkerbellTemplateConfig
    name: tmpl1
  users:
    - name: ec2-user
      sshAuthorizedKeys:
        - ssh-rsa <some rsa key>
This object contains details like:
- which family of OS is going to be installed.
- which hardware will be part of this object via
hardwareSelector. In this case, the value of hardwareSelector (type: cp) should match some of the machine labels in the hardware CSV file. - also, this object is connected to
TinkerbellTemplateConfigviatemplateRef. - a field called
sshAuthorizedKeysthat takes a list of public keys so that users can SSH into the hardware part of that manifest via respective private keys. A simple way to create SSH keys would be to runssh-keygenfrom a machine in the same network from which you would like to connect to the hardware.
Both IPXE enabled VMs will have Bottlerocket OS installed as mentioned in TinkerbellMachineConfig. If you would like to switch to something like Ubuntu, then you have to host an Ubuntu image and provide the hosting details in the additional config section of TinkerbellMachineConfig. For Bottlerocket, this hosting is not required because the OS image is pulled from the public AWS ECR registry itself.
TinkerbellTemplateConfig
Now look at the TinkerbellTemplateConfig object. We should also be expecting two TinkerbellTemplateConfig definitions, one for CP node, and another for DP node.
apiVersion: anywhere.eks.amazonaws.com/v1alpha1
kind: TinkerbellTemplateConfig
metadata:
  name: tmpl2
spec:
  template:
    global_timeout: 6000
    id: ""
    name: tmpl2
    tasks:
      - name: tmpl2
        actions:
          - environment:
              COMPRESSED: "true"
              DEST_DISK: /dev/sda
              IMG_URL: https://anywhere-assets.eks.amazonaws.com/releases/bundles/36/artifacts/raw/1-26/bottlerocket-v1.26.2-eks-d-1-26-6-eks-a-36-amd64.img.gz
            name: stream-image
            image: public.ecr.aws/eks-anywhere/tinkerbell/hub/image2disk:6c0f0d437bde2c836d90b000312c8b25fa1b65e1-eks-a-36
            timeout: 600
          - environment:
              BOOTCONFIG_CONTENTS: kernel {}
              DEST_DISK: /dev/sda12
              DEST_PATH: /bootconfig.data
              DIRMODE: "0700"
              FS_TYPE: ext4
              GID: "0"
              MODE: "0644"
              UID: "0"
            name: write-bootconfig
            image: public.ecr.aws/eks-anywhere/tinkerbell/hub/writefile:6c0f0d437bde2c836d90b000312c8b25fa1b65e1-eks-a-36
            timeout: 90
            pid: host
         ….
    version: "0.1"
This object basically contains the workflow that is going to be executed once the machine starts booting up. The workflow includes actions like stream image, network config setup, disk partition, inject user details, restart, etc. All these actions help to make the bare metal ready for cluster provisioning.
Once the bare metal comes up and the pre boot loader files (vmlinuz, initramfs) are run, an agent tink-worker gets installed as a part of that and it connects with the local kind cluster to pull the workflow for that bare metal and runs it as well as relays back the status. And this is how all cluster objects are defined and are connected with each other.
With a grasp of fundamental concepts such as DHCP, TFTP, and Tinkerbell, pivotal components enabling AWS EKS-A’s bare metal provisioning capabilities, coupled with a deeper understanding of its operational mechanisms, you can translate this knowledge into practical implementation.
To establish a Kubernetes cluster using AWS EKS-A, we need bare metal infrastructure. For this purpose, VirtualBox serves as a viable option. The setup process can be executed manually or automated through the utilization of scripts. After setting up the infrastructure, the subsequent step involves configuring a Kubernetes cluster on the provisioned resources using the provided instructions. InfraCloud has added an AWS EKS Anywhere Setup file on Github with detailed steps.
Wrap up
Cloud Kubernetes is helpful, but sometimes, you have to provision a Kubernetes cluster on bare metal for various reasons. AWS EKS-Anywhere is a powerful tool that allows customers to deploy and manage Kubernetes clusters on-premises. It offers greater control, although it may involve increased complexity and costs compared to AWS EKS. In this article, we provide a step-by-step guide on how to set up a Kubernetes cluster using VirtualBox, highlighting the importance of proper network configurations and the installation of Kubernetes tools like kubectl and eksctl. However, with projects in production, these processes could be complex. You can contact our bare metal provisioning consultants for help in such cases.
I hope this article helped you provision EKS-A on bare metal. For more posts like this one, subscribe to our weekly newsletter. I’d love to hear your thoughts on this post, so do start a conversation on LinkedIn. If you need any clarification or corrections, please feel free to reach out to Hitesh Pattanayak.
Reads and References
Stay updated with latest in AI and Cloud Native tech
We hate 😖 spam as much as you do! You're in a safe company.
Only delivering solid AI & cloud native content.
Posts You Might Like