How to Simplify Multi-cluster Istio Service Mesh using Admiral?
 Nishant Barola
  Dada Gore
 In today’s rapidly evolving technological landscape, organizations are increasingly embracing cloud-native architectures and leveraging the power of Kubernetes for application deployment and management. However, as enterprises grow and their infrastructure becomes more complex, a single Kubernetes cluster on a single cloud provider may no longer suffice, potentially leading to limitations in redundancy, disaster recovery, vendor lock-in, performance optimization, geographical diversity, cost-efficient scaling, and security and compliance measures. This is where the concept of a multi Kubernetes cluster on multi-cloud, combined with a multi-cluster service mesh, emerges as a game-changer. This does sound complex, but let’s walk through and understand each part in the coming sections.
In this blog post, we will learn why a multi-cluster setup is needed? How does Istio Service Mesh work on multi-clusters? How does Admiral simplify multi-cluster Istio configuration? And then we will set up the end-to-end service communication on multi-cloud Kubernetes clusters on AWS and Azure.
Why use multi-cluster setup?
Multi-cluster architecture setups offer various advantages in many use cases such as:
-
Fault isolation and failover: Deploying multiple clusters helps you to achieve fault isolation. In case one cluster experiences an issue or goes down, the traffic can be seamlessly redirected to other healthy clusters, ensuring high availability and minimizing service disruptions. This failover capability helps maintain the overall system stability and reliability.
-
Location-aware routing and failover: Multi-cluster setups enable location-aware routing, which means that requests can be directed to the nearest cluster or service instance based on the user’s location. This routing strategy improves network latency and provides a better user experience by minimizing network delays. In case of a failure or degraded performance in a specific cluster, traffic can be automatically rerouted to an alternate cluster, ensuring continuous service availability.
-
Team or project isolation: Each team or project within an organization may have its own specific requirements, configurations, and policies. You achieve isolation and independence across teams or projects by deploying separate clusters. This isolation enables teams to have control over their own set of clusters, making it easier to manage and scale their services without interfering with other teams’ environments. It also provides enhanced security and reduces the risk of unintentional clashes among different projects.
Multi-cluster deployments give you a greater degree of isolation and availability but it does introduce complexity. That’s where service mesh like Istio comes into the picture. They help to streamline the management of multi-cluster deployments.
Istio deployment models
There are various deployment models for Istio service mesh, like Multi-Primary, Primary-Remote, Multi-Primary on different networks, and Primary-Remote on different networks.
In Multi-Primary, we have the Istio control plane running on all clusters, whereas in Primary-Remote we have the Istio control plane running on a single cluster. There will be direct connectivity between service workloads across clusters if they are on the same network.
Advantages of Multi-Primary on different networks
Multi-Primary Istio on different networks provide the following benefits:
-
Improved availability: Deploying multiple primary control planes enhances availability. If one control plane becomes unavailable, it only affects the workloads within its managed clusters, minimizing disruptions and allowing other clusters to function normally.
-
Configuration isolation: Configuration changes can be made independently in one cluster, zone, or region without affecting others, allowing controlled rollout across the mesh.
-
Selective service visibility: Selective service visibility enables service-level isolation, restricting access to specific parts of the mesh.
-
Cross-network communication: Istio supports spanning a single service mesh across multiple networks, known as multi-network deployments. This configuration offers benefits such as overlapping IP or VIP ranges for service endpoints, crossing administrative boundaries, fault tolerance, scaling of network addresses, and compliance with network segmentation standards. Istio gateways facilitate secure communication between workloads in different networks.
-
Secure communication: Istio ensures secure communication by supporting cross-network communication only for workloads with an Istio proxy. Istio exposes services at the Gateway with TLS pass-through, enabling mutual TLS (mTLS) directly to the workload.
The Multi-Primary on different networks Istio deployment model combines multiple clusters across distinct networks in a single mesh, enabling fault isolation, precise location-based routing, and controlled configuration changes. This approach enhances availability, scalability, and compliance, making it ideal for ensuring reliable and efficient multi-cluster setups with diverse requirements.
Understanding Multi-Primary on different networks architecture
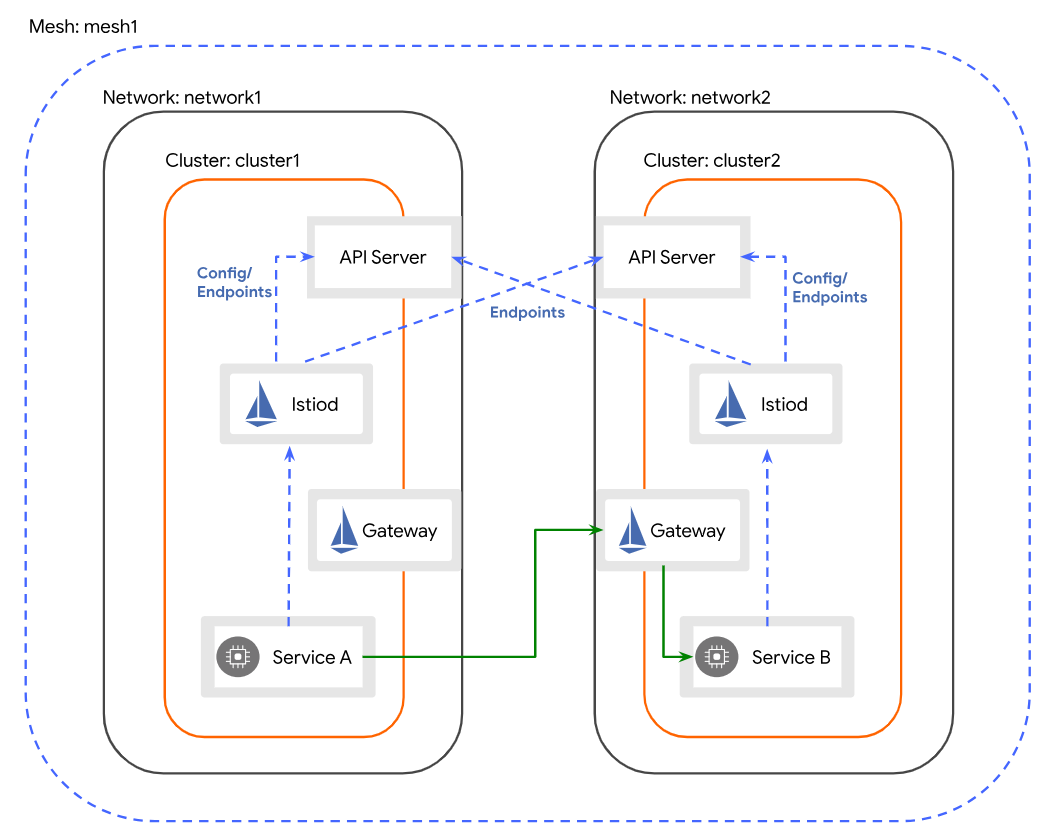
In the Multi-Primary on different networks deployment model, the clusters within the Istio mesh are situated on separate networks. It means that there is no direct connection between the service workloads in different clusters. To enable communication between service workloads across cluster boundaries, each Istio control plane monitors the API Servers in all clusters to obtain information about service endpoints. Service workloads across cluster boundaries communicate indirectly via dedicated gateways for east-west traffic. It is crucial that the gateway in each cluster can be accessed from the other cluster.
Challenges of Istio Multi-Primary
As there are many benefits of Multi-Primary Istio, you should also know about the following challenges:
-
As per namespace sameness by default, the traffic will be load-balanced across all clusters in the mesh having the same FQDN (same service name and namespace). In order to change the default load balancing, you have to apply appropriate Istio configuration such as Destination rules in each cluster.
-
If the same service is in different namespaces across the clusters and requires a single global identity, then you have to implement Istio’s configuration such as service entries and Destination rules in each cluster to enable the service discovery across clusters.
-
With each cluster having its own control plane, services will get the configuration from their respective control plane. Currently, Istio does not have any way to manage the configurations across the multiple control planes.
Admiral can help you in overcoming these challenges. For one, Admiral can be used in order to have a single global identity for a service, and sync its related Istio’s configuration across the multiple control planes.
Let’s explore how Admiral can help you in managing the multi-cluster service mesh seamlessly.
Overview of Admiral multi-cluster management
Admiral simplifies the configuration of an Istio service mesh that spans multiple clusters, enabling it to function as a single mesh. It facilitates high-level configuration management, automating communication between services across different clusters. Admiral enables the creation of globally unique service names, ensuring consistency and avoiding naming conflicts. Furthermore, it allows the specification of custom service names for explicit environments or regions, providing flexibility in naming conventions based on specific requirements.
Admiral further streamline the management process for cross-cluster services by introducing two custom resources: Dependency and GlobalTrafficPolicy. These resources are utilized to configure ServiceEntries, VirtualServices, and DestinationRules on each cluster that is involved in the cross-cluster communication.
Admiral architecture
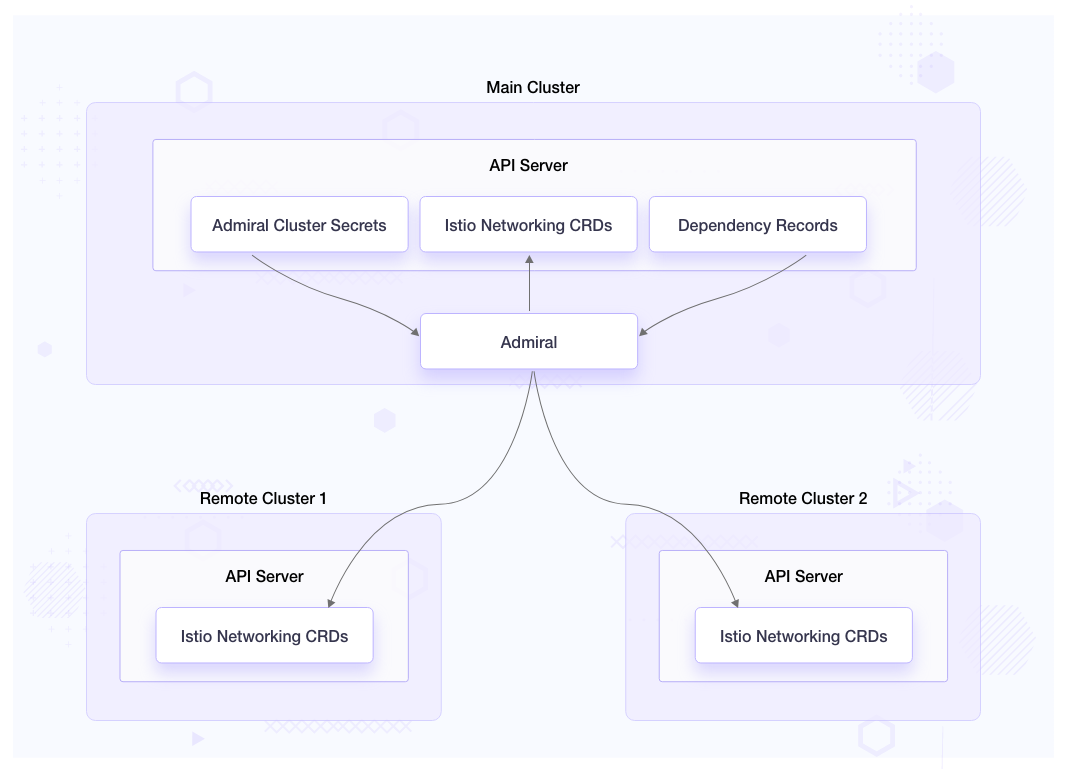
Admiral serves as a controller that monitors Kubernetes clusters where it has access to credentials stored as secret objects within the namespace in which the Admiral is running. It leverages these credentials to talk to API servers of the clusters, and to distribute Istio configuration to each cluster, enabling seamless communication between services.
Admiral’s CRD
Dependency
apiVersion: admiral.io/v1alpha1
kind: Dependency
metadata:
  name: dependency
  namespace: admiral
spec:
  source: service1
  identityLabel: identity
  destinations:
    - service2
The dependency CRD is only created in the cluster where Admiral controller is running. This custom resource tells Admiral to sync Istio’s configuration for the destination services where the source service is running. In the above example, service2’s Istio configuration will be synced to all the clusters where service1 is running. This CRD is optional.
Global traffic policy
apiVersion: admiral.io/v1alpha1
kind: GlobalTrafficPolicy
metadata:
  name: gtp-service-podinfo
  namespace: webapp-eks
  annotations:
    admiral.io/env: stage
  labels:
    identity: backend
spec:
  policy:
    - dnsPrefix: default
      lbType: 1
      target:
        - region: ap-south-1
          weight: 50
        - region: westus
          weight: 50
The Global Traffic Policy can be created in any of the clusters the Admiral is watching over. It works on the identity label to generate a globally unique DNS name for all the services having the matching label.
When dnsPrefix value is default or if it matches the value of admiral.io/env annotation on a deployment, then the service host is generated as - {admiral.io/env}.{identity-label}.global
For the above example it would be - stage.backend.global
If dnsPrefix value is other than default and doesn’t match the value of admiral.io/env annotation on a deployment, then the service host is generated as {dnsPrefix}.{admiral.io/env}.{identity-label}.global
Istio creates service entries to all the clusters with the respective endpoints matching the labels.
The lbType value is to create the locality load balancing setting in Istio Destination rules for routing. Value 0 means Istio’s Locality failover and value 1 means Istio’s Locality weighted distribution.
Managing microservices on different clouds using Istio and Admiral
In the previous section, we learned how Admiral helps Istio in service discovery. Now, let us see how to manage microservices on different clouds using Istio and Admiral. We will start with installing Istio on Kubernetes clusters hosted on AWS and Azure. Then, we will install Admiral on one of the clusters, and register both clusters with Admiral, so Admiral will be able to watch both clusters. Next, we will deploy the podinfo application and then see how we can use Admiral for automatic Istio configuration and service discovery across clusters. Lastly, we will set up multi-cluster monitoring with Prometheus, Grafana, and Kiali.
Pre-requisites
- Two Kubernetes clusters. In this blog, we will be using AWS (EKS) and Azure (AKS) Kubernetes clusters with the cluster’s API server being publicly accessible. To quickly spin up the clusters you can use the respective links - EKS, AKS.
- kubectl
- yq
- GIT
- az cli
- eksctl
- Resources Repository - This repository contains resources that you can use to follow along with this tutorial.
Clone the repository
Clone the resources repository and download the necessary files
git clone https://github.com/infracloudio/istio-admiral.git

cd istio-admiral
# Note: we will be executing all commands from the root of the directory

export REPO_HOME=$PWD

# download the 1.17.2 release of Istio
curl -L https://istio.io/downloadIstio | ISTIO_VERSION=1.17.2 sh -


# rename istio directory for simplicity
mv istio-1.17.2 istio

# Add the istioctl client to your path
echo "export PATH=$PWD/istio/bin:$PATH" >> ~/.bashrc
source ~/.bashrc
Multi-cluster mesh setup
Setup multi-cluster Istio mesh across different cloud environments
1. Generate common CA certificates
In order for both the clusters to be part of a single mesh, we will generate a common root CA, then use the root CA to issue intermediate certificates to the Istio CAs that run in each cluster. By having a common CA, all clusters within the mesh can trust the same CA for issuing and validating certificates.
# certs
mkdir -p $REPO_HOME/certs
cd certs
make -f ../istio/tools/certs/Makefile.selfsigned.mk root-ca
make -f ../istio/tools/certs/Makefile.selfsigned.mk eks-cacerts
make -f ../istio/tools/certs/Makefile.selfsigned.mk aks-cacerts
2. Set respective contexts to the below environment variables
You can use kubectl config get-contexts to get the required contexts of created clusters.
export CTX_EKS=<eks-context>
export CTX_AKS=<aks-context>
3. Create cacerts secret from the generated certificates in istio-system namespace
kubectl --context=${CTX_EKS} create namespace istio-system

kubectl --context=${CTX_EKS} create secret generic cacerts -n istio-system \
--from-file=eks/ca-cert.pem \
--from-file=eks/ca-key.pem \
--from-file=eks/root-cert.pem \
--from-file=eks/cert-chain.pem

kubectl --context=${CTX_AKS} create namespace istio-system

kubectl --context=${CTX_AKS} create secret generic cacerts -n istio-system \
--from-file=aks/ca-cert.pem \
--from-file=aks/ca-key.pem \
--from-file=aks/root-cert.pem \
--from-file=aks/cert-chain.pem
4. Install Istio and configure Gateway on EKS
Follow the below steps to install Istio on the EKS cluster.
cd $REPO_HOME

# add network label to istio-system namespace

kubectl --context="${CTX_EKS}" label namespace istio-system topology.istio.io/network=eks
To install Istio on EKS, we will have the following configuration. In the global values we have provided meshID as mesh1, which will be the same for both clusters as it would be a single mesh. clusterName and network values are set to eks and aks respectively.
With ISTIO_META_DNS_CAPTURE, and ISTIO_META_DNS_AUTO_ALLOCATE values set to true, Istio’s ServiceEntry addresses can be resolved without requiring a custom configuration of a DNS server.
$ cat istio-eks.yaml

apiVersion: install.istio.io/v1alpha1
kind: IstioOperator
spec:
  values:
    global:
      meshID: mesh1
      multiCluster:
        clusterName: eks
      network: eks
  meshConfig:
    defaultConfig:
      proxyMetadata:
        # Enable basic DNS proxying
        ISTIO_META_DNS_CAPTURE: "true"
        # Enable automatic address allocation
        ISTIO_META_DNS_AUTO_ALLOCATE: "true"
# To Install istio we will use istioctl install command.
istioctl install --context="${CTX_EKS}" -f istio-eks.yaml
Press y to proceed after the prompt


This will install the Istio 1.17.2 default profile with ["Istio core" "Istiod" "Ingress gateways"] components into the cluster. Proceed? (y/N) y
✔ Istio core installed
✔ Istiod installed
✔ Ingress gateways installed
✔ Installation complete                                                                                                 Making this installation the default for injection and validation.
# install Istio east-west gateway
istio/samples/multicluster/gen-eastwest-gateway.sh \
    --mesh mesh1 --cluster eks --network eks | \
    istioctl --context="${CTX_EKS}" install -y -f -
Service istio-eastwestgateway should get an external IP.
kubectl --context="${CTX_EKS}" get svc istio-eastwestgateway -n istio-system

NAME                    TYPE           CLUSTER-IP       EXTERNAL-IP                                                                PORT(S)                                                           AGE
istio-eastwestgateway   LoadBalancer   10.100.181.251   a81362f21b84f471eb19689b5510d365-1262659891.ap-south-1.elb.amazonaws.com   15021:30962/TCP,15443:31614/TCP,15012:32334/TCP,15017:30431/TCP   25s
Since the clusters are on different networks, we need to expose all services (*.local and *.global) on the east-west gateway in both clusters. Since the east-west gateway is exposed as a public load balancer, services behind it can only be accessed by services with a trusted mTLS certificate and workload ID, just as if they were on the same network.
$ cat cross-network-gateway.yaml

apiVersion: networking.istio.io/v1alpha3
kind: Gateway
metadata:
  name: cross-network-gateway
spec:
  selector:
    istio: eastwestgateway
  servers:
    - port:
        number: 15443
        name: tls
        protocol: TLS
      tls:
        mode: AUTO_PASSTHROUGH
      hosts:
        - "*.local"
        - "*.global"
Create the cross-network gateway
kubectl --context="${CTX_EKS}" apply -f cross-network-gateway.yaml -n istio-system
Install Istio and configure gateway on AKS
Repeat the similar steps to install Istio on the AKS cluster.
# install on aks
kubectl --context="${CTX_AKS}" label namespace istio-system topology.istio.io/network=aks

istioctl install --context="${CTX_AKS}" -f istio-aks.yaml

istio/samples/multicluster/gen-eastwest-gateway.sh \
    --mesh mesh1 --cluster aks --network aks | \
    istioctl --context="${CTX_AKS}" install -y -f -

kubectl --context="${CTX_AKS}" apply -f cross-network-gateway.yaml -n istio-system
Service istio-eastwestgateway should get an external IP.
kubectl --context="${CTX_AKS}" get svc istio-eastwestgateway -n istio-system

NAME                    TYPE           CLUSTER-IP       EXTERNAL-IP                                                                PORT(S)                                                           AGE
istio-eastwestgateway   LoadBalancer   10.10.81.191   20.245.234.103  15021:30962/TCP,15443:31614/TCP,15012:32334/TCP,15017:30431/TCP   20s
Enable endpoint discovery
We will create remote secrets in both clusters to provide access to the other cluster’s API server. So, each control plane would be able to gather information about service endpoints from the API Server in every cluster. Istio then provides each proxy with a collection of service endpoints to manage traffic within the mesh.
# Install a remote secret in aks that provides access to eks's API server.
istioctl x create-remote-secret \
--context="${CTX_EKS}" \
--name=eks | \
kubectl apply -f - --context="${CTX_AKS}"


# Install a remote secret in eks that provides access to aks's API server.
istioctl x create-remote-secret \
--context="${CTX_AKS}" \
--name=aks | \
kubectl apply -f - --context="${CTX_EKS}"
Setup Admiral
1. Install Admiral CRDs
Create Admiral’s CRDs on EKS and AKS. We will be using EKS as our main cluster i.e where the Admiral controller would be running.
# on EKS
kubectl --context="${CTX_EKS}" apply -f admiral/crds/depencency-crd.yaml
kubectl --context="${CTX_EKS}" apply -f admiral/crds/globaltrafficpolicy-crd.yaml

# on AKS
kubectl --context="${CTX_AKS}" apply -f admiral/crds/globaltrafficpolicy-crd.yaml
2. Create admiral-sync namespace and required role bindings
Create admiral-sync namespace and required role bindings for permission to create Istio’s custom resources. Admiral creates and syncs all the Istio’s custom resources in the admiral-sync namespace.
# on EKS
kubectl --context="${CTX_EKS}" apply -f admiral/admiral-sync.yaml

# on AKS
kubectl --context="${CTX_AKS}" apply -f admiral/admiral-sync.yaml
3. Install Admiral’s control plane on EKS
In Admiral’s deployment manifest, make sure to have this container argument gateway_app with value istio-eastwestgateway, so while creating Istio’s service entry, Admiral will use the east-west gateway.
spec:
  containers:
  - args:
    - --gateway_app
    - istio-eastwestgateway
kubectl --context="${CTX_EKS}" apply -f admiral/install-admiral.yaml
The Admiral control plane should be up and running.
kubectl --context="${CTX_EKS}" get pods -n admiral
NAME                      READY   STATUS    RESTARTS   AGE
admiral-b6c89bc44-bc5rd   1/1     Running   0          32s
4. Register clusters with Admiral
In order to register the clusters with Admiral, we need to provide the cluster’s kubeconfig file as a secret to Admiral. You can create a service account token and add that token to the respective cluster’s kubeconfig file to provide access to the required Kubernetes resources. We should register the cluster where Admiral is running if it has other workloads that require service discovery.
To prepare EKS kubeconfig file with token:
# create secret to generate the token
kubectl --context="${CTX_EKS}" apply -f admiral/admiral-sa-secret.yaml

# get the token
EKS_SA_TOKEN=$(kubectl --context="${CTX_EKS}" get secret admiral-sa-token -o jsonpath='{.data.token}' -n admiral-sync | base64 --decode)

# get the kubeconfig
kubectl --context="${CTX_EKS}" config view --minify --flatten > admiral-eks.yaml

# Add the token to the kubeconfig file
# If you have installed yq can use the below command or you can manually add the token to #the kubeconfig file under .users[0].user
yq eval "del(.users[0].user) | .users[0].user = {\"token\": \"$EKS_SA_TOKEN\"}" -i admiral-eks.yaml
To prepare AKS kubeconfig file with token:
# create secret to generate the token
kubectl --context="${CTX_AKS}" apply -f admiral/admiral-sa-secret.yaml

# get the token
AKS_SA_TOKEN=$(kubectl --context="${CTX_AKS}" get secret admiral-sa-token -o jsonpath='{.data.token}' -n admiral-sync | base64 --decode)

# get the kubeconfig
kubectl --context="${CTX_AKS}" config view --minify --flatten > admiral-aks.yaml

# Add the token to the kubeconfig file
# if you have yq can use the below command
yq eval "del(.users[0].user) | .users[0].user = {\"token\": \"$AKS_SA_TOKEN\"}" -i admiral-aks.yaml
To register remote clusters with Admiral, create a secret with the generated kubeconfig files:
kubectl --context="${CTX_EKS}" create secret generic admiral-eks --from-file admiral-eks.yaml -n admiral

kubectl --context="${CTX_EKS}" create secret generic admiral-aks --from-file admiral-aks.yaml -n admiral

kubectl --context="${CTX_EKS}" label secret admiral-eks admiral/sync=true -n admiral

kubectl --context="${CTX_EKS}" label secret admiral-aks admiral/sync=true -n admiral
Demo with a podinfo application
1. Deploy podinfo application
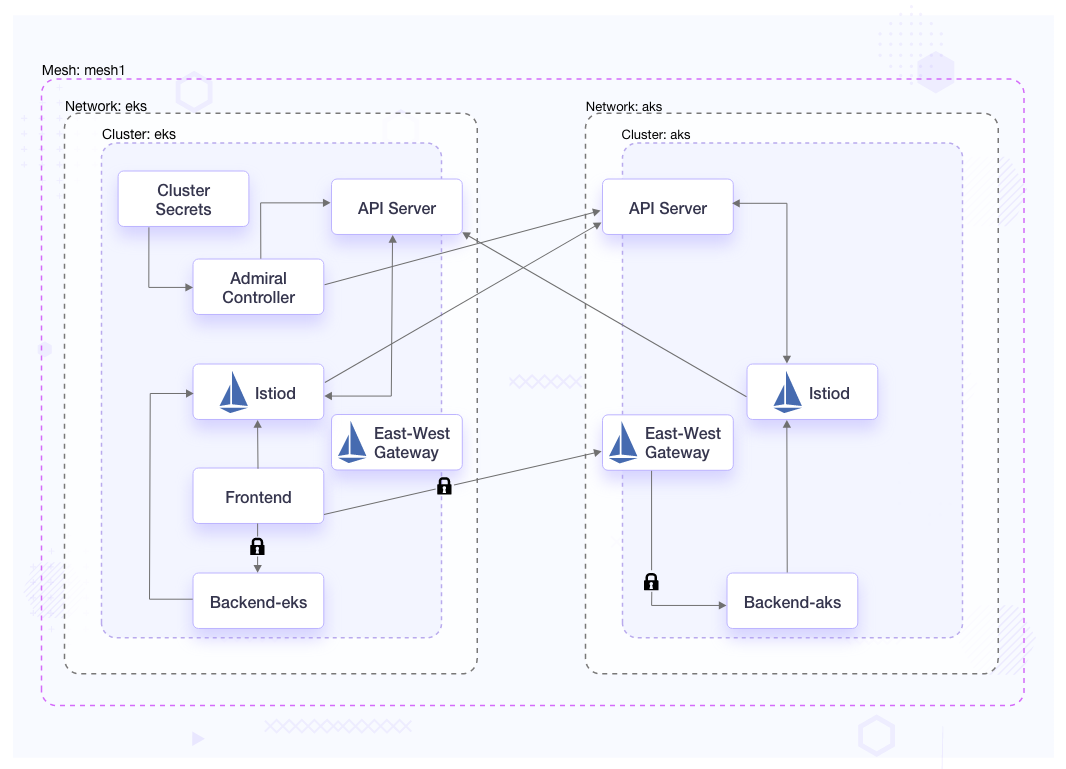
We will deploy frontend on EKS and backend on both the clusters on different namespaces, webapp-eks and webapp-aks respectively. Label both the namespaces with istio-injection: enabled to auto-inject the Istio proxy to the applications. To distinguish between both the backend services, we have named the deployments accordingly: backend-eks and backend-aks.
On the backend deployment, the manifest’s pod template will have the below annotations and labels for Admiral.
annotations:
  admiral.io/env: stage
  sidecar.istio.io/inject: "true"
labels:
   identity: backend
Deploy the podinfo application
kubectl --context="${CTX_EKS}" apply -f app/webapp-eks/common
kubectl --context="${CTX_EKS}" apply -f app/webapp-eks/backend
kubectl --context="${CTX_EKS}" apply -f app/webapp-eks/frontend


kubectl --context="${CTX_AKS}" apply -f app/webapp-aks/common
kubectl --context="${CTX_AKS}" apply -f app/webapp-aks/backend
2. Setup Admiral global traffic policy
Global traffic policy should have the same labels and annotations added to applications. In the below global traffic policy we have the lbType=1 and weight distribution is 50-50 to both regions.
$ cat gtp-podinfo.yaml

apiVersion: admiral.io/v1alpha1
kind: GlobalTrafficPolicy
metadata:
  name: gtp-service-podinfo
  namespace: webapp-eks
  annotations:
    admiral.io/env: stage
  labels:
    identity: backend
spec:
  policy:
    - dnsPrefix: default
      lbType: 1
      target:
        - region: ap-south-1
          weight: 50
        - region: westus
          weight: 50
Create global traffic policy
kubectl --context="${CTX_EKS}" apply -f gtp-podinfo.yaml
Check the service entry and destination rules created as a result.
Service entry created on EKS
kubectl --context="${CTX_EKS}" get serviceentry stage.backend.global-se -n admiral-sync -o yaml

apiVersion: networking.istio.io/v1beta1
kind: ServiceEntry
metadata:
  annotations:
    app.kubernetes.io/created-by: admiral
    associated-gtp: gtp-service-podinfo
  labels:
    admiral.io/env: stage
    identity: backend
  name: stage.backend.global-se
  namespace: admiral-sync
spec:
  addresses:
  - 240.0.10.1
  endpoints:
  - address: backend.webapp-eks.svc.cluster.local
    locality: ap-south-1
    ports:
      http: 9898
  - address: 20.245.234.103
    locality: westus
    ports:
      http: 15443
  hosts:
  - stage.backend.global
  location: MESH_INTERNAL
  ports:
  - name: http
    number: 80
    protocol: http
  resolution: DNS
Service entry created on AKS
kubectl --context="${CTX_AKS}" get serviceentry stage.backend.global-se -n admiral-sync -o yaml

apiVersion: networking.istio.io/v1beta1
kind: ServiceEntry
metadata:
  annotations:
    app.kubernetes.io/created-by: admiral
    associated-gtp: gtp-service-podinfo
  labels:
    admiral.io/env: stage
    identity: backend
  name: stage.backend.global-se
  namespace: admiral-sync
spec:
  addresses:
  - 240.0.10.1
  endpoints:
  - address: backend.webapp-aks.svc.cluster.local
    locality: westus
    ports:
      http: 9898
  - address: a81362f21b84f471eb19689b5510d365-1262659891.ap-south-1.elb.amazonaws.com
    locality: ap-south-1
    ports:
      http: 15443
  hosts:
  - stage.backend.global
  location: MESH_INTERNAL
  ports:
  - name: http
    number: 80
    protocol: http
  resolution: DNS
As we can see that two endpoints have been added to each service entry. One is pointing to local service and another is pointing to the east-west gateway load balancer. So, requests can route to both clusters accordingly. Service will be accessible on stage.backend.global
Destination rule created on EKS
kubectl --context="${CTX_EKS}" get dr stage.backend.global-default-dr -n admiral-sync -o yaml

apiVersion: networking.istio.io/v1beta1
kind: DestinationRule
metadata:
  annotations:
    app.kubernetes.io/created-by: admiral
  name: stage.backend.global-default-dr
  namespace: admiral-sync
spec:
  host: stage.backend.global
  trafficPolicy:
    connectionPool:
      http:
        http2MaxRequests: 1000
        maxRequestsPerConnection: 100
    loadBalancer:
      localityLbSetting:
        distribute:
        - from: ap-south-1/*
          to:
            ap-south-1: 50
            westus: 50
      simple: LEAST_REQUEST
    outlierDetection:
      baseEjectionTime: 300s
      consecutive5xxErrors: 0
      consecutiveGatewayErrors: 50
      interval: 60s
      maxEjectionPercent: 100
    tls:
      mode: ISTIO_MUTUAL
Destination rule created on AKS
kubectl --context="${CTX_AKS}" get dr stage.backend.global-default-dr -n admiral-sync -o yaml

apiVersion: networking.istio.io/v1beta1
kind: DestinationRule
metadata:
  annotations:
    app.kubernetes.io/created-by: admiral
  name: stage.backend.global-default-dr
  namespace: admiral-sync
spec:
  host: stage.backend.global
  trafficPolicy:
    connectionPool:
      http:
        http2MaxRequests: 1000
        maxRequestsPerConnection: 100
    loadBalancer:
      localityLbSetting:
        distribute:
        - from: westus/*
          to:
            ap-south-1: 50
            westus: 50
      simple: LEAST_REQUEST
    outlierDetection:
      baseEjectionTime: 300s
      consecutive5xxErrors: 0
      consecutiveGatewayErrors: 50
      interval: 60s
      maxEjectionPercent: 100
    tls:
      mode: ISTIO_MUTUAL
We can see that the destination rules created have the locality load balancing setting as distributed with 50-50 weight distribution to both regions and TLS mode as ISTIO_MUTUAL enforcing mTLS communication.
3. Test cross cluster communication
Execute the below command to test the cross cluster communication
kubectl --context="${CTX_EKS}" -n webapp-eks exec -it $(kubectl --context="${CTX_EKS}" get pods -l app=frontend -o jsonpath='{.items[*].metadata.name}' -n webapp-eks) -c frontend -- curl http://stage.backend.global
Request should route to backend service in both the clusters
kubectl --context="${CTX_EKS}" -n webapp-eks exec -it $(kubectl --context="${CTX_EKS}" get pods -l app=frontend -o jsonpath='{.items[*].metadata.name}' -n webapp-eks) -c frontend -- curl http://stage.backend.global
{
  "hostname": "backend-eks-6cb98b774f-r2vfl",
  "version": "6.3.6",
  "revision": "073f1ec5aff930bd3411d33534e91cbe23302324",
  "color": "#34577c",
  "logo": "https://raw.githubusercontent.com/stefanprodan/podinfo/gh-pages/cuddle_clap.gif",
  "message": "greetings from podinfo v6.3.6",
  "goos": "linux",
  "goarch": "amd64",
  "runtime": "go1.20.4",
  "num_goroutine": "8",
  "num_cpu": "2"
}

kubectl --context="${CTX_EKS}" -n webapp-eks exec -it $(kubectl --context="${CTX_EKS}" get pods -l app=frontend -o jsonpath='{.items[*].metadata.name}' -n webapp-eks) -c frontend -- curl http://stage.backend.global
{
  "hostname": "backend-aks-58fd55b79c-wzp2n",
  "version": "6.3.6",
  "revision": "073f1ec5aff930bd3411d33534e91cbe23302324",
  "color": "#FFC0CB",
  "logo": "https://raw.githubusercontent.com/stefanprodan/podinfo/gh-pages/cuddle_clap.gif",
  "message": "greetings from podinfo v6.3.6",
  "goos": "linux",
  "goarch": "amd64",
  "runtime": "go1.20.4",
  "num_goroutine": "8",
  "num_cpu": "2"
}
With requests being able to route across clusters in the mesh, we are able to successfully manage podinfo application on different clouds using Istio and Admiral.
Monitoring the multi-cluster setup
Observability plays an important role in service mesh by providing visibility into the behavior and health of the service mesh. Monitoring setups should be centralized to provide a single pane of glass for all your services running across clusters. We will use Prometheus to scrape the metrics from both the clusters, and Grafana and Kiali to visualize those metrics.
To set up the multi-cluster monitoring, follow the below steps:
1. Install Prometheus in the federation
EKS Prometheus will be our primary Prometheus. Additional scrape configuration has been added to the EKS Prometheus configuration to add AKS Prometheus to the federation. We have used a global endpoint for Prometheus that Admiral will create for us after we apply the global traffic policies.
scrape_configs:
    - job_name: 'federate-aks-cluster'
      scrape_interval: 15s
      honor_labels: true
      metrics_path: '/federate'
      params:
        'match[]':
          - '{job="kubernetes-pods"}'
      static_configs:
        - targets:
          - 'aks.prometheus-aks.global'
          labels:
            cluster: 'aks-cluster'
    - job_name: 'federate-local'
      honor_labels: true
      metrics_path: '/federate'
      metric_relabel_configs:
      - replacement: 'eks-cluster'
        target_label: cluster
      kubernetes_sd_configs:
      - role: pod
        namespaces:
          names: ['istio-system']
      params:
        'match[]':
        - '{__name__=~"istio_(.*)"}'
        - '{__name__=~"pilot(.*)"}'
The EKS Prometheus deployment template has label - sidecar.istio.io/inject: “true” to inject the Istio sidecar and label - identity: prometheus-eks, annotations - admiral.io/env: eks, sidecar.istio.io/inject: “true” for Admiral.
The AKS Prometheus deployment template has a label - sidecar.istio.io/inject: “true” to inject the Instio sidecar and label - identity: prometheus-aks, annotations - admiral.io/env: aks, sidecar.istio.io/inject: “true” for Admiral.
Install the Prometheus on EKS and AKS
kubectl --context="${CTX_EKS}" apply -f monitoring/prometheus-eks.yaml
kubectl --context="${CTX_AKS}" apply -f monitoring/prometheus-aks.yaml
2. Create global traffic policy
Create the global traffic policy for both AKS and EKS Prometheus
kubectl --context="${CTX_AKS}" apply -f gtp-prometheus-aks.yaml
kubectl --context="${CTX_EKS}" apply -f gtp-prometheus-eks.yaml
Check the service entry and destination rules created for host aks.prometheus-aks.global in AKS. It only has the endpoint to AKS’s local Prometheus, so all requests will go to this local endpoint on AKS.
kubectl --context="${CTX_AKS}" get se aks.prometheus-aks.global-se -n admiral-sync -o yaml

apiVersion: networking.istio.io/v1beta1
kind: ServiceEntry
metadata:
  annotations:
    app.kubernetes.io/created-by: admiral
    associated-gtp: gtp-service-prometheus
  labels:
    admiral.io/env: aks
    identity: prometheus-aks
  name: aks.prometheus-aks.global-se
  namespace: admiral-sync
spec:
  addresses:
  - 240.0.10.3
  endpoints:
  - address: prometheus.istio-system.svc.cluster.local
    locality: westus
    ports:
      http: 9090
  hosts:
  - aks.prometheus-aks.global
  location: MESH_INTERNAL
  ports:
  - name: http
    number: 80
    protocol: http
  resolution: DNS
There would not be a service entry created for host aks.prometheus-aks.global on EKS as there is no service running with the same labels and annotations. We need the service entry to be created in EKS for host aks.prometheus-aks.global so that EKS Prometheus can access the AKS Prometheus. For that, we will create Admiral’s dependency CRD.
3. Create dependency CRD on EKS
In the Prometheus federation, we have Primary Prometheus running on the EKS cluster. To sync the Istio’s service discovery configuration for the AKS Prometheus added in the federation, we will have EKS Prometheus as the source and AKS Prometheus as the destination.
$ cat dependency-prometheus.yaml

apiVersion: admiral.io/v1alpha1
kind: Dependency
metadata:
  name: dependency
  namespace: admiral
spec:
  source: prometheus-eks
  identityLabel: identity
  destinations:
    - prometheus-aks
Create the dependency CRD
kubectl --context="${CTX_EKS}" apply -f dependency-prometheus.yaml
After creating the dependency CRD, the service entry for host aks.prometheus-aks.global is created in EKS. It has an endpoint to AKS’s east-west gateway load balancer. So, when this host is used within EKS all requests will go to AKS Prometheus via the east-west gateway.
kubectl --context="${CTX_EKS}" get se aks.prometheus-aks.global-se -n admiral-sync -o yaml

apiVersion: networking.istio.io/v1beta1
kind: ServiceEntry
metadata:
  annotations:
    app.kubernetes.io/created-by: admiral
    associated-gtp: gtp-service-prometheus
  labels:
    admiral.io/env: aks
    identity: prometheus-aks
  name: aks.prometheus-aks.global-se
  namespace: admiral-sync
spec:
  addresses:
  - 240.0.10.3
  endpoints:
  - address: 20.245.234.103
    locality: westus
    ports:
      http: 15443
  hosts:
  - aks.prometheus-aks.global
  location: MESH_INTERNAL
  ports:
  - name: http
    number: 80
    protocol: http
  resolution: DNS
4. Install Kiali and Grafana on EKS
The EKS Grafana deployment template has a label - sidecar.istio.io/inject: “true” to inject the Istio sidecar so that Grafana would be able to resolve host eks.prometheus-eks.global, which we have created with the Prometheus EKS global traffic policy in the previous step.
Since by default, the service in the same namespace with the same name gets load balanced to all the clusters where it is running, we needed a service entry that will only route to EKS Prometheus.
Install Grafana and Kiali on EKS
kubectl --context="${CTX_EKS}" apply -f monitoring/grafana-eks.yaml
kubectl --context="${CTX_EKS}" apply -f monitoring/kiali-eks.yaml
5. Visualize graphs and dashboards
To access the Grafana dashboard locally, use the following command
istioctl --context="${CTX_EKS}" dash grafana
Once the Grafana dashboard has opened, navigate to Istio > Istio workload dashboard. You should be able to view the metrics for both clusters. In the Namespace dropdown, both the namespaces should be present, namely webapp-eks and webapp-aks.
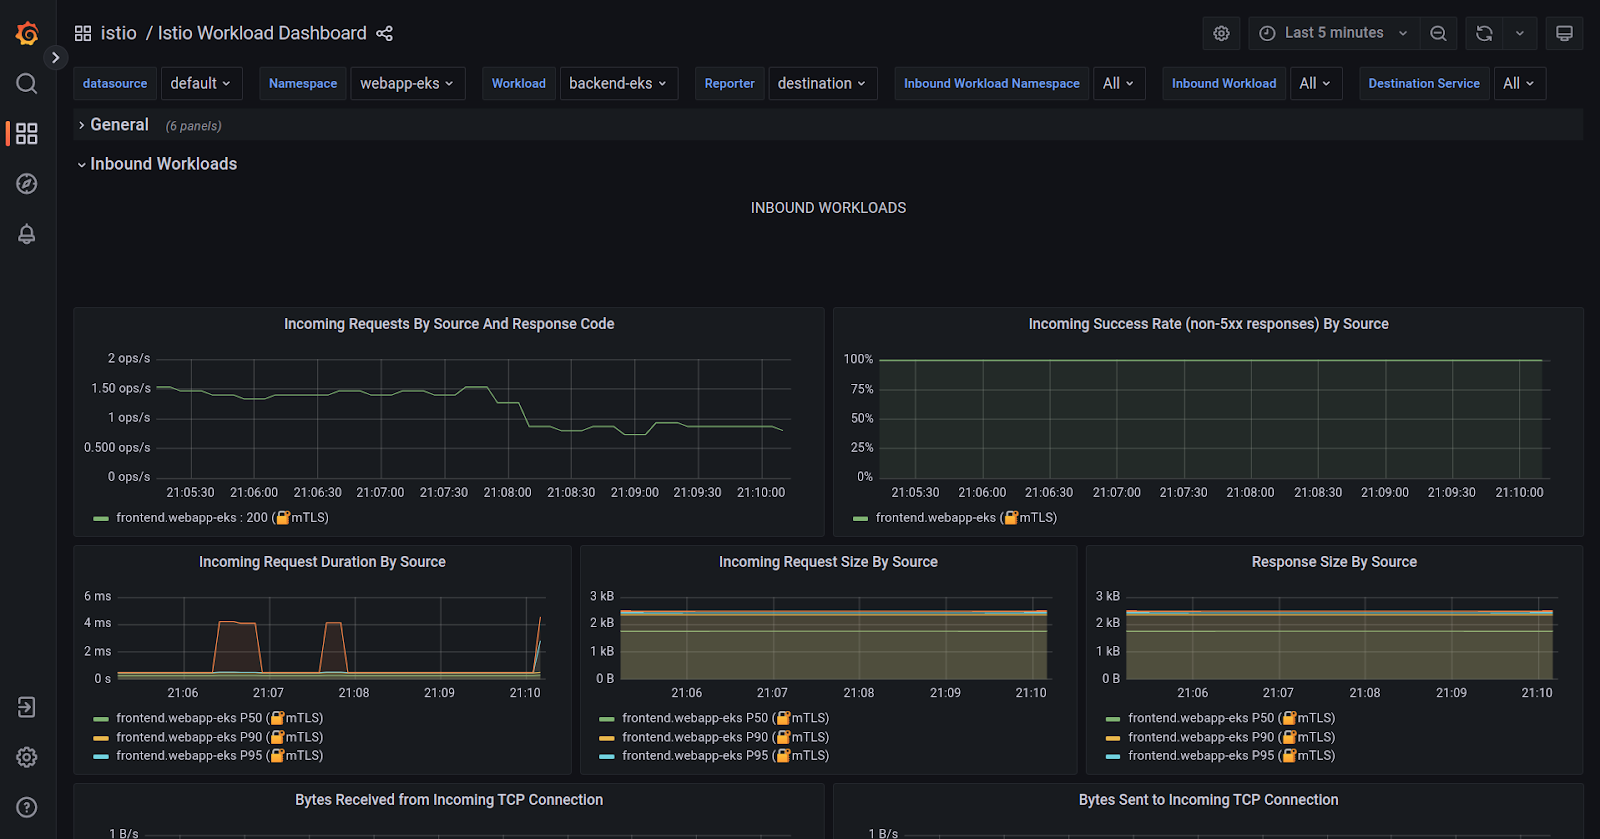
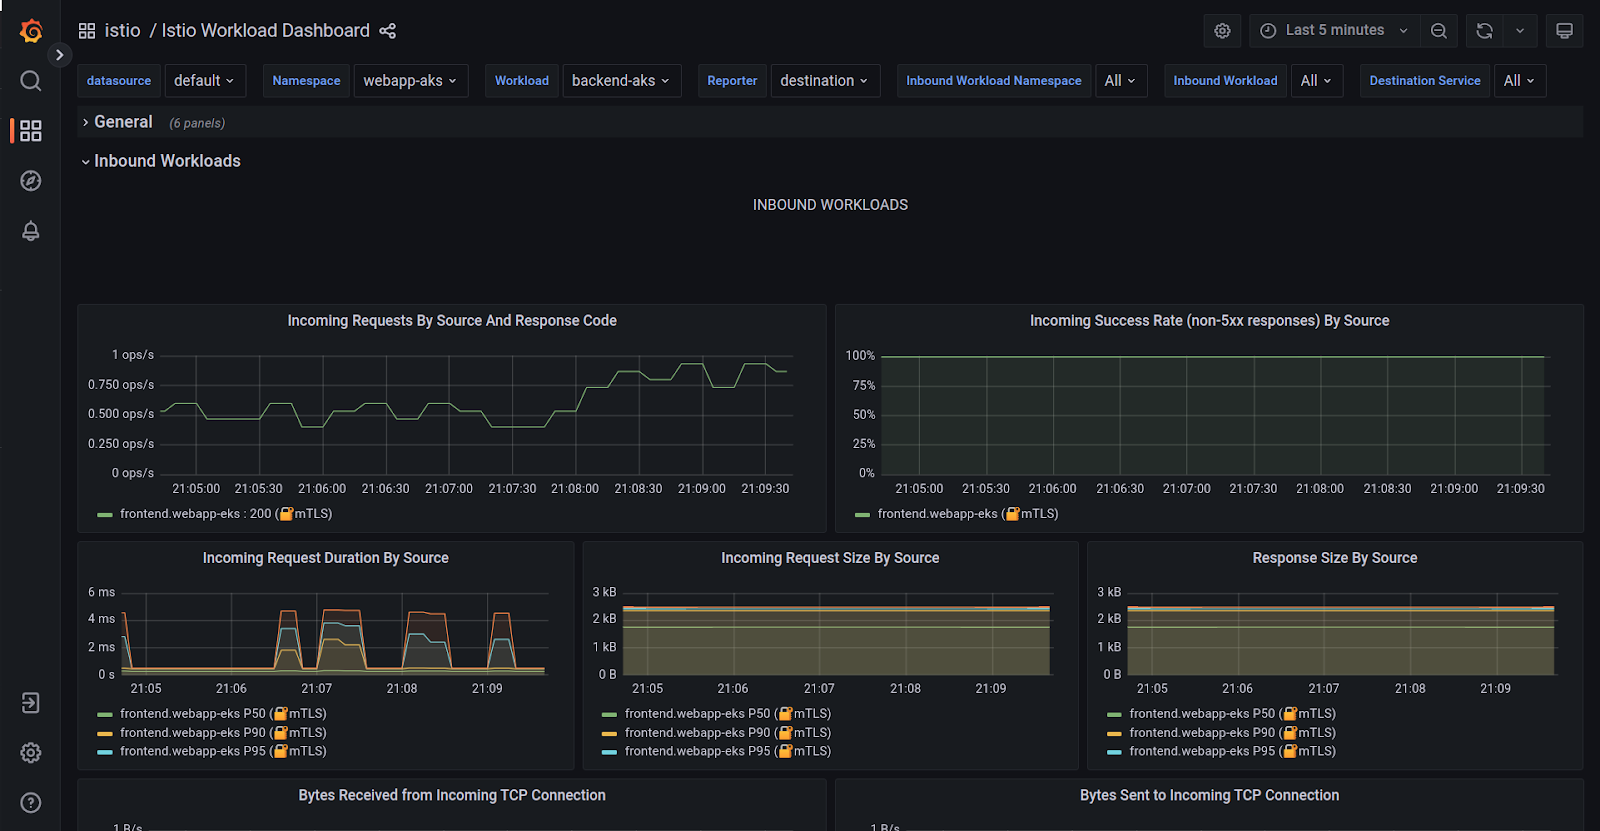
The above graphs show details about various metrics (success rate, request rate, latency, etc.) for service workloads. We can see the frontend service as an Inbound workload for both the backends across clusters.
To access the Kiali dashboard, use the below command:
istioctl --context="${CTX_EKS}" dash kiali
Once the Kiali dashboard is open
- Select Graph from the left pane.
- Select webapp-eks from the Namespace dropdown.
You should be able to see the traffic flow from frontend in webapp-eks namespace to backend in the same namespace and to webapp-aks namespace in another cluster.
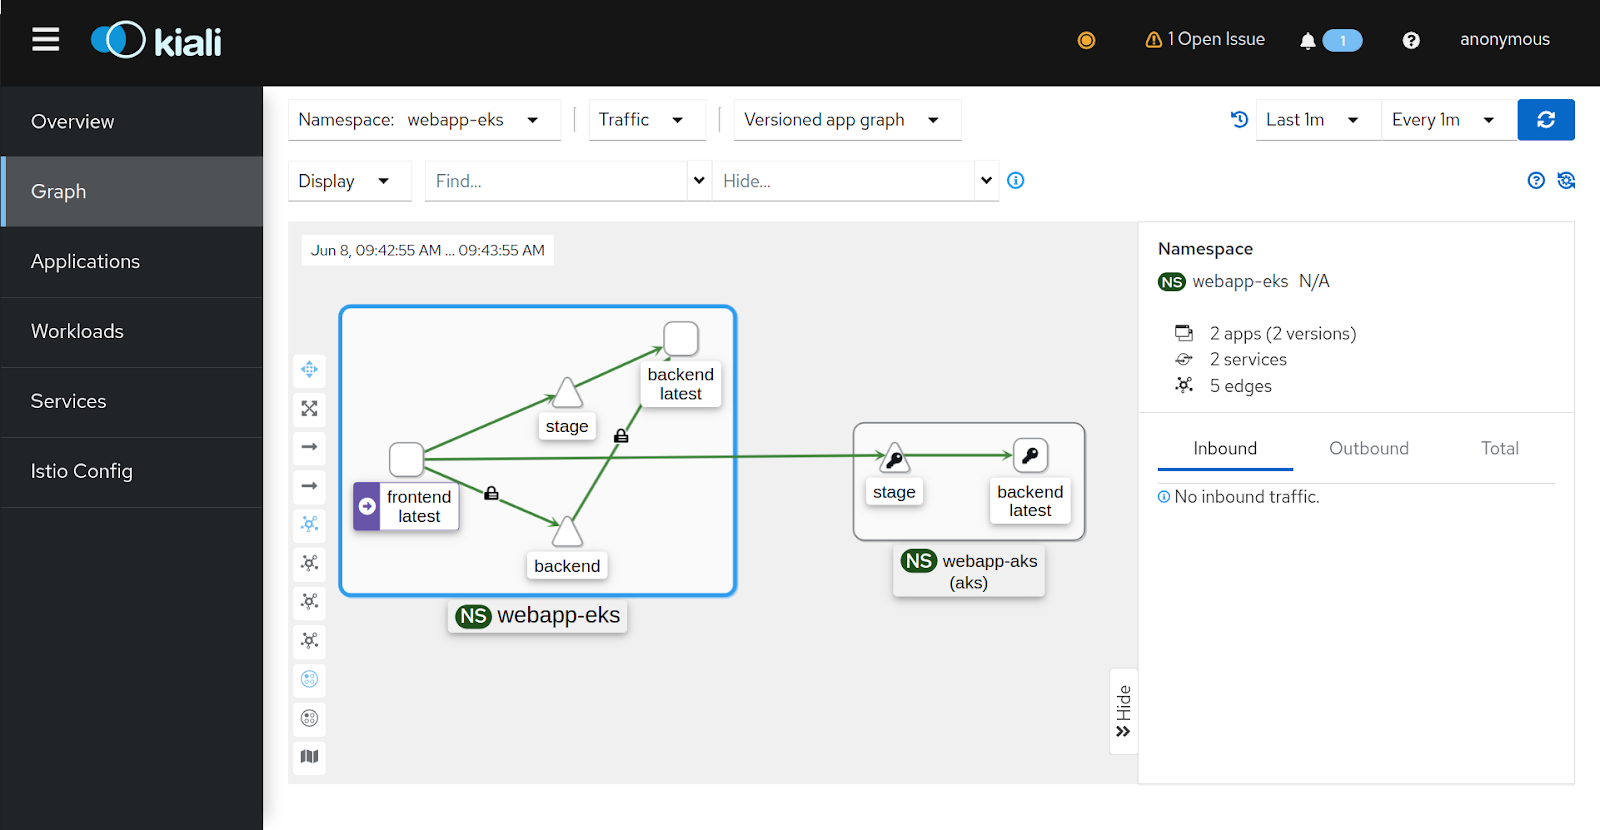
Note: if you don’t see the lock (mTLS) icon on the traffic, make sure that the security option is enabled from the Display dropdown.
Conclusion
In this blog post, we covered the importance of a multi-cluster setup, different Istio deployment models, and the advantages of the multi-primary deployment model on different networks. We discussed the challenges associated with multi-primary and how Admiral simplifies multi-cluster Istio configuration management.
Furthermore, we explored the architecture of Admiral, including its CRDs like dependency and global traffic policy, and showcased a demo on managing microservices on different clouds using Istio and Admiral.
Lastly, we successfully set up observability using Prometheus federation, and used Grafana, and Kiali to visualize application traffic flow, enabling efficient monitoring and troubleshooting in a multi-cluster environment.
While the blog post showed how easy it is to leverage Admiral with Istio for automatic configuration and service discovery. In real-world scenarios with hundreds of services, clusters, and users, things could be complex. Our experienced Istio consulting experts can provide valuable assistance. Our Istio support team specializes in configuring Istio for large-scale production deployments and excels at resolving emergency conflicts.
For more assistance please feel free to reach out and start a conversation with Nishant Barola, and Dada Gore who have jointly written this detailed blog post.
References
Stay updated with latest in AI and Cloud Native tech
We hate 😖 spam as much as you do! You're in a safe company.
Only delivering solid AI & cloud native content.


