
Virtual Clusters for Kubernetes

If you speak to teams or organizations running Kubernetes in production, one of the complaints you’ll often hear is how difficult multi-tenancy is. Organizations follow two approaches to share Kubernetes clusters with multiple tenants (multiple teams or people).
Those two approaches are:
- Namespace-based multi-tenancy
- Cluster-based multi-tenancy
Namespace-based multi-tenancy:
In namespace-based multi-tenancy, each team or tenant is restricted to a single namespace or a specific set of namespaces. The administrator is responsible for restricting access through RBAC. Once the team/tenant gains permissions they will be deploying their applications (pods) to these sets of namespaces. Though it appears simple and flawless, here are some of the drawbacks of this approach:
- Tenants will only have access to namespace-based resources, which means they don’t have access to global objects like CRDs (Custom Resource definitions).
- Applications deployed to one namespace need to connect to services deployed in other namespaces. So administrators need to enable communication between these namespaces using network policies. When more teams/tenants are added to the cluster, this task becomes complex for the administrator.
Cluster-based multi-tenancy:
In cluster-based multi-tenancy, each tenant/team gets its own dedicated Kubernetes cluster. So the number of Kubernetes clusters that will be provisioned is directly proportional to the number of teams/tenants. Although better isolation is achieved in this model, this approach also includes some drawbacks. Drawbacks are listed below.
- Provisioning individual clusters for each team involves a lot of cost as it involves a lot of computational resources.
- Very difficult to manage multiple Kubernetes clusters.
Since both approaches have their own limitations, organizations choose one of these models based on their use case and budget. Despite all the features, both the multi-tenancy approaches come with certain drawbacks. There is a new concept named “Virtual clusters,” which helps in achieving better isolation and addressing multi tenant issues. In this blog post, we will talk about virtual clusters and solutions that implement them and explore a few common scenarios using those solutions.
What is a virtual cluster?
Virtual cluster is a Kubernetes cluster that is created/runs on top of an existing Kubernetes cluster. It runs inside the underlying cluster’s regular namespaces. Every tenant can get one or multiple virtual clusters assigned to them. They have admin access on those virtual clusters and limited access outside of the virtual cluster.
Tenants have full control over virtual clusters. They will have admin-level privileges on virtual clusters, which means they can do anything within virtual clusters without impacting other teams or tenant on underlying shared/base Kubernetes clusters.
Solutions for implementing virtual clusters
Kamaji
Kamaji is a Kubernetes control manager made by Clastix labs. Using Kamaji we can turn any Kubernetes cluster into a Management cluster. This Management cluster can orchestrate other Kubernetes clusters called “Tenant clusters”. Kamaji manages the control plane components of tenant clusters, and these control plane components run as pods inside the Management cluster. Tenant cluster worker nodes can be anything (VMS, Baremetal) that can run anywhere (cloud or on-premises) and connect to the tenant control plane running on the Management cluster. Since tenant control plane components run inside pods they are cheaper, and easy to deploy and operate.
vCluster
vCluster is a product of Loft Labs. This project is open source and helps in creating Virtual clusters. Virtual clusters are dedicated Kubernetes clusters that are created on top of existing Kubernetes clusters (which are referred to as host or base Kubernetes clusters). These virtual clusters are created inside underlying base/host cluster namespaces.
The administrator is responsible for creating virtual clusters and handing over the kube config files of those virtual clusters to each team/tenant. If the organization is already implementing namespace-based isolation then teams/tenants can provision virtual clusters on their own in their own namespace (namespace on to which they are restricted).
The main difference between Vcluster and Kamaji is that Kamaji uses separate worker nodes or node pools to schedule the workloads (pods/apps), whereas Vcluster uses the same underlying host cluster/base cluster worker nodes for scheduling apps.
In this article, we will explore vCluster and use it to set up virtual clusters.
How does vCluster work?
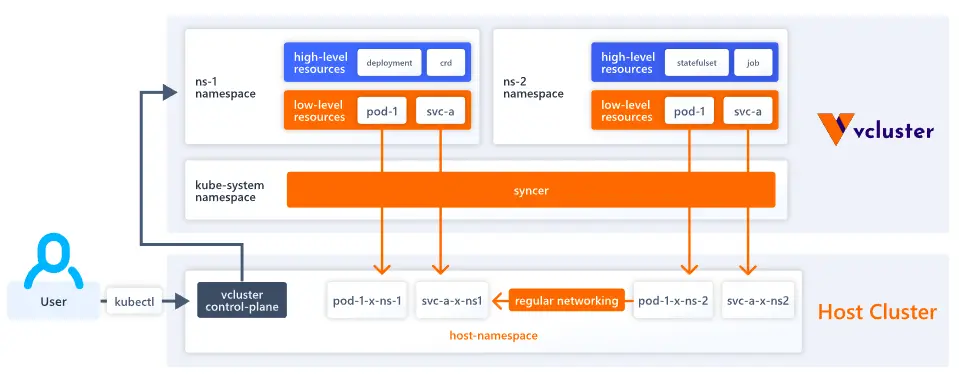
Virtual cluster runs as a statefulset pod inside the host cluster namespace. This statefulset pod includes all control plane components (APIserver, Controller manager etc..). All the user requests will be sent to Virtual cluster API Sever (which is running inside statefulset pod). Hence, virtual cluster API requests are completely isolated from underlying host cluster API requests. Every virtual cluster maintains its own datastore, which is different from the host cluster datastore(for ex: etcd). Every object that is created inside a virtual cluster will be stored in its own datastore (instead of storing it on the host cluster datastore). All these features make a virtual cluster a dedicated Kubernetes cluster, which provides a lot of advantages to tenants.
- Every tenant gets their own virtual cluster, which they can administrate and use as they please.
- Virtual clusters are very easy and quick to provision because they are lightweight.
vCluster architecture
By default, the vCluster runs as a single pod (scheduled by a StatefulSet) that consists of 2 containers:
Control plane: This container includes an API server, Controller manager, and Datastore. By default, K3s distro is used for the API server & controller manager. SQLite is used as a datastore, but it can be replaced with etcd, MySQL, or Postgres. Similarly, K3s distribution can be replaced with K0s or Kubernetes. By default, the host cluster scheduler is used to schedule workloads. However, we can enable a separate scheduler for the virtual cluster while provisioning it.
Syncer: Virtual clusters don’t have dedicated worker nodes. They leverage the underlying host cluster worker nodes for scheduling. But for this to happen, syncer component copies the pod created inside the virtual cluster to the host cluster. Then, the host cluster scheduler picks up the copied pod and schedules it onto the worker node.
Components of vCluster control plane
When the virtual cluster is provisioned under the hood, a statefulset pod is created. This statefulset pod includes all control plane components.
- APISever: Every virtual cluster gets its own API Server. All kubectl requests will be pointed to the virtual cluster API server.
- Data store: By default, the virtual cluster state is stored inside SQLite. However, SQLite can be replaced with etcd, Postgres, etc.
- Controller Manager: This ensures the desired number of replicas is always maintained.
- Scheduler: By default, this is disabled, which means the underlying host or base Kubernetes cluster’s scheduler is used to schedule virtual cluster workloads. We can enable this while provisioning the Virtual cluster.
Host Cluster & Namespace
The Host Cluster is the Kubernetes cluster that provides the underlying infrastructure for one or more virtual clusters. A Host Namespace is the specific namespace within the host cluster where a virtual cluster is created. The virtual cluster operates as a StatefulSet pod within this Host Namespace, leveraging the resources of the host cluster while ensuring logical separation and management of workloads.
In the next sections of the blog post, we will also explore how existing Kubernetes features (existing ingress controller, storage class on host clusters) can be reused in vCluster.
Use cases of vCluster
vCluster can be used in the following use cases, inspired from opensource.com:
CI/CD & testing
CI/CD is a popular use case for virtual clusters. CI pipelines (Jenkins pipeline or GitLab pipeline) may need to provision the infrastructure (for ex: Kubernetes) to run test suites. Provisioning Kubernetes clusters generally involves a lot of time. You could have noticed this while provisioning managed cloud Kubernetes solutions like AWS EKS. On the other hand, provisioning a virtual cluster is very quick since it uses K3s distribution and runs as a regular pod inside the host cluster namespace. So, provisioning hardly takes a couple of seconds. Hence, pipelines can leverage this solution, i.e., provisioning virtual clusters and running the test suites against them.
Development environments
Generally, developers create local K8s setups (using Minikube, kind, microk8s, etc) for their development work. This works fine. However, they have to spend some time setting up these solutions. Besides, these solutions require a lot of computational resources. So, instead of wasting time and computational resources, we can create virtual Kubernetes clusters on top of shared dev clusters (every organization maintains one). Since provisioning virtual clusters is very quick, administrators can create these on the fly and can tear them down when not needed. This helps in improving developer cycle time and productivity.
AI/ML experiments
Virtual clusters can be provisioned within seconds. Hence they are ideal use case for testing AI/ML experiments. Once AI/ML experiments are tested, virtual clusters can be teardown easily. This way cost can be minimized.
Testing different Kubernetes versions
Provisioning virtual clusters is quick because, by default, it uses K3s distribution, which is very lightweight. We can use K0s or Kubernetes distributions instead of the default K3s distribution. While provisioning the virtual cluster, we can supply options for the distribution (K3s, k0s, K8s) & version of the cluster (1.27, 1.28, etc). This helps in a lot of scenarios:
- Applications can be tested against different versions of Kubernetes.
- If any operator is developed, it can be tested against different K8s distributions & different K8s versions.
Steps to create your virtual cluster
Create Kubernetes cluster
To create virtual clusters, we should have a base cluster. This base cluster (or host cluster) can be a remote cluster on AWS EKS, Azure AKS, Google GKE, etc., or a local cluster on Minikube, or kind cluster, etc.
For this demonstration, let’s try to create a kind (Kubernetes in Docker) cluster. The following are the prerequisites for creating a kind cluster.
Create a file named cluster.yaml with the below content.
---
kind: Cluster
apiVersion: kind.x-k8s.io/v1alpha4
name: demo
nodes:
- role: control-plane
  image: kindest/node:v1.25.3@sha256:f52781bc0d7a19fb6c405c2af83abfeb311f130707a0e219175677e366cc45d1
- role: worker
  image: kindest/node:v1.25.3@sha256:f52781bc0d7a19fb6c405c2af83abfeb311f130707a0e219175677e366cc45d1
- role: worker
  image: kindest/node:v1.25.3@sha256:f52781bc0d7a19fb6c405c2af83abfeb311f130707a0e219175677e366cc45d1
Above mentioned YAML contains the cluster specifications (in this case, it is 1 master & 2 worker nodes). Execute the below command to create the cluster.
kind create cluster --config cluster.yaml
The output of the previous command should look as follows.
Creating cluster "demo" ...
 ✓ Ensuring node image (kindest/node:v1.25.3) 🖼
 ✓ Preparing nodes 📦 📦 📦
 ✓ Writing configuration 📜
 ✓ Starting control-plane 🕹️
 ✓ Installing CNI 🔌
 ✓ Installing StorageClass 💾
 ✓ Joining worker nodes 🚜
Set kubectl context to "kind-demo"
You can now use your cluster with:

kubectl cluster-info --context kind-demo

Not sure what to do next? 😅  Check out https://kind.sigs.k8s.io/docs/user/quick-start/
Now, let’s switch the context to the new cluster using the below command.
kubectl cluster-info --context kind-demo
Install vCluster CLI
Execute the below command to install vCluster CLI.
curl -L -o vcluster "https://github.com/loft-sh/vcluster/releases/download/v0.15.0/vcluster-linux-amd64" && sudo install -c -m 0755 vcluster /usr/local/bin && rm -f vcluster
Note: The above command will be used for Linux systems with AMD64. If you are using a different OS, then refer to these instructions to install CLI.
You can verify whether vCluster CLI is installed by using the following command.
vcluster --version
The output of the previous command looks as follows.
$vcluster --version

vcluster version 0.15.0
Create virtual clusters
Execute the below command to create a virtual cluster with the name testcluster in demo namespace.
vcluster create testcluster --namespace demo --connect=false
The output of the previous command should look as follows.
warn   There is a newer version of vcluster: v0.15.2. Run `vcluster upgrade` to upgrade to the newest version.

info   Creating namespace demo
info   failed to find IPv6 service CIDR: couldn't find host cluster Service CIDR ("Service "" is invalid: spec.clusterIPs[0]: Invalid value: []string{"2001:DB8::1"}: IPv6 is not configured on this cluster")
info   Detected local kubernetes cluster kind. Will deploy vcluster with a NodePort & sync real nodes
info   Create vcluster testcluster...
info   execute command: helm upgrade testcluster /tmp/vcluster-0.15.0.tgz-3390147506 --kubeconfig /tmp/2639221004 --namespace demo --install --repository-config='' --values /tmp/994102761
done √ Successfully created virtual cluster testcluster in namespace demo.
- Use 'vcluster connect testcluster --namespace demo' to access the virtual cluster
A virtual cluster with name testcluster has been created in the demo namespace. Execute the below command to view the control plane & CoreDNS of the newly created virtual cluster.
kubectl get pods -n demo
NAME                                                   READY   STATUS    RESTARTS   AGE
coredns-56d44fc4b4-hvchv-x-kube-system-x-testcluster   1/1     Running   0          58s
testcluster-0                                          2/2     Running   0          100s
Virtual cluster named testcluster control plane is running as part of StatefulSet pod testcluster-0 (shown above). This StatefulSet pod contains 2 containers.
- 1st container is responsible for running
control plane components - 2nd container is
syncer
Connect to virtual cluster
Execute the below command to connect to the newly created virtual cluster (testcluster).
vcluster connect testcluster -n demo
The output of the previous command should look as follows.
info   Starting proxy container...
done √ Switched active kube context to vcluster_testcluster_demo_kind-demo
- Use `vcluster disconnect` to return to your previous kube context
- Use `kubectl get namespaces` to access the vcluster
Now, you are on the virtual cluster. Let’s test a few commands.
kubectl get nodes
kubectl get pods -A
kubectl get ns
The output of the previous command should look as follows.
$ kubectl get nodes
NAME          STATUS   ROLES    AGE     VERSION
demo-worker   Ready    <none>   5m16s   v1.25.3
$ kubectl get pods -A
NAMESPACE     NAME                       READY   STATUS    RESTARTS   AGE
kube-system   coredns-56d44fc4b4-hvchv   1/1     Running   0          5m20s
$ kubectl get ns
NAME              STATUS   AGE
default           Active   5m39s
kube-system       Active   5m39s
kube-public       Active   5m39s
kube-node-lease   Active   5m39s
Note: As you can see from the above screenshot, there is only one pod running in virtual cluster i.e CoreDNS pod. CoreDNS pod is synchronized to hostcluster namespace (i.e demo namespace).
Let’s create a sample deployment using the below command.
kubectl create deployment frontend --image nginx --replicas 3

kubectl get pods -A
The output of the previous command should look as follows.
NAMESPACE     NAME                        READY   STATUS    RESTARTS   AGE
kube-system   coredns-56d44fc4b4-hvchv    1/1     Running   0          7m11s
default       frontend-7f9649877f-mrckw   1/1     Running   0          38s
default       frontend-7f9649877f-zc8j2   1/1     Running   0          38s
default       frontend-7f9649877f-6r9p7   1/1     Running   0          38s
Virtual cluster leverages the underlying host cluster worker nodes to schedule pods. So, the pods created above are synchronized to host cluster worker nodes. This synchronization is done by syncer component (explained in architecture). By default, the virtual cluster uses the host cluster scheduler.
Note: Only lower-level resources (pods) are synchronized to host cluster nodes. Higher-level resources (deployments, statefulsets) are not synchronized to host cluster nodes. Find out more information about which resources will be synchronized by default.
Let’s return to the host cluster and verify whether the pods are synchronized or not. Execute the below command to switch back to the host cluster.
vcluster disconnect
Now you are on the host cluster (in this case, kind cluster). Execute the below command to view the synchronized pods.
kubectl get pods -n demo
The output of the previous command should look as follows.
NAME                                                   READY   STATUS    RESTARTS   AGE
coredns-56d44fc4b4-hvchv-x-kube-system-x-testcluster   1/1     Running   0          8m17s
frontend-7f9649877f-6r9p7-x-default-x-testcluster      1/1     Running   0          104s
frontend-7f9649877f-mrckw-x-default-x-testcluster      1/1     Running   0          104s
frontend-7f9649877f-zc8j2-x-default-x-testcluster      1/1     Running   0          104s
testcluster-0                                          2/2     Running   0          8m59s
Note: As you can observe from the above screenshot, pods are synchronized. The synchronized pods are renamed by including the namespace & virtual cluster name in them. So this way, pods are synchronized to the same namespace where the virtual cluster is installed.
Delete virtual clusters
Execute the below command to delete the virtual cluster.
vcluster delete testcluster -n demo
Exploring a few common scenarios using vCluster
As we introduce multiple virtual clusters on top of the existing Kubernetes cluster, it’s important to know how the existing Kubernetes features can be implemented across virtual clusters.
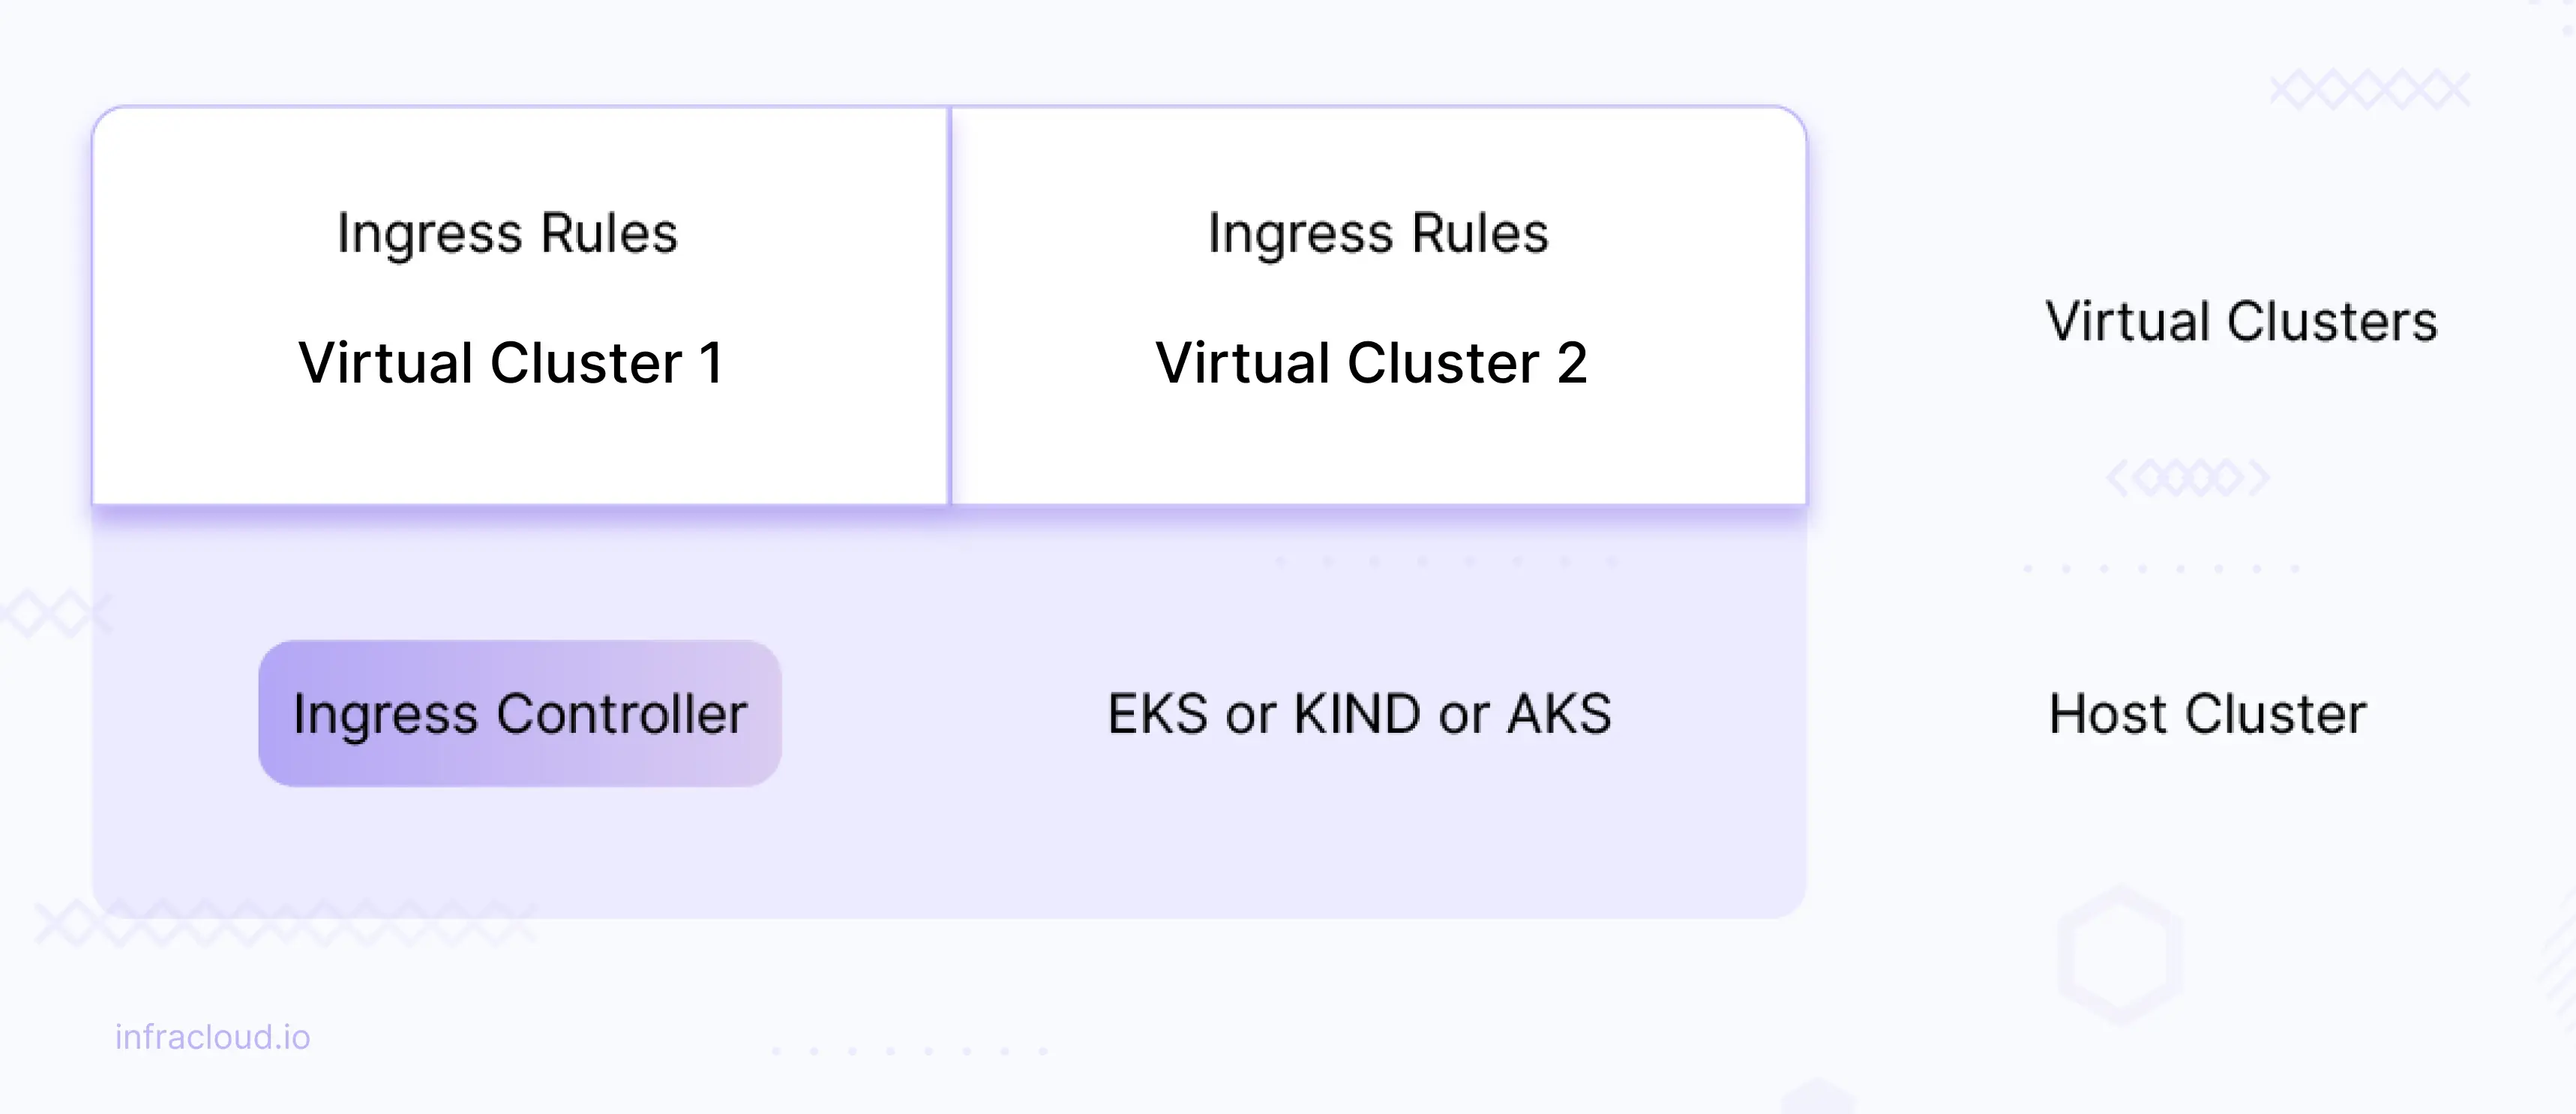
Reusing the host cluster ingress controller across virtual clusters
If there is an ingress controller (nginx or any other ingress) deployed on the host cluster, then we can reuse the same host ingress controller across the virtual cluster. This means you don’t need to explicitly install the ingress controller in each virtual cluster.
In this section, we are going to install a load balancer on the host cluster and reuse it across the virtual clusters. Let’s install MetalLB load balancing solution using the following commands.
kubectl apply -f https://raw.githubusercontent.com/metallb/metallb/v0.13.7/config/manifests/metallb-native.yaml
Note: This MetalLB load balancing is required only if you are using kind or other local development cluster setups. This is not required if you are using cloud provider’s managed Kubernetes solution.
Wait until the MetalLB pods (controller and speakers) are ready:
kubectl get pods -n metallb-system
To complete layer2 (metallb works in layer2 configuration) configuration, we need to provide MetalLB with a range of IP addresses it controls. We want this range to be on the Docker kind network.
docker network inspect -f '{{ .IPAM.Config }}' kind
The output of the previous command should look as follows.
[{172.18.0.0/16 172.18.0.1 map[]} {fc00:f853:ccd:e793::/64 fc00:f853:ccd:e793::1 map[]}]
In this case, the output will contain a CIDR such as 172.18.0.0/16. We want our load balancer IP range to come from this subclass. In the next, step we configure MetalLB, for instance, to use 172.18.255.200 to 172.18.255.250 by creating the IPAddressPool and the related L2 Advertisement.
Create a file named metallb-config.yaml with the below content.
---
apiVersion: metallb.io/v1beta1
kind: IPAddressPool
metadata:
  name: example
  namespace: metallb-system
spec:
  addresses:
  - 172.18.255.200-172.18.255.250
---
apiVersion: metallb.io/v1beta1
kind: L2Advertisement
metadata:
  name: empty
  namespace: metallb-system
Apply the above manifest file.
kubectl apply -f metallb-config.yaml
Note: Adjust the addresspool as per your network CIDR.
Let’s install nginx ingress controller on the host cluster (in this case kind cluster).
kubectl apply -f https://raw.githubusercontent.com/kubernetes/ingress-nginx/controller-v1.7.0/deploy/static/provider/cloud/deploy.yaml
Wait until ingress controller pod goes into a running state.
kubectl get pods -n ingress-nginx
kubectl get svc -n ingress-nginx
The output of the previous command should look as follows.
$ kubectl get pods -n ingress-nginx
NAME                                        READY   STATUS      RESTARTS   AGE
ingress-nginx-admission-create-995f6        0/1     Completed   0          7m11s
ingress-nginx-admission-patch-hjwqm         0/1     Completed   2          7m11s
ingress-nginx-controller-7d9674b7cf-vh6d5   1/1     Running     0          7m11s
$ kubectl get svc -n ingress-nginx
NAME                                 TYPE           CLUSTER-IP     EXTERNAL-IP      PORT(S)                      AGE
ingress-nginx-controller             LoadBalancer   10.96.106.2    172.18.255.200   80:30596/TCP,443:31865/TCP   7m17s
ingress-nginx-controller-admission   ClusterIP      10.96.241.18   <none>           443/TCP                      7m17s
Let’s create a file named ingress-values.yaml with the content below.
sync:
  ingresses:
    enabled: true
Execute the below command to create a virtual cluster named ingress-demo in the demo namespace.
vcluster create ingress-demo -n demo --create-namespace -f ingress-values.yaml --connect=false
Wait until virtual cluster pods go into running state (both CoreDNS & control plane pod).
kubectl get pods -n demo
NAME                                                    READY   STATUS    RESTARTS   AGE
coredns-56d44fc4b4-jqd6z-x-kube-system-x-ingress-demo   1/1     Running   0          8s
ingress-demo-0                                          2/2     Running   0          69s
Now, let’s connect to the virtual cluster, install the sample app (deployment), and define ingress rules.
Execute the below command to connect to vCluster, deploy a sample application, and expose it as ClusterIP service.
# connecting to virtual cluster

vcluster connect ingress-demo

# creating deployment

kubectl create deployment frontend --image purushothamkdr453/frontend --replicas 3

# creating service

kubectl expose deployment/frontend --type ClusterIP --name frontend --port 80
Now, let’s create an ingress rule. Create a file named ingress.yaml with the below content.
---
apiVersion: networking.k8s.io/v1
kind: Ingress
metadata:
  name: frontend
spec:
  ingressClassName: nginx
  rules:
  - host: "frontend.example.com"
    http:
      paths:
      - path: /
        pathType: Prefix
        backend:
          service:
            name: frontend
            port:
              number: 80
Let’s apply the above ingress rule.
kubectl apply -f ingress.yaml
Now let’s disconnect from virtual cluster and grab the ingress controller loadbalancer IP.
# Disconnect from virtual cluster

vcluster disconnect

# Grab the ip of nginx ingress

export INGRESS_IP=$(kubectl get svc -n ingress-nginx | grep -v 'NAME' | grep -i 'loadbalancer' | awk '{print $4}')

# Test the application using below commands

curl frontend.example.com/frontend/ --resolve "frontend.example.com:80:$INGRESS_IP"

curl frontend.example.com --resolve "frontend.example.com:80:$INGRESS_IP"
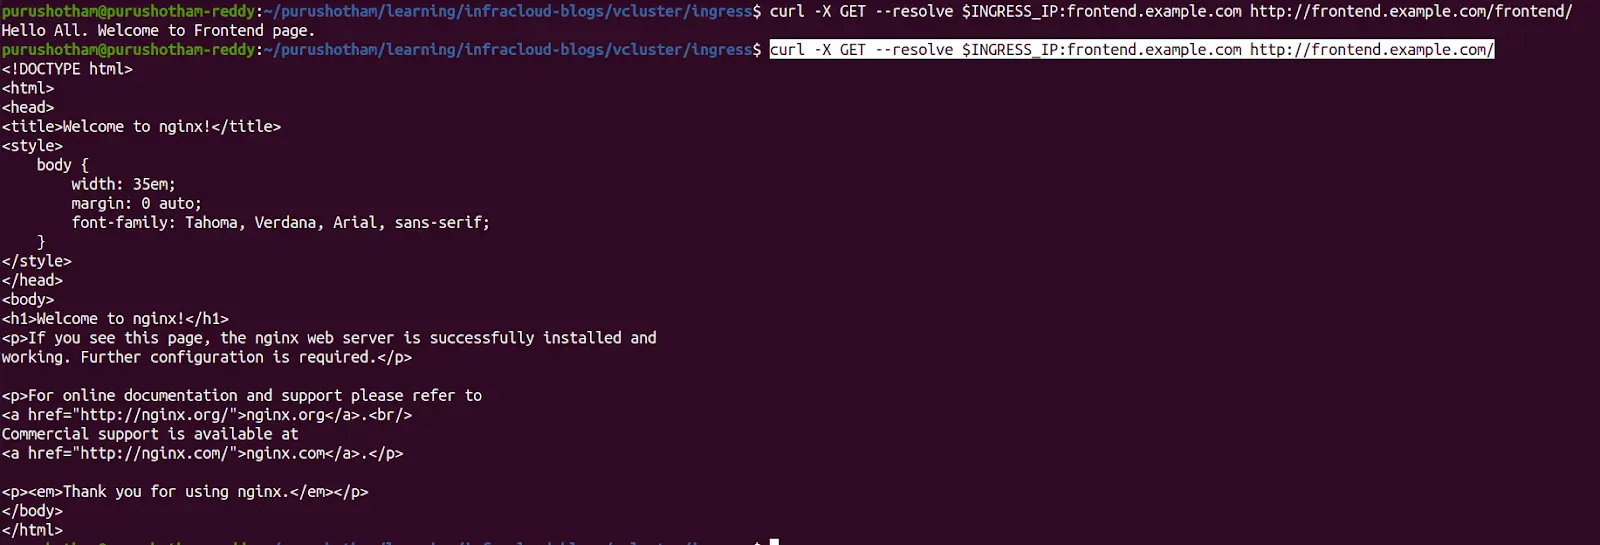
As you can notice from the above screenshot, the application that is running on a virtual Kubernetes cluster is accessible via the ingress controller running on the host cluster. This way, you can reuse the ingress controller across virtual Kubernetes clusters.
Now, let’s delete the virtual cluster created. Execute the below command.
vcluster delete ingress-demo
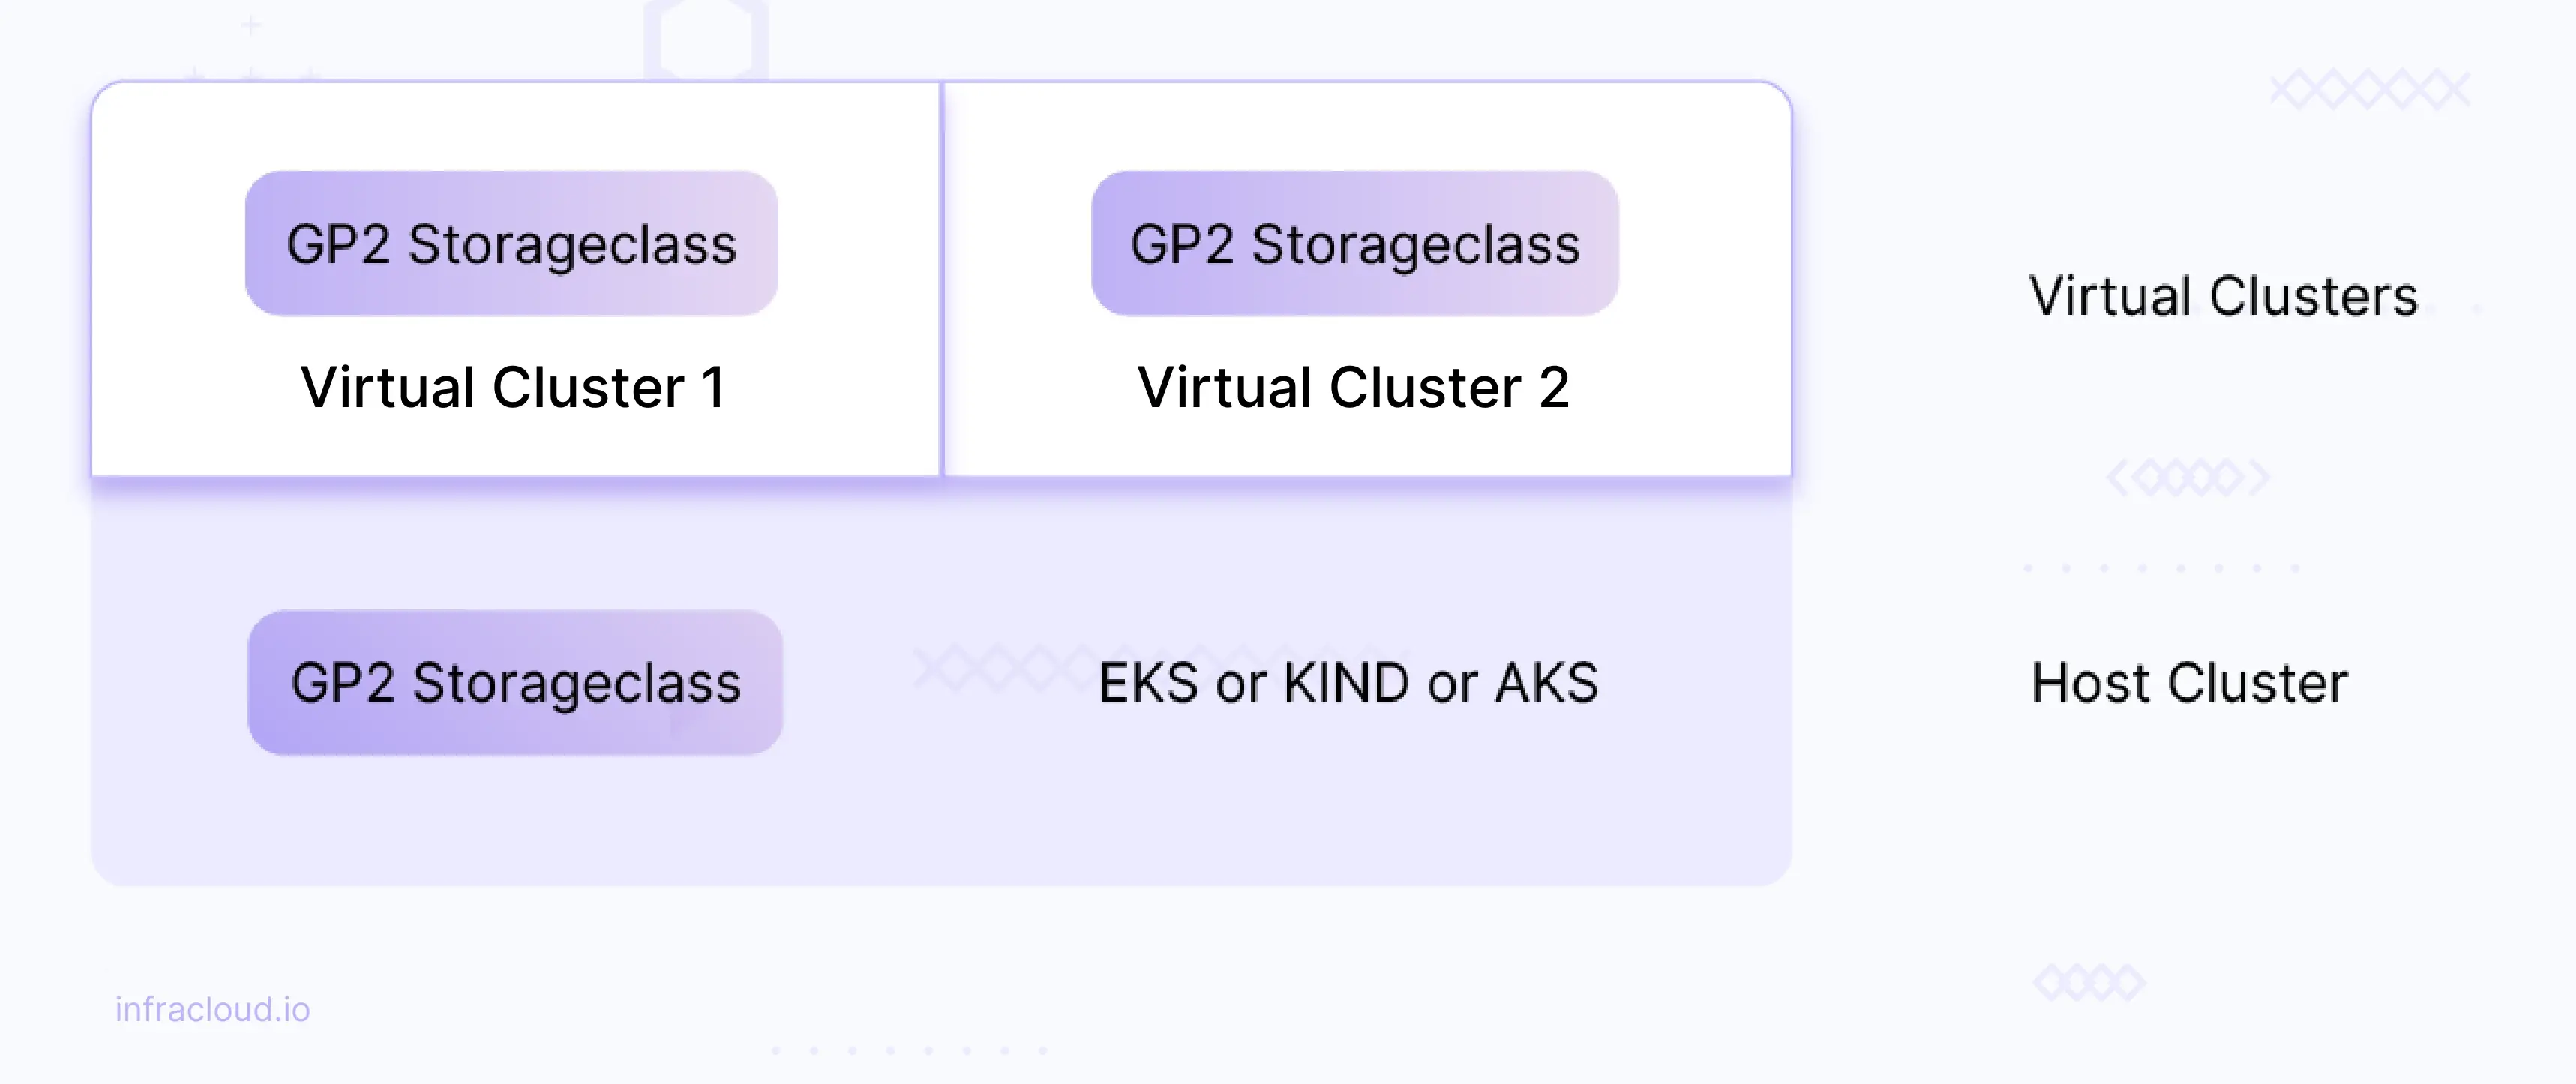
Reusing the host cluster storage class across virtual clusters
Existing storageclass in the host cluster can be reused across virtual clusters.
For example: If you have a gp2 storage class in AWS EKS then that storageclass (gp2) can be reused across virtual clusters.
Create a file named reuse-storageclass.yaml with the below content.
sync:
 hoststorageclasses:
   enabled: true
Now let’s create a new virtual cluster named reuse-storageclass by executing the below command.
vcluster create reuse-storageclass -n demo --create-namespace -f reuse-storageclass.yaml --connect=false
The output of the previous command should look as follows.
warn   There is a newer version of vcluster: v0.15.2. Run `vcluster upgrade` to upgrade to the newest version.

info   failed to find IPv6 service CIDR: couldn't find host cluster Service CIDR ("Service "" is invalid: spec.clusterIPs[0]: Invalid value: []string{"2001:DB8::1"}: IPv6 is not configured on this cluster")
info   Detected local kubernetes cluster kind. Will deploy vcluster with a NodePort & sync real nodes
info   Create vcluster reuse-storageclass...
info   execute command: helm upgrade reuse-storageclass /tmp/vcluster-0.15.0.tgz-2200742311 --kubeconfig /tmp/4819025 --namespace demo --install --repository-config='' --values /tmp/1551633164 --values reuse-storageclass.yaml
done √ Successfully created virtual cluster reuse-storageclass in namespace demo.
- Use 'vcluster connect reuse-storageclass --namespace demo' to access the virtual cluster
Now, let’s connect to the newly created virtual cluster by executing the below command.
vcluster connect reuse-storageclass -n demo
The output of the previous command should look as follows.
warn   There is a newer version of vcluster: v0.15.2. Run `vcluster upgrade` to upgrade to the newest version.
info   Starting proxy container...
done √ Switched active kube context to vcluster_reuse-storageclass_demo_kind-demo
- Use `vcluster disconnect` to return to your previous kube context
- Use `kubectl get namespaces` to access the vcluster
Now you are on virutal cluster (i.e reuse-storageclass). Execute the below command to view the storage classes synchronized from the host cluster.
kubectl get storageclass
The output of the previous command should look as follows.
NAME                 PROVISIONER             RECLAIMPOLICY   VOLUMEBINDINGMODE      ALLOWVOLUMEEXPANSION   AGE
standard (default)   rancher.io/local-path   Delete          WaitForFirstConsumer   false                  109s
Note: The above shown storage class, i.e Standard, is the base or host cluster storage class that is synchronized to the virtual cluster.
Now let’s deploy an application on the virtual cluster that makes use of a synchronized storage class i.e Standard. For demonstration, we will be deploying the Elasticsearch application, which uses the Standard Storage class.
Let’s deploy the ECK operator (elastic operator) before installing Elasticsearch.
# Installing elasticstack crds
kubectl create -f https://download.elastic.co/downloads/eck/2.8.0/crds.yaml
# Installing ECK operator
kubectl apply -f https://download.elastic.co/downloads/eck/2.8.0/operator.yaml
The output of the previous commands should look as follows.
$ kubectl create -f https://download.elastic.co/downloads/eck/2.8.0/crds.yaml
customresourcedefinition.apiextensions.k8s.io/agents.agent.k8s.elastic.co created
customresourcedefinition.apiextensions.k8s.io/apmservers.apm.k8s.elastic.co created
customresourcedefinition.apiextensions.k8s.io/beats.beat.k8s.elastic.co created
customresourcedefinition.apiextensions.k8s.io/elasticmapsservers.maps.k8s.elastic.co created
customresourcedefinition.apiextensions.k8s.io/elasticsearchautoscalers.autoscaling.k8s.elastic.co created
customresourcedefinition.apiextensions.k8s.io/elasticsearches.elasticsearch.k8s.elastic.co created
customresourcedefinition.apiextensions.k8s.io/enterprisesearches.enterprisesearch.k8s.elastic.co created
customresourcedefinition.apiextensions.k8s.io/kibanas.kibana.k8s.elastic.co created
customresourcedefinition.apiextensions.k8s.io/logstashes.logstash.k8s.elastic.co created
customresourcedefinition.apiextensions.k8s.io/stackconfigpolicies.stackconfigpolicy.k8s.elastic.co created

$ kubectl apply -f https://download.elastic.co/downloads/eck/2.8.0/operator.yaml
namespace/elastic-system created
serviceaccount/elastic-operator created
secret/elastic-webhook-server-cert created
configmap/elastic-operator created
clusterrole.rbac.authorization.k8s.io/elastic-operator created
clusterrole.rbac.authorization.k8s.io/elastic-operator-view created
clusterrole.rbac.authorization.k8s.io/elastic-operator-edit created
clusterrolebinding.rbac.authorization.k8s.io/elastic-operator created
service/elastic-webhook-server created
statefulset.apps/elastic-operator created
validatingwebhookconfiguration.admissionregistration.k8s.io/elastic-webhook.k8s.elastic.co created
Note: Wait until the ECK operator pod is running. ECK operator pod will be created in elastic-system namespace.
Create a file named elasticsearch.yaml with the below content.
apiVersion: elasticsearch.k8s.elastic.co/v1
kind: Elasticsearch
metadata:
 name: es
spec:
 version: 6.8.14
 volumeClaimDeletePolicy: DeleteOnScaledownOnly
 nodeSets:
 - name: default
   count: 1
   config:
     node.store.allow_mmap: false
   podTemplate:
       spec:
         containers:
         - name: elasticsearch
           readinessProbe:
             exec:
               command:
               - bash
               - -c
               - /mnt/elastic-internal/scripts/readiness-probe-script.sh
             failureThreshold: 3
             initialDelaySeconds: 10
             periodSeconds: 12
             successThreshold: 1
             timeoutSeconds: 12
           env:
           - name: READINESS_PROBE_TIMEOUT
             value: "10"
   volumeClaimTemplates:
   - metadata:
       name: elasticsearch-data # Do not change this name unless you set up a volume mount for the data path.
     spec:
         accessModes:
         - ReadWriteOnce
         resources:
           requests:
             storage: 5Gi
         storageClassName: standard
Let’s apply elasticsearch.yaml to the cluster.
kubectl apply -f elasticsearch.yaml
kubectl get pods

kubectl get pvc

kubectl get pv
The output of the previous command should look as follows.
$ kubectl get pods
NAME              READY   STATUS    RESTARTS   AGE
es-es-default-0   1/1     Running   0          26s
$ kubectl get pvc
NAME                                 STATUS   VOLUME                                     CAPACITY   ACCESS MODES   STORAGECLASS   AGE
elasticsearch-data-es-es-default-0   Bound    pvc-b73a5933-8cf9-49bc-9f41-fe7d3d306a8b   5Gi        RWO            standard       6m35s
$ kubectl get pv
NAME                                       CAPACITY   ACCESS MODES   RECLAIM POLICY   STATUS   CLAIM                                        STORAGECLASS   REASON   AGE
pvc-b73a5933-8cf9-49bc-9f41-fe7d3d306a8b   5Gi        RWO            Delete           Bound    default/elasticsearch-data-es-es-default-0   standard                6m33s
As you can notice from the above deployed Elasticsearch application leveraged the synchronized storage class and created PV and PVC.
Switch back to the host cluster by executing the below commands.
vcluster disconnect
Now, let’s delete the virtual cluster created. Execute the below command.
vcluster delete reuse-storageclass
Restricting virtual cluster workload scheduling to specific nodes of the host cluster
Virtual cluster workloads are scheduled on the underlying host or base cluster nodes. We can restrict the pod scheduling to a specific set of nodes (use cases could be running ML jobs on specific nodes that have GPU support, running applications/pods on Nodes that have SSD attached to them, and colocating applications to reduce the network latency).
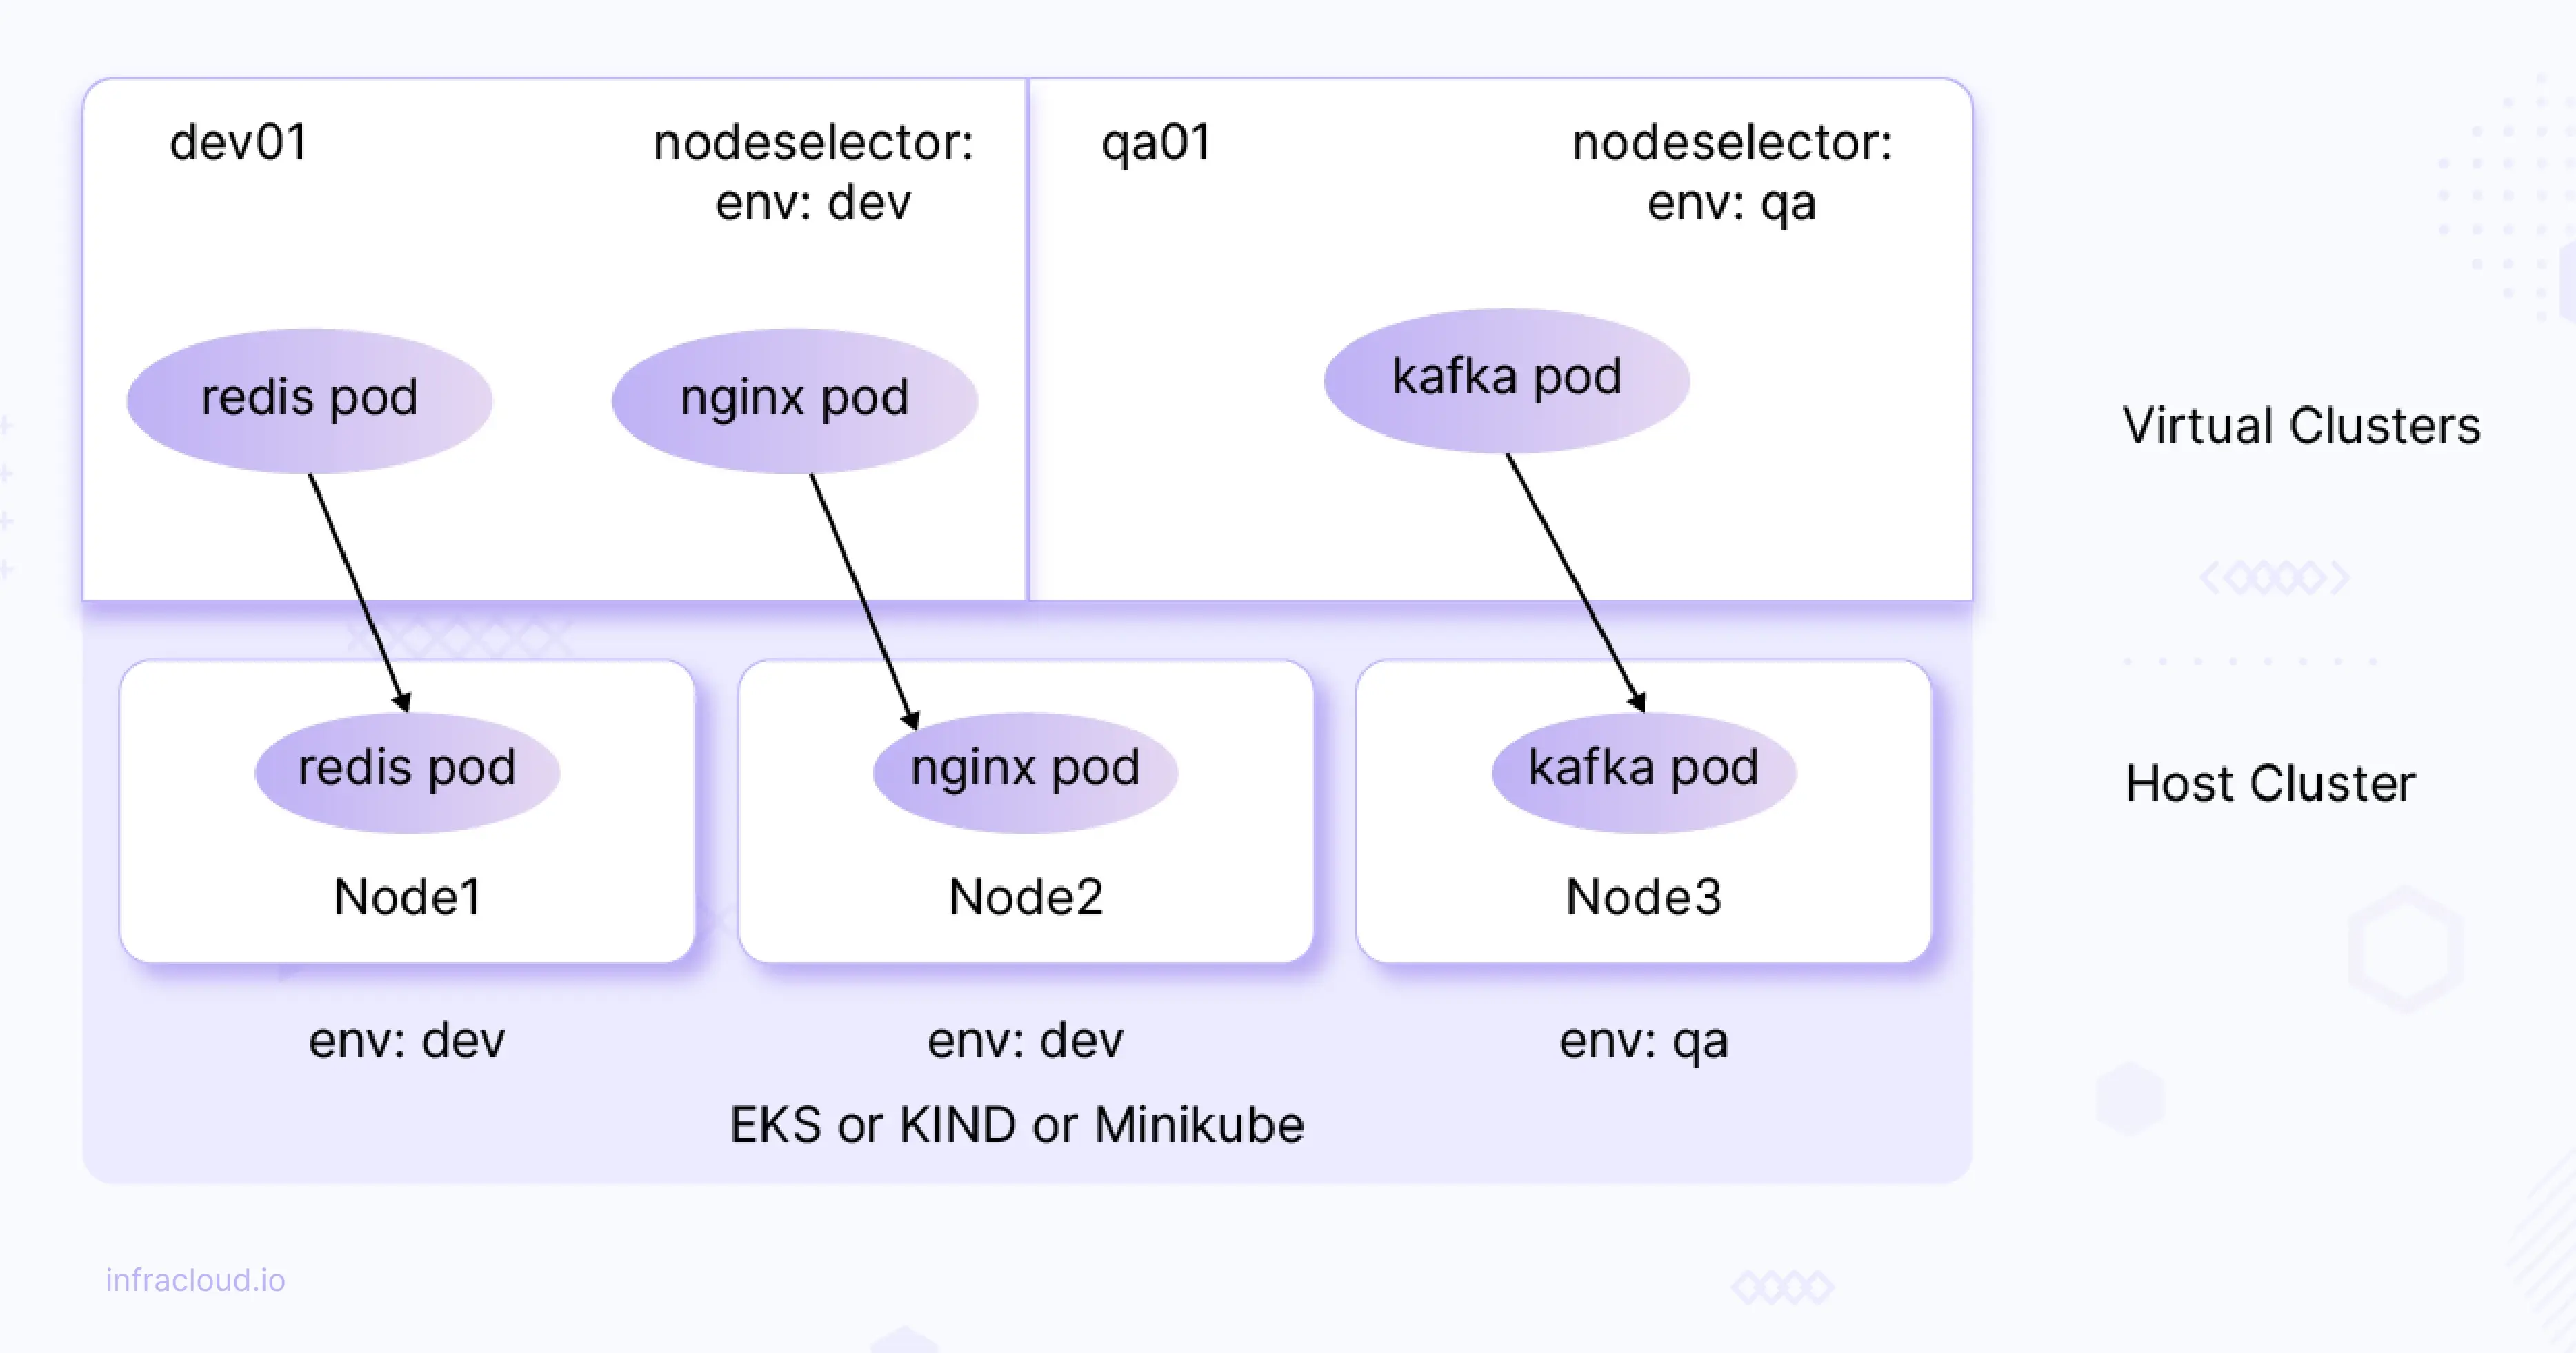
As shown in the above diagram (for illustration purposes) we can restrict pods to specific nodes. For example, nginx pod on vCluster (virtual K8s cluster) can be scheduled to node (underlying node) which is labeled with env: dev.
Let’s try to simulate the above scenario (depicted in the above diagram).
Make sure you are on the host cluster and apply a label (env: dev) to any of the worker nodes (for ex: demo-worker2).
kubectl label node demo-worker2 env=dev
kubectl get nodes --show-labels
The output of the previous commands should look as follows.
NAME                 STATUS   ROLES           AGE   VERSION   LABELS
demo-control-plane   Ready    control-plane   56m   v1.25.3   beta.kubernetes.io/arch=amd64,beta.kubernetes.io/os=linux,kubernetes.io/arch=amd64,kubernetes.io/hostname=demo-control-plane,kubernetes.io/os=linux,node-role.kubernetes.io/control-plane=,node.kubernetes.io/exclude-from-external-load-balancers=
demo-worker          Ready    <none>          55m   v1.25.3   beta.kubernetes.io/arch=amd64,beta.kubernetes.io/os=linux,kubernetes.io/arch=amd64,kubernetes.io/hostname=demo-worker,kubernetes.io/os=linux
demo-worker2         Ready    <none>          55m   v1.25.3   beta.kubernetes.io/arch=amd64,beta.kubernetes.io/os=linux,env=dev,kubernetes.io/arch=amd64,kubernetes.io/hostname=demo-worker2,kubernetes.io/os=linux
Create a file named specific-nodes.yaml with the below content.
sync:
  nodes:
    enabled: true
    enableScheduler: true
    nodeSelector: "env=dev"
Now, let’s create a virtual cluster named specific-nodes by executing the below command.
vcluster create specific-nodes -n demo --create-namespace -f specific-nodes.yaml --connect=false
Note: Wait until all the pods are up & running i.e make sure all the control plane & CoreDNS pods of the virtual cluster are up and running in demo namespace before proceeding.
Let’s connect to the newly created virtual cluster by executing the below command.
vcluster connect specific-nodes
Now, we are on the virtual cluster. Let’s display the existing nodes.
kubectl get nodes --show-labels
NAME           STATUS   ROLES    AGE    VERSION   LABELS
demo-worker2   Ready    <none>   2m4s   v1.25.3   beta.kubernetes.io/arch=amd64,beta.kubernetes.io/os=linux,env=dev,kubernetes.io/arch=amd64,kubernetes.io/hostname=demo-worker2,kubernetes.io/os=linux
Note: As you can notice from the above screenshot, only a specific node got synchronized from the host cluster to the virtual cluster i.e the node which is labeled with “env=dev”.
Now, let’s deploy a sample application. Create a file named frontend.yaml with the below content.
apiVersion: apps/v1
kind: Deployment
metadata:
 creationTimestamp: null
 labels:
   app: frontend
 name: frontend
spec:
 replicas: 3
 selector:
   matchLabels:
     app: frontend
 template:
   metadata:
     creationTimestamp: null
     labels:
       app: frontend
   spec:
     nodeSelector:
       env: dev
     containers:
     - image: purushothamkdr453/frontend
       name: frontend
kubectl apply -f frontend.yaml
kubectl get pods
NAME                        READY   STATUS    RESTARTS   AGE
frontend-6bcd48987b-2kv92   1/1     Running   0          24s
frontend-6bcd48987b-j48z6   1/1     Running   0          24s
frontend-6bcd48987b-nptqd   1/1     Running   0          24s
Let’s switch back to the host cluster by executing the below command.
vcluster disconnect
kubectl get pods -n demo -o wide | grep frontend
The output of the previous command should look as follows.
$ kubectl get pods -n demo -o wide | grep frontend
frontend-6bcd48987b-2kv92-x-default-x-specific-nodes      1/1     Running   0          2m8s    10.244.1.15   demo-worker2   <none>           <none>
frontend-6bcd48987b-j48z6-x-default-x-specific-nodes      1/1     Running   0          2m8s    10.244.1.17   demo-worker2   <none>           <none>
frontend-6bcd48987b-nptqd-x-default-x-specific-nodes      1/1     Running   0          2m8s    10.244.1.16   demo-worker2   <none>           <none>
Note: As you can notice from the above screenshot, all the pods are scheduled to specific node i.e node labeled with “env=dev”.
Now, let’s delete the virtual cluster.
vcluster delete specific-nodes
Mapping of virtual cluster services to host cluster and vice versa
Each virtual cluster has its own DNS service (CoreDNS by default), which allows pods in the vCluster to get the IP addresses of services also running in this vCluster.
We can map the virtual cluster services to host cluster services and vice versa. This way, we can access the services from either way (means host cluster services can be accessed on virtual cluster and virtual cluster services can be accessed on hostcluster) .
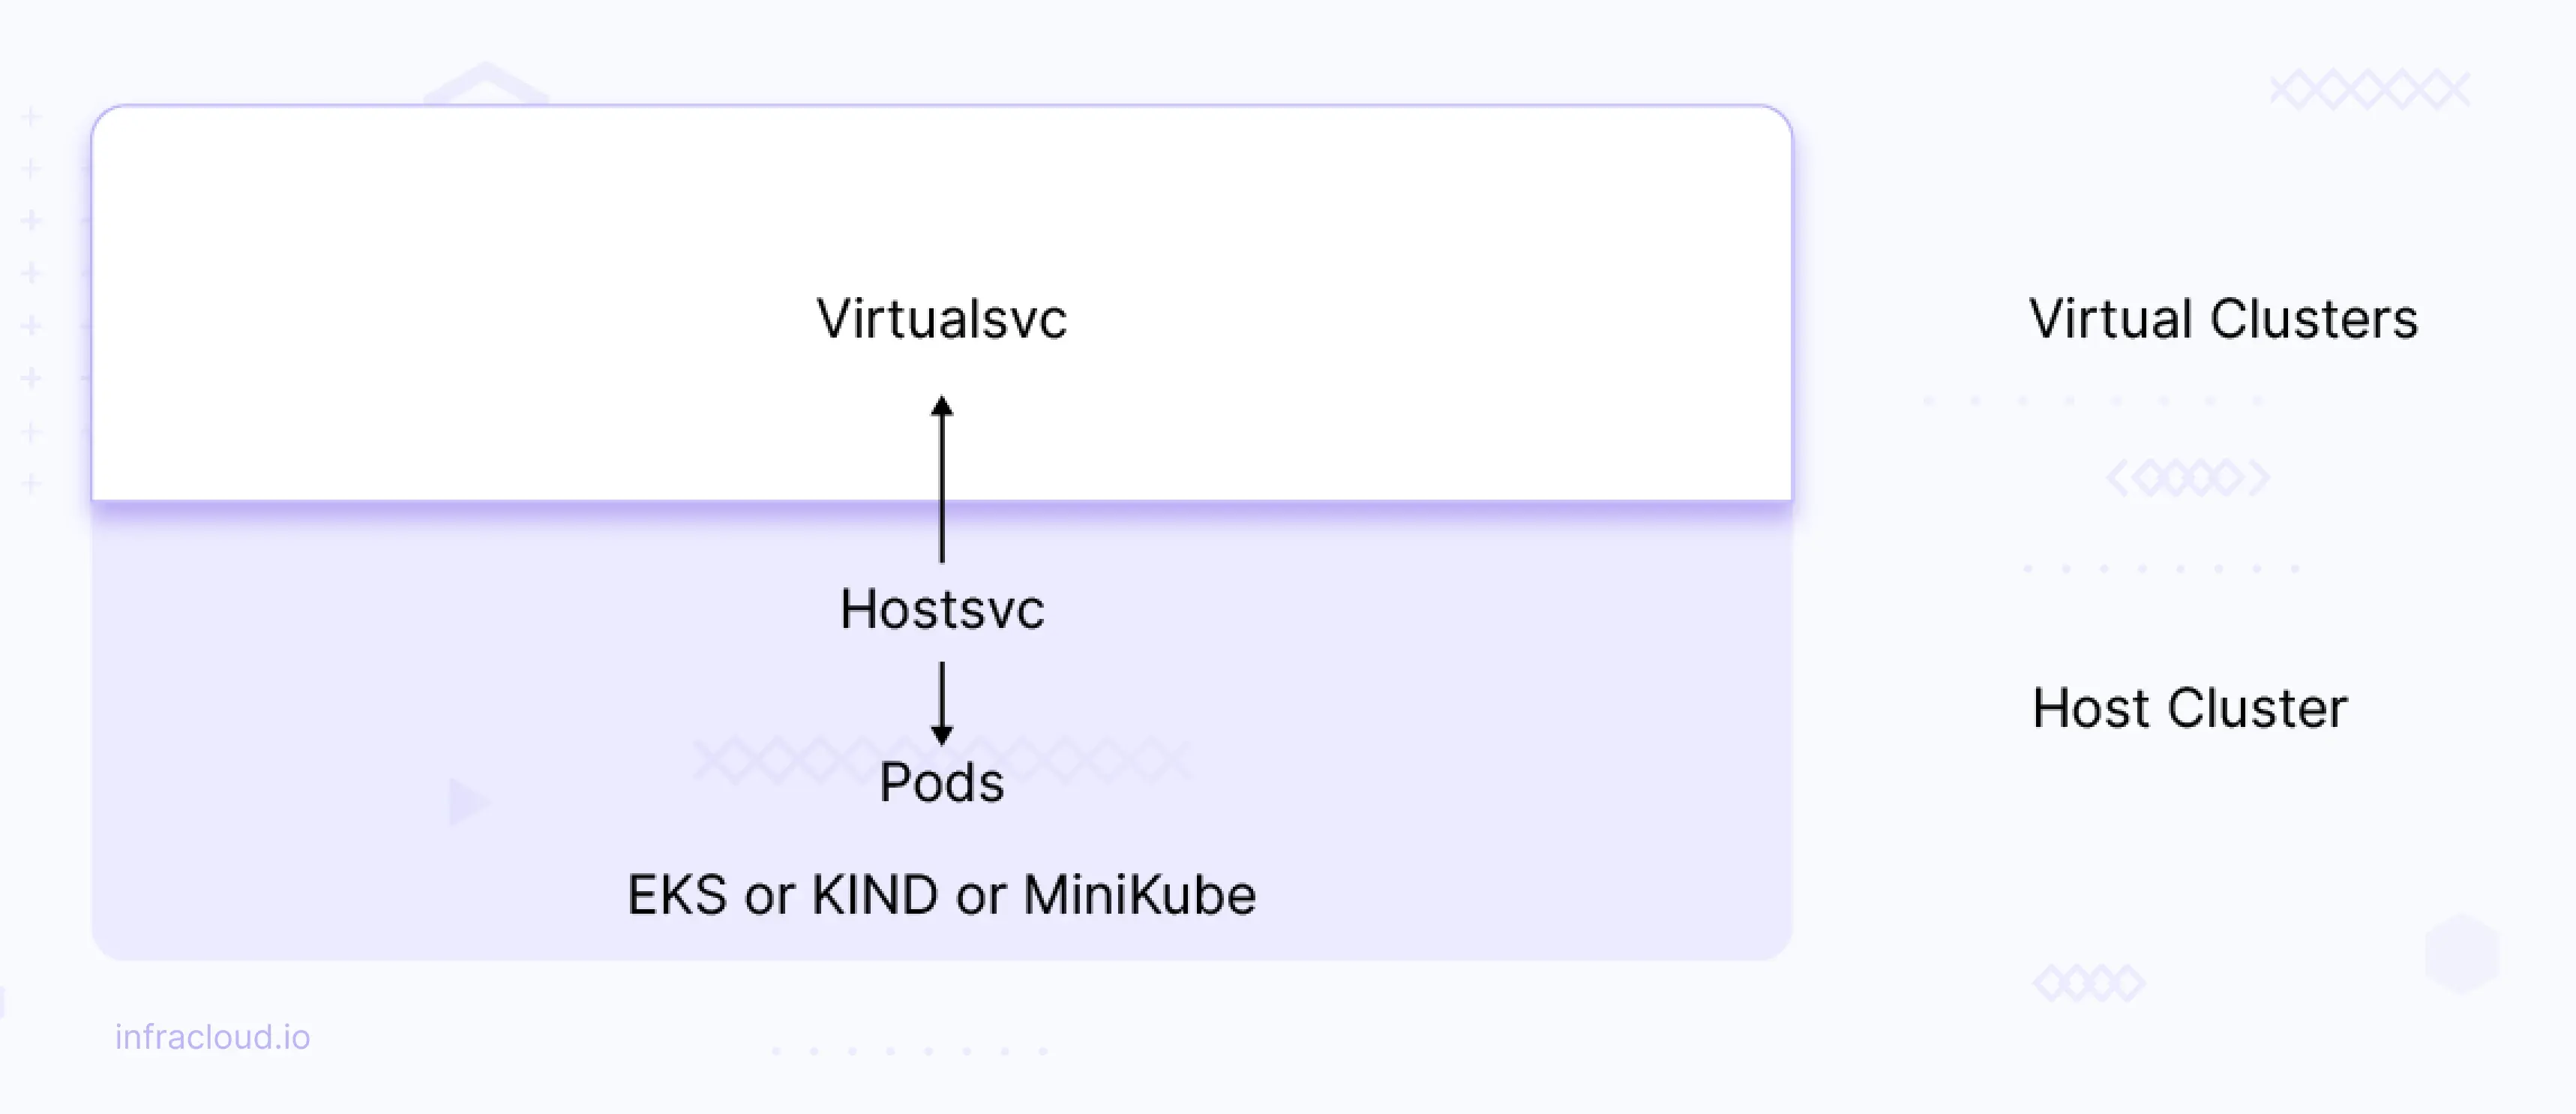
Let’s say you have a service named hostsvc on host or base cluster, which is mapped to virtualsvc on the virtual cluster then hostsvc can be accessed on the virtual cluster using virtualsvc and this can be done vice-versa as well. Let’s look into this scenario in detail.
-
Create a file named
map-services.yamlwith the below content.mapServices: fromHost: - from: default/hostsvc to: default/virtualsvc -
Create the new virtual cluster named
map-servicesby executing the below command.vcluster create map-services -f map-services.yaml --connect=falseThe output of the previous command should look as follows.
warn There is a newer version of vcluster: v0.15.2. Run `vcluster upgrade` to upgrade to the newest version. info Creating namespace vcluster-map-services info failed to find IPv6 service CIDR: couldn't find host cluster Service CIDR ("Service "" is invalid: spec.clusterIPs[0]: Invalid value: []string{"2001:DB8::1"}: IPv6 is not configured on this cluster") info Detected local kubernetes cluster kind. Will deploy vcluster with a NodePort & sync real nodes info Create vcluster map-services... info execute command: helm upgrade map-services /tmp/vcluster-0.15.0.tgz-953321213 --kubeconfig /tmp/3324421733 --namespace vcluster-map-services --install --repository-config='' --values /tmp/2655888955 --values map-services.yaml done √ Successfully created virtual cluster map-services in namespace vcluster-map-services. - Use 'vcluster connect map-services --namespace vcluster-map-services' to access the virtual cluster -
Now, let’s create a sample deployment & service on the host cluster.
kubectl create deployment webapp --image nginx --replicas 3 kubectl expose deployment/webapp --type=ClusterIP --port 80 --name hostsvc -
Now, let’s connect to the virtual cluster using the below command.
vcluster connect map-services -
Now let’s execute the below command to view if a virtual cluster mapped service i.e
virtualsvcis created.kubectl get svcThe output of the previous command should look as follows.
 NAME         TYPE        CLUSTER-IP     EXTERNAL-IP   PORT(S)   AGE
 kubernetes   ClusterIP   10.96.12.131   <none>        443/TCP   17m
 virtualsvc   ClusterIP   None           <none>        80/TCP    6m57s
As you can see from the above screenshot
hostsvcis mapped tovirtualsvc.Note: pods still run on host node. Only service gets mapped to the virtual cluster.
-
To test the behavior, let’s create test pod with alpine image and access the
virtualsvcfrom it.kubectl run test --image alpine --command sleep 1h kubectl exec test apk add curlThe output of the previous commands should look as follows.
kubectl run test --image alpine --command sleep 1h pod/test created kubectl exec test apk add curl kubectl exec [POD] [COMMAND] is DEPRECATED and will be removed in a future version. Use kubectl exec [POD] -- [COMMAND] instead. fetch https://dl-cdn.alpinelinux.org/alpine/v3.18/main/x86_64/APKINDEX.tar.gz fetch https://dl-cdn.alpinelinux.org/alpine/v3.18/community/x86_64/APKINDEX.tar.gz (1/7) Installing ca-certificates (20230506-r0) (2/7) Installing brotli-libs (1.0.9-r14) (3/7) Installing libunistring (1.1-r1) (4/7) Installing libidn2 (2.3.4-r1) (5/7) Installing nghttp2-libs (1.53.0-r0) (6/7) Installing libcurl (8.1.2-r0) (7/7) Installing curl (8.1.2-r0) Executing busybox-1.36.1-r0.trigger Executing ca-certificates-20230506-r0.trigger OK: 12 MiB in 22 packages -
Now let’s exec into the test pod and access the
virtualsvcfrom it.#exec into the test pod kubectl exec -it test -- sh #after exec into the pod run the below command. curl http://virtualsvcOutput should look as follows. $ kubectl exec -it test -- sh / # curl http://virtualsvc <!DOCTYPE html> <html> <head> <title>Welcome to nginx!</title> <style> html { color-scheme: light dark; } body { width: 35em; margin: 0 auto; font-family: Tahoma, Verdana, Arial, sans-serif; } </style> </head> <body> <h1>Welcome to nginx!</h1> <p>If you see this page, the nginx web server is successfully installed and working. Further configuration is required.</p> <p>For online documentation and support please refer to <a href="http://nginx.org/">nginx.org</a>.<br/> Commercial support is available at <a href="http://nginx.com/">nginx.com</a>.</p> <p><em>Thank you for using nginx.</em></p> </body> </html> / #Similarly, we can map the services in a virtual cluster to the host cluster.
-
Now, let’s disconnect from the virtual cluster using the below command.
vcluster disconnect -
Now, let’s delete the virtual cluster using the below command.
vcluster delete map-services
So, with this, we have covered all the common scenarios that are implemented using vCluster.
Conclusion
In this blog post, we discussed some key issues with the traditional multi-tenancy models and how virtual clusters can help overcome these challenges. We also discussed vCluster and its architecture, installation, and integrations and explored a few common scenarios.
I hope you found this post informative and engaging. I’d love to hear your thoughts on this post; let’s connect and start a conversation on LinkedIn.
Looking for help with Kubernetes? Do check out how we’re helping startups & enterprises as an Kubernetes consulting services provider.
References
- What are Virtual Kubernetes Clusters?
- A Complete Guide to Kubernetes Cost Optimization
- Kubernetes Multitenancy: Why Namespaces aren’t Good Enough
- Kubernetes Namespaces vs. Virtual Clusters
- Virtual Clusters For Kubernetes - Benefits & Use Cases
- Multi-Tenant Kubernetes Clusters: Challenges and Useful Tooling
Stay updated with latest in AI and Cloud Native tech
We hate 😖 spam as much as you do! You're in a safe company.
Only delivering solid AI & cloud native content.
Posts You Might Like